編輯:關於android開發
<LinearLayout xmlns:android="http://schemas.android.com/apk/res/android"
    android:layout_width="match_parent"
    android:layout_height="match_parent"
    android:orientation="vertical" >

    <Button
        android:id="@+id/take_photo"
        android:layout_width="match_parent"
        android:layout_height="wrap_content"
        android:text="Take Photo" />

    <Button
        android:id="@+id/get_photo"
        android:layout_width="match_parent"
        android:layout_height="wrap_content"
        android:text="get Photo" />

    <ImageView
        android:id="@+id/picture"
        android:layout_width="300dp"
        android:layout_height="300dp"
        android:layout_gravity="center_horizontal" />

</LinearLayout>
package com.example.choosepictest;

import java.io.File;
import java.io.IOException;
import java.text.SimpleDateFormat;
import java.util.Date;

import android.app.Activity;
import android.content.Intent;
import android.graphics.Bitmap;
import android.graphics.BitmapFactory;
import android.net.Uri;
import android.os.Bundle;
import android.os.Environment;
import android.provider.MediaStore;
import android.view.View;
import android.view.View.OnClickListener;
import android.widget.Button;
import android.widget.ImageView;

public class MainActivity extends Activity implements OnClickListener {

    static final int REQUEST_IMAGE_CAPTURE = 1;


    private Button takePhoto;
    private Button getPhoto;
    private ImageView picture;
    private Uri imgUri;

    @Override
    protected void onCreate(Bundle savedInstanceState) {
        super.onCreate(savedInstanceState);
        setContentView(R.layout.activity_main);
        takePhoto = (Button) findViewById(R.id.take_photo);
        getPhoto = (Button) findViewById(R.id.get_photo);
        picture = (ImageView) findViewById(R.id.picture);
        takePhoto.setOnClickListener(this);
        getPhoto.setOnClickListener(this);

    }

    @Override
    public void onClick(View v) {
        switch (v.getId()) {
        case R.id.take_photo:
            dispatchTakePictureIntent();
            break;

        default:
            break;
        }

    }

    // 保存全尺寸照片
    String mCurrentPhotoPath;
    private void dispatchTakePictureIntent() {

        File appDir = new File(Environment.getExternalStorageDirectory(),
                "/etoury/picCache");
        if (!appDir.exists()) {
         appDir.mkdirs();
        }
        String timeStamp = new SimpleDateFormat("yyyyMMdd_HHmmss")
                .format(new Date());
        String fileName = timeStamp + ".jpg";

        File outputImage = new File(appDir, fileName);
        try {
            if (outputImage.exists()) {
                outputImage.delete();
            }
            outputImage.createNewFile();
        } catch (IOException e) {
            e.printStackTrace();
        }
        mCurrentPhotoPath = outputImage.getAbsolutePath();
        imgUri = Uri.fromFile(outputImage);
        // 意圖 相機
        Intent intent = new Intent("android.media.action.IMAGE_CAPTURE");
        intent.putExtra(MediaStore.EXTRA_OUTPUT, imgUri);
        // 如果有相機
        if (intent.resolveActivity(getPackageManager()) != null) {
            startActivityForResult(intent, REQUEST_IMAGE_CAPTURE);
        }
    }

    //解碼縮放圖片(Decode a Scaled Image)
    private void setPic() {
        // Get the dimensions of the View
        int targetW = picture.getWidth();
        int targetH = picture.getHeight();
        // Get the dimensions of the bitmap
        BitmapFactory.Options bmOptions = new BitmapFactory.Options();
        // 該 值設為true那麼將不返回實際的bitmap,也不給其分配內存空間這樣就避免內存溢出了。但是允許我們查詢圖片的信息這其中就包括圖片大小信息
        bmOptions.inJustDecodeBounds = true;
        BitmapFactory.decodeFile(mCurrentPhotoPath, bmOptions);
        int photoW = bmOptions.outWidth;
        int photoH = bmOptions.outHeight;
        // Determine how much to scale down the image
        // Math.min求最小值
        int scaleFactor = Math.min(photoW/targetW, photoH/targetH);
        // Decode the image file into a Bitmap sized to fill the View
        bmOptions.inJustDecodeBounds = false;
        // 設置恰當的inSampleSize可以使BitmapFactory分配更少的空間以消除該錯誤
        bmOptions.inSampleSize = scaleFactor;
        // 如果inPurgeable設為True的話表示使用BitmapFactory創建的Bitmap,用於存儲Pixel的內存空間在系統內存不足時可以被回收
        bmOptions.inPurgeable = true;
        Bitmap bitmap = BitmapFactory.decodeFile(mCurrentPhotoPath, bmOptions);
        picture.setImageBitmap(bitmap);
    }

    @Override
    protected void onActivityResult(int requestCode, int resultCode, Intent data) {
        if (resultCode == RESULT_OK) {
            switch (requestCode) {


            case REQUEST_IMAGE_CAPTURE:
            galleryAddPic();
                setPic();
                break;


            default:
                break;
            }
        }
    }
    //發送一條通知添加照片到相冊
    private void galleryAddPic() {

        Intent mediaScanIntent = new Intent(Intent.ACTION_MEDIA_SCANNER_SCAN_FILE);

        mediaScanIntent.setData(imgUri);
        this.sendBroadcast(mediaScanIntent);
        }

}
 Android仿聯系人列表分組懸浮列表實現,自定義PinnedHeaderListView實現
Android仿聯系人列表分組懸浮列表實現,自定義PinnedHeaderListView實現 效果 (關於gif怎麼生成的,我先錄手機的屏幕得到mp4文件,然
 Android Support Library 之 Toolbar
Android Support Library 之 Toolbar 在 Android 3.0 開始 ,所有的主題默認把 ActionBar 作為默認的 Ap
 Android Animation學習 實現 IOS 濾鏡退出動畫,androidios
Android Animation學習 實現 IOS 濾鏡退出動畫,androidiosIOS的用戶體驗做的很好,其中一點很重要的地方就是動畫效果。 最近在學習Andro
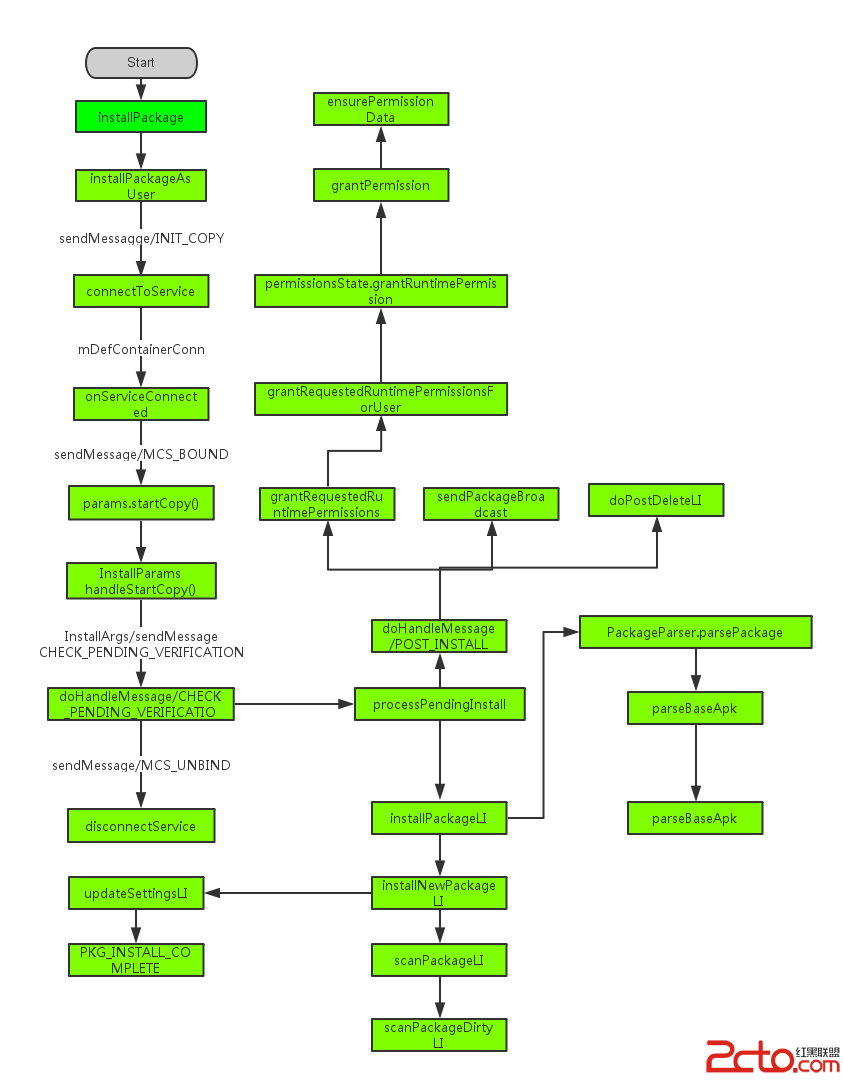 Android應用程序安裝過程淺析
Android應用程序安裝過程淺析 我們知道在android中,安裝應用是由PackageManager來管理的,但是我們發現PackageManager是一個抽象類