編輯:關於android開發
首先自定義一個attrs.xml的資源文件,聲明自定義屬性
<?xml version="1.0" encoding="utf-8"?>
<resources>
    <declare-styleable name="TopBar">

        <attr name="titleText" format="string"></attr>
        <attr name="titleTextSize" format="dimension"></attr>
        <attr name="titleTextColor" format="reference|color"></attr>

        <attr name="leftButtonText" format="string"></attr>
        <attr name="leftButtonTextSize" format="dimension"></attr>
        <attr name="leftButtonBackground" format="reference|color"></attr>

        <attr name="rightButtonText" format="string"></attr>
        <attr name="rightButtonTextSize" format="dimension"></attr>
        <attr name="rightButtonBackground" format="reference|color"></attr>

    </declare-styleable>
</resources>
自定義類TopBar,為簡單起見 繼承RelativeLayout
package com.sphere.topbar;

import android.annotation.SuppressLint;
import android.content.Context;
import android.content.res.TypedArray;
import android.graphics.drawable.Drawable;
import android.util.AttributeSet;
import android.view.View;
import android.view.ViewGroup;
import android.widget.Button;
import android.widget.RelativeLayout;
import android.widget.TextView;
import android.widget.Toast;


public class TopBar extends RelativeLayout {


    private String titleText;
    private float titleTextSize;
    private int titleTextColor;

    private String leftButtonText;
    private float leftButtonTextSize;
    private Drawable leftButtonBackground;

    private String rightButtonText;
    private float rightButtonTextSize;
    private Drawable rightButtonBackground;

    private TextView titleTextView;
    private Button leftButton;
    private Button rightButton;

    private LayoutParams titleLayoutParams;
    private LayoutParams leftBtnLayoutParams;
    private LayoutParams rightBtnLayoutParams;

    private TopBarOnClickListener listener;

    // 定義點擊響應事件回調接口
    interface TopBarOnClickListener{
        public abstract void onLeftButtonClicked();
        public abstract void  onRightButtonClicked();
    }


    @SuppressLint("NewApi")
    public TopBar(Context context, AttributeSet attrs) {
        super(context, attrs);

        // 得到xml文件自定的屬性集合
        TypedArray ta = context.obtainStyledAttributes(attrs,R.styleable.TopBar);

        // 得到title的各個屬性
        titleText = ta.getString(R.styleable.TopBar_titleText);
        titleTextSize = ta.getDimension(R.styleable.TopBar_titleTextSize, 0);
        titleTextColor = ta.getColor(R.styleable.TopBar_titleTextColor, 0);

        // 得到left button的各個屬性
        leftButtonText = ta.getString(R.styleable.TopBar_leftButtonText);
        leftButtonTextSize = ta.getDimension(R.styleable.TopBar_leftButtonTextSize, 0);
        leftButtonBackground = ta.getDrawable(R.styleable.TopBar_leftButtonBackground);

        // 得到right button的各個屬性
        rightButtonText = ta.getString(R.styleable.TopBar_rightButtonText);
        rightButtonTextSize = ta.getDimension(R.styleable.TopBar_rightButtonTextSize, 0);
        rightButtonBackground = ta.getDrawable(R.styleable.TopBar_rightButtonBackground);

        // initial inner basic component
        leftButton = new Button(context);
        rightButton = new Button(context);
        titleTextView = new TextView(context);

        // 設置屬性
        titleTextView.setText(titleText);
        titleTextView.setTextSize(titleTextSize);
        titleTextView.setTextColor(titleTextColor);
        titleLayoutParams = new LayoutParams(LayoutParams.WRAP_CONTENT,LayoutParams.WRAP_CONTENT);
        titleLayoutParams.addRule(RelativeLayout.CENTER_IN_PARENT);
        titleTextView.setLayoutParams(titleLayoutParams);


        leftButton.setText(leftButtonText);
        leftButton.setTextSize(leftButtonTextSize);
        leftButton.setBackground(leftButtonBackground);
        leftBtnLayoutParams = new LayoutParams(LayoutParams.WRAP_CONTENT,LayoutParams.WRAP_CONTENT);
        leftBtnLayoutParams.addRule(RelativeLayout.ALIGN_PARENT_LEFT, TRUE);
        leftButton.setLayoutParams(leftBtnLayoutParams);

        rightButton.setText(rightButtonText);
        rightButton.setTextSize(rightButtonTextSize);
        rightButton.setBackground(rightButtonBackground);
        rightBtnLayoutParams = new LayoutParams(LayoutParams.WRAP_CONTENT,LayoutParams.WRAP_CONTENT);
        rightBtnLayoutParams.addRule(RelativeLayout.ALIGN_PARENT_RIGHT, TRUE);
        rightButton.setLayoutParams(rightBtnLayoutParams);

        // 添加到View中
        addView(titleTextView);
        addView(leftButton);
        addView(rightButton);
        //addView(View child, ViewGroup.LayoutParams params);
        ta.recycle();

        leftButton.setOnClickListener(new OnClickListener() {
            @Override
            public void onClick(View v) {
                listener.onLeftButtonClicked();
            }
        });

        rightButton.setOnClickListener(new OnClickListener() {
            @Override
            public void onClick(View v) {
                listener.onRightButtonClicked();
            }
        });
    }

    /**
     * 類的實例調用此方法
     * 以匿名內部類的形式現實接口中的方法
     * @param listener
     */
    public void setTopBarOnClickListener(TopBarOnClickListener listener){
        this.listener = listener;
    }

    /**
     * 設置導航背景顏色
     * @param color
     */
    public void setTopBarBackgroundColor(int color){
        this.setBackgroundColor(color);
    }

    /**
     * 設置按鈕是否可見
     * @param show
     */
    public void setLeftButtonVisible(boolean show){
        leftButton.setVisibility(show ? View.VISIBLE : View.GONE);
    }

    public void setRightButtonVisible(boolean show){
        rightButton.setVisibility(show ? View.VISIBLE : View.GONE);
    }
}
需要帶 Context context, AttributeSet attrs這兩個參數的構造方法
從xml文件中得到各個屬性,並設置給對應的控件。
別忘了addView() 將內部包含的控件添加到View中
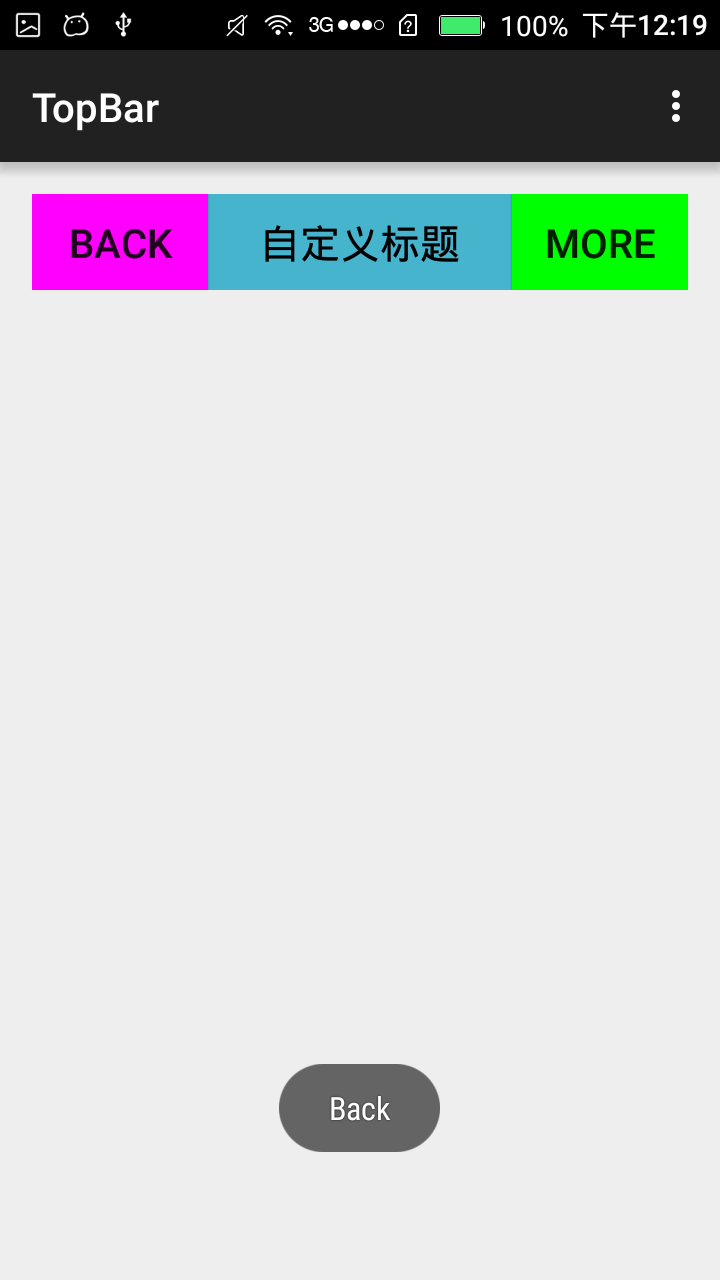
在main.xml中使用自定義控件
<RelativeLayout xmlns:android="http://schemas.android.com/apk/res/android"
    xmlns:tools="http://schemas.android.com/tools"
    xmlns:myTopBar="http://schemas.android.com/apk/res-auto"
    android:layout_width="match_parent"
    android:layout_height="match_parent" android:paddingLeft="@dimen/activity_horizontal_margin"
    android:paddingRight="@dimen/activity_horizontal_margin"
    android:paddingTop="@dimen/activity_vertical_margin"
    android:paddingBottom="@dimen/activity_vertical_margin" tools:context=".MainActivity">

    <com.sphere.topbar.TopBar
        android:id="@+id/topbar"
        android:layout_width="match_parent"
        android:layout_height="48dp"
        myTopBar:titleText="自定義標題"
        myTopBar:titleTextColor="#000"
        myTopBar:titleTextSize="10sp"
        myTopBar:leftButtonText="Back"
        myTopBar:leftButtonBackground="#ff00ff"
        myTopBar:leftButtonTextSize="10sp"
        myTopBar:rightButtonText="More"
        myTopBar:rightButtonBackground="#00ff00"
        myTopBar:rightButtonTextSize="10sp"
        />

</RelativeLayout>
注意要添加名稱空間,xmlns:myTopBar="http://schemas.android.com/apk/res-auto"
如果是ADT開發環境,則需要這麼寫 xmlns:myTopBar="http://schemas.android.com/apk/res/com.sphere.topbar"
注意雖然myTopBar名字可以隨便起,但是不能使用android,否則會與系統沖突,ADT中引用時 需要在res後邊接完整包名才可以。
引用自定義屬性以(myTopBar:屬性名)開頭。
MainActivity.java
package com.sphere.topbar;

import android.graphics.Color;
import android.support.v7.app.ActionBarActivity;
import android.os.Bundle;
import android.view.Menu;
import android.view.MenuItem;
import android.widget.Toast;


public class MainActivity extends ActionBarActivity {

    private TopBar mTopBar;

    @Override
    protected void onCreate(Bundle savedInstanceState) {
        super.onCreate(savedInstanceState);
        setContentView(R.layout.activity_main);
        mTopBar = (TopBar)findViewById(R.id.topbar);
        mTopBar.setBackgroundColor(Color.parseColor("#46B4CD"));
        mTopBar.setTopBarOnClickListener(new TopBar.TopBarOnClickListener() {
            @Override
            public void onLeftButtonClicked() {
                Toast.makeText(MainActivity.this,"Back",Toast.LENGTH_SHORT).show();
            }

            @Override
            public void onRightButtonClicked() {
                Toast.makeText(MainActivity.this, "More", Toast.LENGTH_SHORT).show();
            }
        });
    }

    @Override
    public boolean onCreateOptionsMenu(Menu menu) {
        // Inflate the menu; this adds items to the action bar if it is present.
        getMenuInflater().inflate(R.menu.menu_main, menu);
        return true;
    }

    @Override
    public boolean onOptionsItemSelected(MenuItem item) {
        int id = item.getItemId();

        //noinspection SimplifiableIfStatement
        if (id == R.id.action_settings) {
            return true;
        }

        return super.onOptionsItemSelected(item);
    }
}
這裡我們拿到自定義控件的實例,調用 setTopBarOnClickListener(TopBarOnClickListener listener)方法
為按鈕添加點擊事件監聽器。
效果圖如下:
 機頂盒上gridview+ScrollView的使用。,gridviewscrollview
機頂盒上gridview+ScrollView的使用。,gridviewscrollview最近在機頂盒上做一個gridview, 其焦點需要在item的子控件上,但g
 android 項目 分享圖片到微信
android 項目 分享圖片到微信 慕課網學習項目 android 項目 分享圖片到微信 AlertDialog 對話框設置 .9.png的編輯及使用 sdk-&
 Android基礎入門教程——10.8 LayoutInflater(布局服務)
Android基礎入門教程——10.8 LayoutInflater(布局服務) Android基礎入門教程——10.8 LayoutInflat
 搭建流媒體服務器
搭建流媒體服務器需求:現在需要搭建一台流媒體服務器,為了將主講人的電腦桌面屏幕和聲音直播給遠端的人接收實時觀看,要求延遲在5秒左右。理論上RTSP、RTMP、HTTP都可