編輯:關於android開發
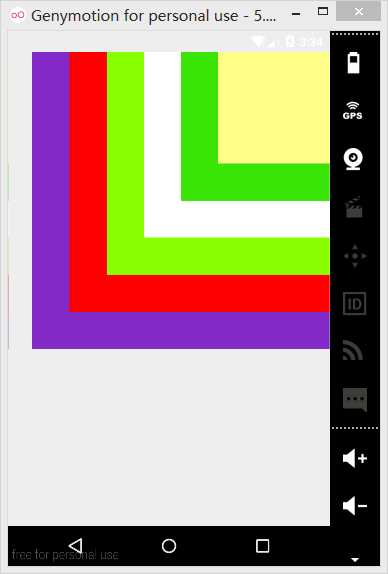
Framelayout即幀布局,使用這種布局可以把幾個控件疊加在一起。使用Framelayout結合textview就可以實現一個簡單的霓虹燈效果。
一、首先在XML中使用了FrameLayout布局並添加六個TestView文件,並設定了顏色和位置。
XML布局如下:
<?xml version="1.0" encoding="utf-8"?>
<FrameLayout xmlns:android="http://schemas.android.com/apk/res/android"
    android:layout_width="match_parent" android:layout_height="match_parent">

    <TextView
        android:layout_width="wrap_content"
        android:layout_height="wrap_content"

        android:id="@+id/textView"
        android:layout_gravity="right"
        android:width="160pt"
        android:height="160pt"
        android:background="#f00" />

    <TextView
        android:layout_width="wrap_content"
        android:layout_height="wrap_content"

        android:id="@+id/textView2"
        android:layout_gravity="right"
        android:width="140pt"
        android:height="140pt"
        android:background="#88ff00"/>

    <TextView
        android:layout_width="wrap_content"
        android:layout_height="wrap_content"

        android:id="@+id/textView3"
        android:layout_gravity="right"
        android:width="120pt"
        android:height="120pt"
        android:background="#ffffff"/>

    <TextView
        android:layout_width="wrap_content"
        android:layout_height="wrap_content"

        android:id="@+id/textView4"
        android:layout_gravity="right"
        android:width="100pt"
        android:height="100pt"
        android:background="#3be407"/>

    <TextView
        android:layout_width="wrap_content"
        android:layout_height="wrap_content"

        android:id="@+id/textView5"
        android:layout_gravity="right"
        android:width="80pt"
        android:height="80pt"
        android:background="#ffff88"/>

    <TextView
        android:layout_width="wrap_content"
        android:layout_height="wrap_content"

        android:id="@+id/textView6"
        android:layout_gravity="right"
        android:width="60pt"
        android:height="60pt"
        android:background="#8329c7"/>
</FrameLayout>
二、便於管理及調用將定義的六種顏色在colors.xml中定義
<?xml version="1.0" encoding="utf-8"?>
<resources>
   <color name="color1">#f00</color>
    <color name="color2">#88ff00</color>
    <color name="color3">#ffffff</color>
    <color name="color4">#3be407</color>
    <color name="color5">#ffff88</color>
    <color name="color6">#8329c7</color>
</resources>
三、MainActivity中主程序代碼
package happy.framelayout;

import android.os.Bundle;
import android.os.Message;
import android.support.v7.app.AppCompatActivity;
import android.widget.TextView;
import java.util.Timer;
import java.util.TimerTask;
public class MainActivity extends AppCompatActivity {

    private int currentColor = 0 ;
    //定義一個顏色數組
    final int[] colors = new int[]{
            R.color.color1,
            R.color.color2,
            R.color.color3,
            R.color.color4,
            R.color.color5,
            R.color.color6,

    };

    final int[] names = new int[] {
            R.id.textView,
            R.id.textView2,
            R.id.textView3,
            R.id.textView4,
            R.id.textView5,
            R.id.textView6,
    };
    TextView[] views = new TextView[names.length ] ;
    //handler主要接收主線程發送的數據,並用此數據配合主線程更新UI
    android.os.Handler handler = new android.os.Handler()
    {
        @Override
        public void handleMessage(Message msg)
        {
            // 表明消息來自本程序所發送
            if (msg.what == 0x234)
            {
                //依次改變testView的背景
                for (int i = 0; i < names.length; i++)
                {
                    //收到一條msg就開始改變一次views的顏色(六個都依照colors的+currentcolor顏色來改)
                    views[i].setBackgroundResource(colors[(i
                            + currentColor)    % names.length]);
                }
                currentColor++;
            }
            //將消息拋給父類,避免丟失
            super.handleMessage(msg);
        }
    };
    protected void onCreate(Bundle savedInstanceState) {
        super.onCreate(savedInstanceState);
        setContentView(R.layout.test);
        for (int i = 0; i < names.length; i++)
        {
            //為views設置初始顏色,(六個TestView)
            views[i] = (TextView) findViewById(names[i]);
        }
        // 定義一個線程周期性地改變currentColor變量值
        new Timer().schedule(new TimerTask() {
            @Override
            public void run() {
                // 發送一條空消息通知系統改變6個TextView組件的背景色
                handler.sendEmptyMessage(0x234);
            }
        }, 0, 200);

    }
}
四、動態霓虹燈效果
 安卓學習-- RecyclerView簡單入門,安卓recyclerview
安卓學習-- RecyclerView簡單入門,安卓recyclerview一、加入JAR包 第一感覺這個東東,好復雜,沒ListView來的快,方便 在項目中加入and
 第三方開源水面波浪波形view:WaveView,viewwaveview
第三方開源水面波浪波形view:WaveView,viewwaveview一個比較有趣的Android第三方開源波形view:WaveView,這種WaveView在一些
 安卓應用的界面編程(5),安卓界面編程
安卓應用的界面編程(5),安卓界面編程第四組UI組件:AdapterView及其子類 AdapterView組件是一組重要的組件,Adapte
 Android Studio 打包apk,自動追加版本號和版本名稱
Android Studio 打包apk,自動追加版本號和版本名稱 默認AS大包好的apk是app-deubg.apk的,這樣的話版本多了找出一個bug在哪個版本中存在的