編輯:關於android開發
謹記(指定選擇器Intent.createChooser())
開始今天的內容前,先閒聊一下:
(1)突然有一天頭腦風暴,對很多問題有了新的看法和見解,迫不及待的想要分享給大家,文檔已經寫好了,我需要通過微信或者QQ,短信等社交工具發送給大家。
(2)在網上發現一段特別好的文章,想要保存收藏下來。
上面描述了進入智能手機時代後,我們經常遇到的兩種情況,那麼作為開發者的我們如何讓自己開發的APP實現這兩種功能呢,下面我們以實現文本的發送分享以及接收來梳理下兩種功能的實現過程(其他類型的數據在博文末尾會給大家做簡單介紹)。
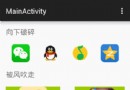
在實現APP發送與分享的功能時,根據是否指定選擇器Intent.createChooser(),會有兩種不同的實現效果。
每次需要發送分享的時候,都會彈出所有具有分享功能的APP供選擇。(個人認為很人性化)

圖中演示測試使用的安卓原生系統,在未設置選擇器的時候,每次會提醒用戶使用當前APP提交發送分享所使用的APP僅使用一次還是始終都使用(經測試萬一大家手滑,誤點了“始終”,那麼好吧,如果下次想換其他APP分享內容時,除非你卸載重裝當前APP);但在其他一些安卓定制系統的品牌手機上測試時,發現僅第一次會跳出所有具有發送分享功能的APP供你選擇(但是不會提示你僅使用一次還是始終),一旦選擇後,後果與在原生系統上點擊始終的效果相同 。立馬卸載APP的心都有了。
好了,實現效果大家都看到了,我們開始撸一把代碼吧:
 1 <?xml version="1.0" encoding="utf-8"?>
 2     <LinearLayout
 3     xmlns:android="http://schemas.android.com/apk/res/android"
 4     xmlns:tools="http://schemas.android.com/tools"
 5     android:id="@+id/activity_main"
 6     android:layout_width="match_parent"
 7     android:layout_height="match_parent"
 8     android:orientation="vertical"
 9     tools:context="com.example.administrator.sendshare.MainActivity">
10     <EditText
11         android:id="@+id/et"
12         android:layout_width="match_parent"
13         android:layout_height="wrap_content"
14         android:hint="想給潘侯爺說點什麼"/>
15     <Button
16         android:layout_width="match_parent"
17         android:layout_height="wrap_content"
18         android:onClick="sendtext"
19         android:text="發送文本" />
20 </LinearLayout>
注意注意:指定選擇器啊
 1 public class MainActivity extends AppCompatActivity {
 2     EditText et;//聲明文本編輯框
 3     String str;//聲明字符串,用於獲取文本編輯框內的內容
 4     @Override
 5     protected void onCreate(Bundle savedInstanceState) {
 6         super.onCreate(savedInstanceState);
 7         setContentView(R.layout.activity_main);
 8         //獲取文本框
 9         et = (EditText) findViewById(R.id.et);
10     }
11     //創建方法將輸入的內容發出去
12     public void sendtext(View view){
13         str=et.getText().toString();
14         Intent intent = new Intent();
15         /*設置action為發送分享,
16         *並判斷要發送分享的內容是否為空
17          */
18         intent.setAction(Intent.ACTION_SEND);
19         if(str!=null){
20             intent.putExtra(Intent.EXTRA_TEXT,str);
21         }else{
22             intent.putExtra(Intent.EXTRA_TEXT,"");
23         }
24         intent.setType("text/plain");//設置分享發送的數據類型
25         //未指定選擇器,部分定制系統首次選擇後,後期將無法再次改變
26 //        startActivity(intent);
27         //指定選擇器選擇使用有發送文本功能的App
28         startActivity(Intent.createChooser(intent,getResources().getText(R.string.app_name)));
29     }
30 }
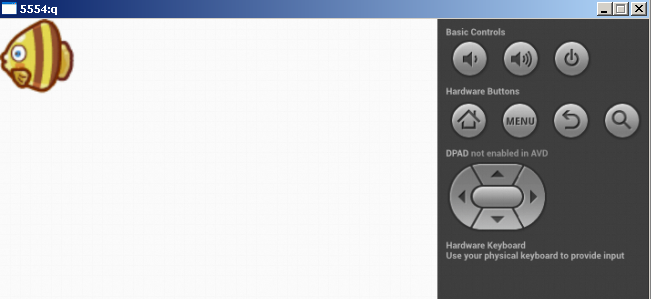
實現效果如下(將短信內容分享到我們的APP上):

layout布局界面為初始默認,僅一個默認helloworld的TextView界面,這裡就省略不寫了。
 1 <?xml version="1.0" encoding="utf-8"?>
 2 <manifest xmlns:android="http://schemas.android.com/apk/res/android"
 3     package="com.example.administrator.test" >
 4     <application
 5         android:allowBackup="true"
 6         android:icon="@mipmap/ic_launcher"
 7         android:label="@string/app_name"
 8         android:supportsRtl="true"
 9         android:theme="@style/AppTheme" >
10         <activity android:name=".MainActivity" >
11             <intent-filter>
12                 <action android:name="android.intent.action.MAIN" />
13                 //添加接收文本用的action,category,mimeType
14                 <action android:name="android.intent.action.SEND" />
15                 <category android:name="android.intent.category.DEFAULT" />
16                 <data android:mimeType="text/plain" />
17                 <category android:name="android.intent.category.LAUNCHER" />
18             </intent-filter>
19         </activity>
20     </application>
21 </manifest>
 1 import android.content.Intent;
 2 import android.support.v7.app.AppCompatActivity;
 3 import android.os.Bundle;
 4 import android.widget.TextView;
 5 public class MainActivity extends AppCompatActivity {
 6     private TextView tv;
 7     @Override
 8     protected void onCreate(Bundle savedInstanceState) {
 9         super.onCreate(savedInstanceState);
10         setContentView(R.layout.activity_main);
11         tv = (TextView) findViewById(R.id.tv);
12         //獲取intent
13         Intent intent =getIntent();
14         String action = intent.getAction();
15         String type = intent.getType();
16         //設置接收類型為文本
17         if (Intent.ACTION_SEND.equals(action) && type != null){
18             if ("text/plain".equals(type)) {
19                 handlerText(intent);
20             }
21         }
22 }
23 //該方法用於獲取intent所包含的文本信息,並顯示到APP的Activity界面上
24     private void handlerText(Intent intent) {
25         String data = intent.getStringExtra(Intent.EXTRA_TEXT);
26         tv.setText(data);
27     }
28 }
 1 import android.content.Intent;
 2 import android.support.v7.app.AppCompatActivity;
 3 import android.os.Bundle;
 4 import android.view.View;
 5 public class Main2Activity extends AppCompatActivity {
 6     @Override
 7     protected void onCreate(Bundle savedInstanceState) {
 8         super.onCreate(savedInstanceState);
 9         setContentView(R.layout.activity_main2);
10     }
11     public void select(View view){
12         Intent intent = new Intent();
13         intent.setAction(Intent.ACTION_SET_WALLPAPER);
14         startActivity(Intent.createChooser(intent,getResources().getText(R.string.app_name)));
15 //        startActivity(intent);
16     }
17 }
1 public void sendimage(View view) {
2     Intent intent = new Intent();
3     intent.setAction(Intent.ACTION_SEND);
4     intent.putExtra(Intent.EXTRA_STREAM, Uri.parse(Environment.getExternalStorageDirectory()+"/DCIM/Camera/20161204_195228.jpg"));
5     intent.setType("image/*");
6 //  startActivity(intent);
7     startActivity(Intent.createChooser(intent,getResources().getText(R.string.app_name)));
8 }
 1 public void sendimages(View view) {
 2     ArrayList<Uri> uris = new ArrayList<>();
 3     //演示發送兩張圖片
 4     uris.add(Uri.parse(Environment.getExternalStorageDirectory()+"/DCIM/Camera/20161204_195228.jpg"));
 5     uris.add(Uri.parse(Environment.getExternalStorageDirectory()+"/DCIM/Camera/20161204_195155.jpg"));
 6     Intent intent = new Intent();
 7     intent.setAction(Intent.ACTION_SEND_MULTIPLE);
 8     intent.putParcelableArrayListExtra(Intent.EXTRA_STREAM,uris);
 9     intent.setType("image/*");
10 //        startActivity(intent);
11     startActivity(Intent.createChooser(intent,getResources().getText(R.string.app_name)));
12 }
今天到這了,有問題歡迎評論討論,晚安喽!
 Android制作粒子爆炸特效
Android制作粒子爆炸特效 簡介 最近在閒逛的時候,發現了一款粒子爆炸特效的控件,覺得比較有意思,效果也不錯。 但是代碼不好擴展,也就是說如果要提供不同的爆炸效果
 《Android源碼設計模式解析與實戰》讀書筆記(十六)
《Android源碼設計模式解析與實戰》讀書筆記(十六) 第十六章、訪問者模式 訪問者模式是一種行為型模式,它是23種設計模式中最復雜的一個,雖然使用頻率不高,但是並
 Drawable Animation 幀動畫,drawableanimation
Drawable Animation 幀動畫,drawableanimationMySurfaceView類: package com.fm; import andr
 Android學習指南之二十三:Drawable及其相關類的使用
對於任何軟件來說,美觀的界面都是用戶體驗的重要組成部分,它能提高整個軟件的品質