編輯:關於android開發
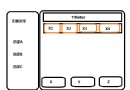
PopupWindow 是一個可以顯示在當前 Activity 之上的浮動容器,這個Demo要實現的功能是,點擊布局中的兩個按鈕,進而控制PopupWindow的顯示與消失,代碼中有詳細的注釋首先看一下效果展示:
在上代碼之前,先總結一下PopupWindow的用法:
1:實例化PopupWindow的對象,三個參數分別對應:填充的布局文件、在當前Activity上所占的寬、高
PopupWindow popupWindow= new PopupWindow(contentView, LayoutParams.FILL_PARENT, LayoutParams.WRAP_CONTENT);
2:完成第一步所需要的布局文件,並實例出來
View contentView = mLayoutInflater.inflate(R.layout.pop, null)
3:設置PopupWindow 所必備的兩個屬性
     //popupWindow的背景
 (1)popupWindow.setBackgroundDrawable(......);
     //popupWindow要顯示的位置
 (2)popupWindow.showAtLocation(View parent, int gravity, int x, int y)
接下來,上代碼!
popupWindow所要添加的布局文件:popu_layout.xml
<?xml version="1.0" encoding="utf-8"?>
<GridLayout xmlns:android="http://schemas.android.com/apk/res/android"
    android:layout_width="match_parent"
    android:layout_height="wrap_content"
    android:background="#87cdff"
    android:columnCount="4"
    android:orientation="horizontal"
    android:rowCount="4">

    <ImageView
        android:layout_width="65dp"
        android:layout_height="65dp"
        android:layout_margin="12dp"
        android:background="@drawable/icon_bank_gongshang" />

    <ImageView
        android:layout_width="65dp"
        android:layout_height="65dp"
        android:layout_margin="12dp"
        android:background="@drawable/icon_bank_guangda" />

    <ImageView
        android:layout_width="65dp"
        android:layout_height="65dp"
        android:layout_margin="12dp"
        android:background="@drawable/icon_bank_jianhang" />

    <ImageView
        android:layout_width="65dp"
        android:layout_height="65dp"
        android:layout_margin="12dp"
        android:background="@drawable/icon_bank_jiaotong" />

    <ImageView
        android:layout_width="65dp"
        android:layout_height="65dp"
        android:layout_margin="12dp"
        android:background="@drawable/icon_bank_minsheng" />

    <ImageView
        android:layout_width="65dp"
        android:layout_height="65dp"
        android:layout_margin="12dp"
        android:background="@drawable/icon_bank_nongye" />

    <ImageView
        android:layout_width="65dp"
        android:layout_height="65dp"
        android:layout_margin="12dp"
        android:background="@drawable/icon_bank_gongshang" />

    <ImageView
        android:layout_width="65dp"
        android:layout_height="65dp"
        android:layout_margin="12dp"
        android:background="@drawable/icon_bank_pingan" />

    <ImageView
        android:layout_width="65dp"
        android:layout_height="65dp"
        android:layout_margin="12dp"
        android:background="@drawable/icon_bank_zhaoshang" />

    <ImageView
        android:layout_width="65dp"
        android:layout_height="65dp"
        android:layout_margin="12dp"
        android:background="@drawable/icon_bank_youzheng" />

    <ImageView
        android:layout_width="65dp"
        android:layout_height="65dp"
        android:layout_margin="12dp"
        android:background="@drawable/icon_bank_xingye" />

    <ImageView
        android:layout_width="65dp"
        android:layout_height="65dp"
        android:layout_margin="12dp"
        android:background="@drawable/icon_bank_pufa" />
</GridLayout>
相當簡單的布局,做出來就是這麼一個玩意:

MainActivity:
 1 package com.example.wgh.popupwindow;
 2 import android.graphics.drawable.ColorDrawable;
 3 import android.support.v7.app.AppCompatActivity;
 4 import android.os.Bundle;
 5 import android.view.Gravity;
 6 import android.view.LayoutInflater;
 7 import android.view.View;
 8 import android.widget.Button;
 9 import android.widget.GridLayout;
10 import android.widget.PopupWindow;
11
12 public class MainActivity extends AppCompatActivity {
13
14     private View mPopView = null;
15     private Button showPopupWindow = null;
16     private Button dismissPopupWindow = null;
17     @Override
18     protected void onCreate(Bundle savedInstanceState) {
19         super.onCreate(savedInstanceState);
20         setContentView(R.layout.activity_main);
21
22         initView();
23         showPopupWindow.setOnClickListener(new View.OnClickListener() {
24             @Override
25             public void onClick(View view) {
26                 showPopupWindow();
27             }
28         });
29     }
30
31     private void initView() {
32         showPopupWindow = (Button) findViewById(R.id.showPopupWindow);
33         dismissPopupWindow = (Button) findViewById(R.id.dismissPopupWindow);
34         /**
35          * 實例popupWindow要添加的布局
36          */
37         mPopView = LayoutInflater.from(this).inflate(R.layout.popu_layout, null);
38     }
39
40     private void showPopupWindow() {
41         /**
42          * 實例popupWindow對象
43          */
44         PopupWindow popupWindow = new PopupWindow(mPopView, GridLayout.LayoutParams.MATCH_PARENT, GridLayout.LayoutParams.WRAP_CONTENT);
45         //設置popupWindow中的item可以被點擊,這句話是必須要添加的
46         popupWindow.setFocusable(true);
47         //設置PopupWindow的背景
48         //如果不設置背景,會導致無論是點擊外部區域還是Back鍵都無法dismiss掉popupWindow
49         ColorDrawable dw = new ColorDrawable(0xb0000000);
50         popupWindow.setBackgroundDrawable(dw);
51         //設置popupWindow顯示的位置
52         popupWindow.showAtLocation(showPopupWindow, Gravity.BOTTOM,0,200);
53     }
54 }
最後說一下關於popupWindow顯示位置的屬性設置
1 // 相對某個控件的位置(正左下方),無偏移
2 popupWindow.showAsDropDown(View anchor)
3 // 相對某個控件的位置,有偏移,xoff 為 X 軸的偏移量,yoff 為 Y 軸的偏移量
4 popupWindow.showAsDropDown(View anchor, int xoff, int yoff)
5 // 在父容器的什麼位置,gravity 為相對位置,
6 //如:正中央 Gravity.CENTER、下方 Gravity.BOTTOM、Gravity.RIGHT|Gravity.BOTTOM 右下方等,後面兩個參數為 x/y 軸的偏移量。
7 popupWindow.showAtLocation(View parent, int gravity, int x, int y)
有興趣的童鞋可以為popupWindow設置上動畫,這樣在彈出的時候,不會顯得那麼突兀,哈哈
如果有什麼地方是錯誤的,請大家批評指正。
 Android提高21篇之二十一:MediaPlayer播放網絡視頻
上次講解了MediaPlayer播放網絡音頻,介紹了MediaPlayer關於網絡音頻的緩沖和進度
 Android React Native使用原生UI組件
Android React Native使用原生UI組件 Android React Native 已經將幾個常用的原生組件進行了封裝,比如 ScrollView 和
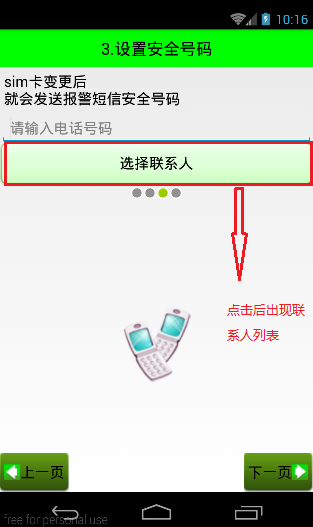 Android 手機衛士--獲取聯系人信息並顯示與回顯,android回顯
Android 手機衛士--獲取聯系人信息並顯示與回顯,android回顯前面的文章已經實現相關的布局,本文接著進行相關的功能實現 本文地址:http://www.cnb
 Android學習筆記--Sqlite數據庫,android--sqlite
Android學習筆記--Sqlite數據庫,android--sqlite 前幾天學習了Android中的數據存儲,包括文件存儲