編輯:關於android開發
本文結合之前的動態創建fragment來進行一個實踐,來實現用Fragment創建一個選項卡
本文地址:http://www.cnblogs.com/wuyudong/p/5898075.html ,轉載請注明源地址。
項目布局
<LinearLayout xmlns:android="http://schemas.android.com/apk/res/android"
    xmlns:tools="http://schemas.android.com/tools"
    android:layout_width="match_parent"
    android:layout_height="match_parent"
    android:orientation="vertical"
    tools:context=".MainActivity" >

    <LinearLayout
        android:layout_width="fill_parent"
        android:layout_height="wrap_content"
        android:orientation="horizontal" >

        <TextView
            android:id="@+id/tab1"
            android:layout_width="0dip"
            android:layout_height="wrap_content"
            android:layout_weight="1"
            android:gravity="center"
            android:text="社會新聞" />

        <TextView
            android:id="@+id/tab2"
            android:layout_width="0dip"
            android:layout_height="wrap_content"
            android:layout_weight="1"
            android:gravity="center"
            android:text="生活新聞" />

        <TextView
            android:id="@+id/tab3"
            android:layout_width="0dip"
            android:layout_height="wrap_content"
            android:layout_weight="1"
            android:gravity="center"
            android:text="軍事新聞" />

        <TextView
            android:id="@+id/tab4"
            android:layout_width="0dip"
            android:layout_height="wrap_content"
            android:layout_weight="1"
            android:gravity="center"
            android:text="娛樂新聞" />
    </LinearLayout>

    <LinearLayout
        android:id="@+id/content"
        android:layout_width="fill_parent"
        android:layout_height="fill_parent" >
    </LinearLayout>

</LinearLayout>
新建Fragment1.java~Fragment4.java,其中Fragment1.java中的代碼如下:
public class Fragment1 extends Fragment {
    @Override
    public View onCreateView(LayoutInflater inflater, ViewGroup container,
            Bundle savedInstanceState) {
        return inflater.inflate(R.layout.fragment1, null);
    }

}
其他幾個文件的代碼類似
新建fragment1.xml~fragment4.xml,其中fragment1.xml中的代碼如下:
<?xml version="1.0" encoding="utf-8"?>
<LinearLayout xmlns:android="http://schemas.android.com/apk/res/android"
    android:layout_width="match_parent"
    android:layout_height="match_parent"
    android:gravity="center"
    android:orientation="vertical" >

    <TextView
        android:id="@+id/textview1"
        android:layout_width="wrap_content"
        android:layout_height="wrap_content"
        android:text="社會新聞"
        android:textAppearance="?android:attr/textAppearanceLarge"/>
</LinearLayout>
其他幾個文件的代碼類似
MainActivity.java中的代碼如下:
public class MainActivity extends Activity implements OnClickListener {

    private LinearLayout content;
    private TextView tv1, tv2, tv3, tv4;
    private FragmentManager fm;
    private FragmentTransaction ft;

    @Override
    protected void onCreate(Bundle savedInstanceState) {
        super.onCreate(savedInstanceState);
        setContentView(R.layout.activity_main);

        content = (LinearLayout) findViewById(R.id.content);

        tv1 = (TextView) findViewById(R.id.tab1);
        tv2 = (TextView) findViewById(R.id.tab2);
        tv3 = (TextView) findViewById(R.id.tab3);
        tv4 = (TextView) findViewById(R.id.tab4);

        tv1.setOnClickListener(this);
        tv2.setOnClickListener(this);
        tv3.setOnClickListener(this);
        tv4.setOnClickListener(this);

        fm = getFragmentManager();
        ft = fm.beginTransaction();
        ft.replace(R.id.content, new Fragment1()); // 默認情況下Fragment1

    }

    @Override
    public void onClick(View v) {
        ft = fm.beginTransaction();
        switch (v.getId()) {
        case R.id.tab1:
            ft.replace(R.id.content, new Fragment1());
            break;
        case R.id.tab2:
            ft.replace(R.id.content, new Fragment2());
            break;
        case R.id.tab3:
            ft.replace(R.id.content, new Fragment3());
            break;
        case R.id.tab4:
            ft.replace(R.id.content, new Fragment4());
            break;

        default:
            break;
        }
        ft.commit();

    }

}
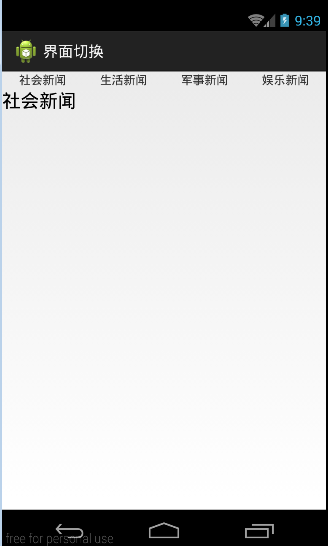
運行項目後如下效果:
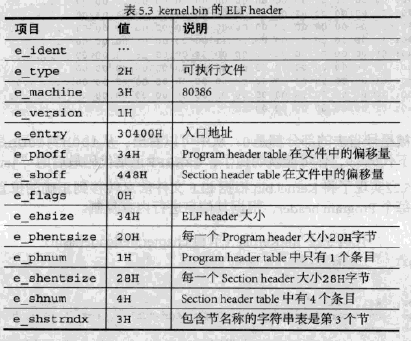 Linux內核系列—12.c.操作系統開發之從Loader加載ELF內核,順便解釋下函數調用過程 ●,12.celf
Linux內核系列—12.c.操作系統開發之從Loader加載ELF內核,順便解釋下函數調用過程 ●,12.celf實際上,我們要做的工作是根據內核的Program he
 用PopWindow做下拉框,PopWindow做下拉框
用PopWindow做下拉框,PopWindow做下拉框 最近在做下拉框,本來想用spinner,可是spinner達不到項目要求,跟同學同事問
 Android性能優化之使用線程池處理異步任務
Android性能優化之使用線程池處理異步任務 說到線程,我想大家都不陌生,因為在開發時候或多或少都會用到線程,而通常創建線程有兩種方式: 1、繼承Thread類
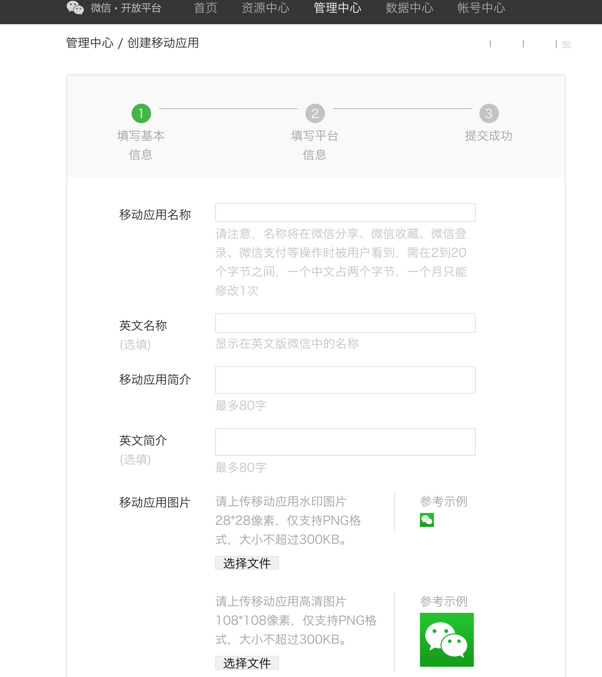 接入微信分享過程的喜和淚
接入微信分享過程的喜和淚 背景故事: 4月份從公司回到學校,要開始著手做大四的畢業設計。然而畢設的其中一個功能模塊便是——心情分享模塊,在記錄