編輯:關於android開發
一、 前言
在上一篇文章 Android IPC機制(三):淺談Binder的使用中,筆者淺談了Binder的使用及其工作機制,利用AIDL方式能很方便地進行客戶端和服務端的跨進程通信。但是,我們想一下,如果按照我們之前的使用方法,必須滿足一個AIDL接口對應一個service,那麼問題來了,假如我們的應用,有很多模塊,而每一個模塊都需要和服務端通訊,那麼我們也要為每一個模塊創建特定的aidl文件,那麼服務端service也會產生很多個,顯然,如果aidl接口變多,那麼service也會跟著變多,那麼這樣的用戶體驗就會非常不好,那麼我們該怎麼做呢?在任玉剛著的《Android 開發藝術探索》一書中,給出了一個Binder連接池的概念,即利用一個Binder連接池來管理所有Binder,服務端只需要管理這個Bindere連接池即可,這樣就能實現一個service管理多個Binder,為不同的模塊返回不同的Binder,以實現進程間通訊。所以,本文將講述如何實現Binder連接池。
二、實現
1、先提供兩個AIDL接口來模擬多個模塊都要使用AIDL的情況:ISpeak接口和ICalculate接口:
package com.chenyu.service;
interface ISpeak {
    void speak();
}
package com.chenyu.service;
interface ICalculate {
int add(in int num1,in int num2);
}public class Speak extends Stub {
public Speak() {
Log.d("cylog","我被實例化了..............");
}
@Override
public void speak() throws RemoteException {
int pid = android.os.Process.myPid();
Log.d("cylog","當前進程ID為:"+pid+"-----"+"這裡收到了客戶端的speak請求");
}
}public class Calculate extends ICalculate.Stub {
@Override
public int add(int num1, int num2) throws RemoteException {
int pid = android.os.Process.myPid();
Log.d("cylog", "當前進程ID為:"+pid+"----"+"這裡收到了客戶端的Calculate請求");
return num1+num2;
}
}2、為Binder連接池創建AIDL接口:IBinderPool.aidl:
interface IBinderPool {
    IBinder queryBinder(int binderCode);  //查找特定Binder的方法
}
3、服務端service代碼:
public class BinderPoolService extends Service {

    private Binder mBinderPool = new BinderPool.BinderPoolImpl();   // 1
    private int pid = Process.myPid();
    @Override
    public IBinder onBind(Intent intent) {
        Log.d("cylog", "當前進程ID為:"+pid+"----"+"客戶端與服務端連接成功,服務端返回BinderPool.BinderPoolImpl 對象");
        return mBinderPool;
    }
}
4、接下來我們看BinderPool的具體實現,代碼比較長,我們先大體上認識,再詳細分析:
public class BinderPool {
    public static final int BINDER_SPEAK = 0;
    public static final int BINDER_CALCULATE = 1;

    private Context mContext;
    private IBinderPool mBinderPool;
    private static volatile BinderPool sInstance;
    private CountDownLatch mConnectBinderPoolCountDownLatch;

    private BinderPool(Context context) {	   // 1
        mContext = context.getApplicationContext();
        connectBinderPoolService();
    }

    public static BinderPool getInstance(Context context) {     // 2
        if (sInstance == null) {
            synchronized (BinderPool.class) {
                if (sInstance == null) {
                    sInstance = new BinderPool(context);
                }
            }
        }
        return sInstance;
    }

    private synchronized void connectBinderPoolService() {      // 3
        mConnectBinderPoolCountDownLatch = new CountDownLatch(1);
        Intent service = new Intent(mContext, BinderPoolService.class);
        mContext.bindService(service, mBinderPoolConnection,
                Context.BIND_AUTO_CREATE);
        try {
            mConnectBinderPoolCountDownLatch.await();
        } catch (InterruptedException e) {
            e.printStackTrace();
        }
    }

    public IBinder queryBinder(int binderCode) {          // 4
        IBinder binder = null;
        try {
            if (mBinderPool != null) {
                binder = mBinderPool.queryBinder(binderCode);
            }
        } catch (RemoteException e) {
            e.printStackTrace();
        }
        return binder;
    }

    private ServiceConnection mBinderPoolConnection = new ServiceConnection() {       // 5

        @Override
        public void onServiceDisconnected(ComponentName name) {

        }

        @Override
        public void onServiceConnected(ComponentName name, IBinder service) {
            mBinderPool = IBinderPool.Stub.asInterface(service);
            try {
                mBinderPool.asBinder().linkToDeath(mBinderPoolDeathRecipient, 0);
            } catch (RemoteException e) {
                e.printStackTrace();
            }
            mConnectBinderPoolCountDownLatch.countDown();
        }
    };

    private IBinder.DeathRecipient mBinderPoolDeathRecipient = new IBinder.DeathRecipient() {    // 6
        @Override
        public void binderDied() {
            mBinderPool.asBinder().unlinkToDeath(mBinderPoolDeathRecipient, 0);
            mBinderPool = null;
            connectBinderPoolService();
        }
    };

    public static class BinderPoolImpl extends IBinderPool.Stub {     // 7

        public BinderPoolImpl() {
            super();
        }

        @Override
        public IBinder queryBinder(int binderCode) throws RemoteException {
            IBinder binder = null;
            switch (binderCode) {
                case BINDER_SPEAK: {
                    binder = new Speak();
                    break;
                }
                case BINDER_CALCULATE: {
                    binder = new Calculate();
                    break;
                }
                default:
                    break;
            }

            return binder;
        }
    }

}①private BinderPool(Context context)構造方法:這裡傳遞了context對象,注意到,這個構造方法使用了private修飾,那麼外界是無法直接調用構造器的,所以有了②號方法。
②public static BinderPool getInstance(Context context):看到getInstance字樣,熟悉設計模式的讀者應該知道了這裡是使用了單例模式,而且是線程同步的懶漢式單例模式,在方法內部,把傳遞進來的context上下文參數傳遞進構造函數,即此時調用了①號方法,接著①號方法調用了connectBinderPoolService()方法,即③號方法。
③private synchronized void connectBinderPoolService():這個方法主要用於客戶端與服務端建立連接,在方法內部出現了CountDownLatch類,這個類是用於線程同步的,由於bindService()是異步操作,所以如果要確保客戶端在執行其他操作之前已經綁定好服務端,就應該先實現線程同步。這裡簡單提一下這個類:
CountDownLatch類有三個主要方法:
(1)構造方法 CountDownLatch(int num):這裡傳遞一個num值,為countdownlatch內部的計時器賦值。
(2)countdown():每當調用一次這個方法,countdownlatch實例內部計時器數值 - 1。
(3)await():讓當前線程等待,如果內部計時器變為0,那麼喚醒當前線程。
④public IBinder queryBinder(int binderCode):根據具體的binderCode值來獲得某個特定的Binder,並返回。
⑤private ServiceConnection mBinderPoolConnection = new ServiceConnection(){} :這個類似於上一章客戶端的連接代碼,在服務端與客戶端連接成功的時候,會回調當前的onServiceConnected()函數,我們來著重看看這個函數:
@Override
        public void onServiceConnected(ComponentName name, IBinder service) {
            mBinderPool = IBinderPool.Stub.asInterface(service);
            try {
                mBinderPool.asBinder().linkToDeath(mBinderPoolDeathRecipient, 0);
            } catch (RemoteException e) {
                e.printStackTrace();
            }
            mConnectBinderPoolCountDownLatch.countDown();
}接著,最後執行了mConnectBinderPoolCountDownLatch.countDown()方法,此時,執行bindService()的線程就會被喚醒。
⑥private IBinder.DeathRecipient mBinderPoolDeathRecipient = new IBinder.DeathRecipient(){}:為IBinder設置死亡監聽,如果連接意外中斷,會自動重新連接。
⑦public static class BinderPoolImpl extends IBinderPool.Stub{} :這個類實現了IBinderPool.Stub,內部實現了IBinderPool的接口方法,這個實現類運行在服務端。內部是queryBinder()方法的實現,根據不同的Bindercode值來實例化不同的實現類,比如Speak或者Calculate,並作為Binder返回給客戶端。當客戶端調用這個方法的時候,實際上已經是進行了一次AIDL方式的跨進程通信。
5、分析完BinderPool代碼,最後,我們實現客戶端代碼:
package com.chenyu.binderpool;
import android.app.Activity;
import android.os.*;
import android.util.Log;
import com.chenyu.service.BinderPool;
import com.chenyu.service.Calculate;
import com.chenyu.service.ICalculate;
import com.chenyu.service.ISpeak;
import com.chenyu.service.Speak;
public class MainActivity extends Activity {
private ISpeak mSpeak;
private ICalculate mCalculate;
private int pid = android.os.Process.myPid();
@Override
protected void onCreate(Bundle savedInstanceState) {
super.onCreate(savedInstanceState);
setContentView(R.layout.activity_main);
new Thread(new Runnable() {
@Override
public void run() {
startWork();
}
}).start();
}
private void startWork() {
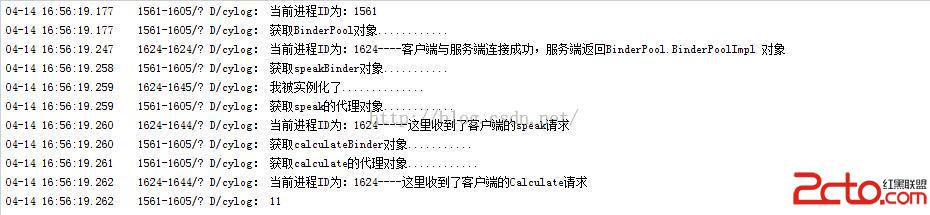
Log.d("cylog","當前進程ID為:"+pid);
Log.d("cylog","獲取BinderPool對象............");
BinderPool binderPool = BinderPool.getInsance(MainActivity.this); // 1
Log.d("cylog","獲取speakBinder對象...........");
IBinder speakBinder = binderPool.queryBinder(BinderPool.BINDER_SPEAK); // 2
Log.d("cylog","獲取speak的代理對象............");
mSpeak = (ISpeak) ISpeak.Stub.asInterface(speakBinder); // 3
try {
mSpeak.speak(); // 4
} catch (RemoteException e) {
e.printStackTrace();
}
Log.d("cylog","獲取calculateBinder對象...........");
IBinder calculateBinder = binderPool.queryBinder(BinderPool.BINDER_CALCULATE);
Log.d("cylog","獲取calculate的代理對象............");
mCalculate = (ICalculate) ICalculate.Stub.asInterface(calculateBinder);
try {
Log.d("cylog",""+mCalculate.add(5,6));
} catch (RemoteException e) {
e.printStackTrace();
}
}
}我們看一下運行結果:
三、總結
最後總結一下使用Binder連接池的流程:
(1)為每個業務模塊創建AIDL接口,以及實現其接口的方法。
(2)創建IBinderPool.aidl文件,定義queryBinder(int BinderCode)方法,客戶端通過調用該方法返回特定的Binder對象。
(3)創建BinderPoolService服務端,在onBind方法返回實例化的BinderPool.IBinderPoolImpl對象。
(4)創建BinderPool類,在該類實現客戶端與服務端的連接,解決線程同步的問題,設置Binder的死亡代理等。在onServiceConnected()方法內,獲取到IBinderPool的代理對象。此外,IBinderPool的實現類:IBinderPoolImpl是BinderPool的內部類,實現了IBinderPool.aidl的方法:queryBinder()。
 Android Studio 優秀插件(二): Parcelable Code Generator,androidparcelable
Android Studio 優秀插件(二): Parcelable Code Generator,androidparcelableAndroid Studio 優秀插
 Android 官方推薦 : DialogFragment 怎樣創建對話框
Android 官方推薦 : DialogFragment 怎樣創建對話框 1、 概述 DialogFragment在android 3.0時被引入。是一種特殊的
 自定義類似於listView中Item背景,listviewitem
自定義類似於listView中Item背景,listviewitem方法一、 drawable/listitem_bk.xml Xml代碼
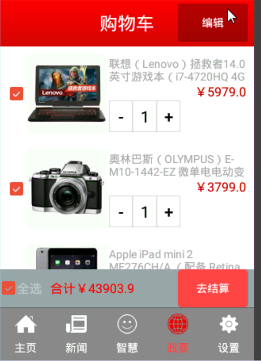 硅谷商城6--購物車編輯實現,硅谷商城6--購物車
硅谷商城6--購物車編輯實現,硅谷商城6--購物車 完成狀態