編輯:關於android開發
分類:C#、Android、VS2015;
創建日期:2016-02-27
這一節演示如何利用以異步方式(async、await)訪問SQLite數據庫。
二、示例4運行截圖
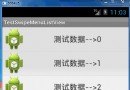
下面左圖為初始頁面,右圖為單擊【創建數據庫】按鈕後的結果。
下面左圖為單擊【添加單行】按鈕的結果,右圖為單擊【添加多行】按鈕的結果。
注意:不想再像上一節的例子那樣逐個添加頁面了,畢竟例子的目的僅僅是為了演示最基本的異步操作用法,代碼太多容易沖淡要關注的內容,所以該例子並沒有去解決重復添加相同學號的記錄引起的沖突問題,只是簡單地把捕獲的異常直接顯示出來了。但是,在實際項目中,你如果也像這個例子這樣去簡單處理,那你肯定會挨訓,呵呵。
1、添加對SQLite.NET.Async-PCL程序包的引用
鼠標右擊項目中的【引用】à【管理NuGet程序包】,數據源選擇【NuGet official package source】,在搜索框中輸入【sqlite】,找到【SQLite.NET.Async-PCL】,選擇最新的版本(本示例使用的是3.1.1版),然後單擊【安裝】。
安裝程序包以後,在【解決方案資源管理器】中,就可以看出它已經替你自動添加了對SQLite.Net.Async的引用。安裝的程序包及其依賴項的名稱和版本見本章開頭(13.0節)列出的packages.config文件。
2、創建數據庫和表
在SrcDemos文件夾下添加一個MyDb4Model文件夾,該文件夾用於保存與“MyDb4.db”數據庫相關的.cs文件。
(1)添加Student.cs文件
using System;
using SQLite.Net.Attributes;

namespace MyDemos.SrcDemos.MyDb4Model
{
    [Table("Student")]
    public class Student
    {
        //主鍵,自動增量
        [PrimaryKey,AutoIncrement]
        public int id { get; set; }

        //學號
        [Unique, NotNull]
        public string XueHao { get; set; }

        //姓名
        [MaxLength(30), NotNull]
        public string Name { get; set; }

        //出生日期
        public DateTime BirthDate { get; set; }

        public override string ToString()
        {
            return string.Format(
                "[學號={0}, 姓名={1}, 出生日期={2:yyyy-MM-dd}]\n",
                XueHao, Name, BirthDate);
        }
    }
}
(2)添加MyDb4.cs文件
using System;
using System.IO;
using SQLite.Net;
using SQLite.Net.Async;
using SQLite.Net.Platform.XamarinAndroid;

namespace MyDemos.SrcDemos.MyDb4Model
{
    public static class MyDb4
    {
        private static readonly string dbPath = Path.Combine(
            Environment.GetFolderPath(Environment.SpecialFolder.Personal),
            "MyDb4.db");

        public static SQLiteAsyncConnection GetAsyncConnection()
        {
            SQLitePlatformAndroid platform = new SQLitePlatformAndroid();
            SQLiteConnectionString connStr = new SQLiteConnectionString(dbPath, false);
            return new SQLiteAsyncConnection(()=> new SQLiteConnectionWithLock(platform, connStr));
        }
    }
}
3、添加ch1304_Main.axml文件
<?xml version="1.0" encoding="utf-8"?>
<LinearLayout xmlns:android="http://schemas.android.com/apk/res/android"
    android:orientation="vertical"
    android:layout_width="fill_parent"
    android:layout_height="fill_parent"
    android:weightSum="1">
    <LinearLayout
        android:orientation="horizontal"
        android:minWidth="25px"
        android:minHeight="25px"
        android:layout_width="match_parent"
        android:layout_height="wrap_content"
        android:id="@+id/linearLayout1"
        android:layout_weight=".2"
        android:gravity="center">
        <Button
            android:text="創建數據庫"
            android:layout_width="wrap_content"
            android:layout_height="wrap_content"
            android:id="@+id/btnCreateDB" />
        <Button
            android:text="添加單行"
            android:layout_width="wrap_content"
            android:layout_height="wrap_content"
            android:id="@+id/btnCreateSingle" />
        <Button
            android:text="添加多行"
            android:layout_width="wrap_content"
            android:layout_height="wrap_content"
            android:id="@+id/btnCreateList" />
    </LinearLayout>
    <LinearLayout
        android:orientation="vertical"
        android:minWidth="25px"
        android:minHeight="25px"
        android:layout_width="match_parent"
        android:layout_height="wrap_content"
        android:id="@+id/linearLayout2"
        android:layout_weight="0.6"
        android:layout_marginLeft="5dp"
        android:layout_marginRight="5dp">
        <TextView
            android:text="結果"
            android:textAppearance="?android:attr/textAppearanceMedium"
            android:layout_width="match_parent"
            android:layout_height="wrap_content"
            android:id="@+id/textView1"
            android:textColor="#fff" />
        <TextView
            android:layout_width="match_parent"
            android:layout_height="wrap_content"
            android:id="@+id/txtResults"
            android:layout_marginTop="5dp" />
    </LinearLayout>
    <LinearLayout
        android:orientation="horizontal"
        android:minWidth="25px"
        android:minHeight="25px"
        android:layout_width="match_parent"
        android:layout_height="wrap_content"
        android:id="@+id/linearLayout3"
        android:layout_weight="0.2" />
</LinearLayout>
4、添加ch1304MainActivity.cs文件
using System;
using System.Collections.Generic;
using Android.App;
using Android.OS;
using Android.Widget;
using MyDemos.SrcDemos.MyDb4Model;
using SQLite.Net;
using System.Threading.Tasks;

namespace MyDemos.SrcDemos
{
    [Activity(Label = "【例13-4】SQLite基本用法4")]
    public class ch1304MainActivity : Activity
    {
        protected override void OnCreate(Bundle savedInstanceState)
        {
            base.OnCreate(savedInstanceState);
            SetContentView(Resource.Layout.ch1304_Main);

            var btnCreate = FindViewById<Button>(Resource.Id.btnCreateDB);
            var btnSingle = FindViewById<Button>(Resource.Id.btnCreateSingle);
            var btnList = FindViewById<Button>(Resource.Id.btnCreateList);
            var txtResult = FindViewById<TextView>(Resource.Id.txtResults);

            // 數據庫創建之前禁用相關按鈕
            btnSingle.Enabled = btnList.Enabled = false;

            btnCreate.Click += async delegate
            {
                try
                {
                    var conn = MyDb4.GetAsyncConnection();
                    await conn.CreateTableAsync<Student>();
                    await conn.DeleteAllAsync<Student>();
                    txtResult.Text = "創建成功。";
                    btnList.Enabled = btnSingle.Enabled = true;
                }
                catch (SQLiteException ex)
                {
                    txtResult.Text = "創建失敗:" + ex.Message;
                }
            };

            btnSingle.Click += async delegate
            {
                var student = new Student { XueHao = "01001", Name = "張三", BirthDate = new DateTime(1995, 4, 7) };
                try
                {
                    var conn = MyDb4.GetAsyncConnection();
                    int x = await conn.InsertAsync(student);
                    await conn.UpdateAsync(student);
                    txtResult.Text = $"添加了 {x} 條記錄。\n";
                    txtResult.Text += await GetStudents();
                }
                catch (SQLiteException ex)
                {
                    txtResult.Text = "Error:" + ex.Message;
                }
            };

            btnList.Click += async delegate
            {
                var list = new List<Student>{
                    new Student { XueHao="01002", Name = "李四", BirthDate = new DateTime(1995,4,8) },
                    new Student { XueHao="01003", Name = "王五", BirthDate = new DateTime(1995,4,9) },
                    new Student { XueHao="01004", Name = "趙六", BirthDate = new DateTime(1995,4,10) }
                };
                try
                {
                    var conn = MyDb4.GetAsyncConnection();
                    int x = await conn.InsertAllAsync(list);
                    await conn.UpdateAllAsync(list);
                    txtResult.Text = $"添加了 {x} 條記錄。\n";
                    txtResult.Text += await GetStudents();
                }
                catch (SQLiteException ex)
                {
                    txtResult.Text = "Error:" + ex.Message;
                }
            };
        }

        private static async Task<string> GetStudents()
        {
            var conn = MyDb4.GetAsyncConnection();
            int count = await conn.Table<Student>().CountAsync();
            string s = $"當前記錄數:{count}\n";
            var data = await conn.Table<Student>().ToListAsync();
            foreach (var v in data)
            {
                s += v.ToString();
            }
            return s;
        }
    }
}
 QQ好友列表向左滑動出現置頂、刪除--第三方開源--SwipeMenuListView,swipemenulistview
QQ好友列表向左滑動出現置頂、刪除--第三方開源--SwipeMenuListView,swipemenulistview SwipeMenuListView是在gith
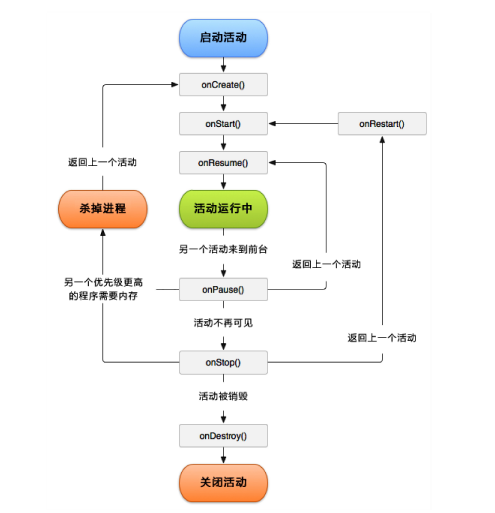 Android生命周期,activity生命周期
Android生命周期,activity生命周期 Activity主要有以下七個回調方法: 1、onCreate() 在Activity第一次創建時調用。 2、onSta
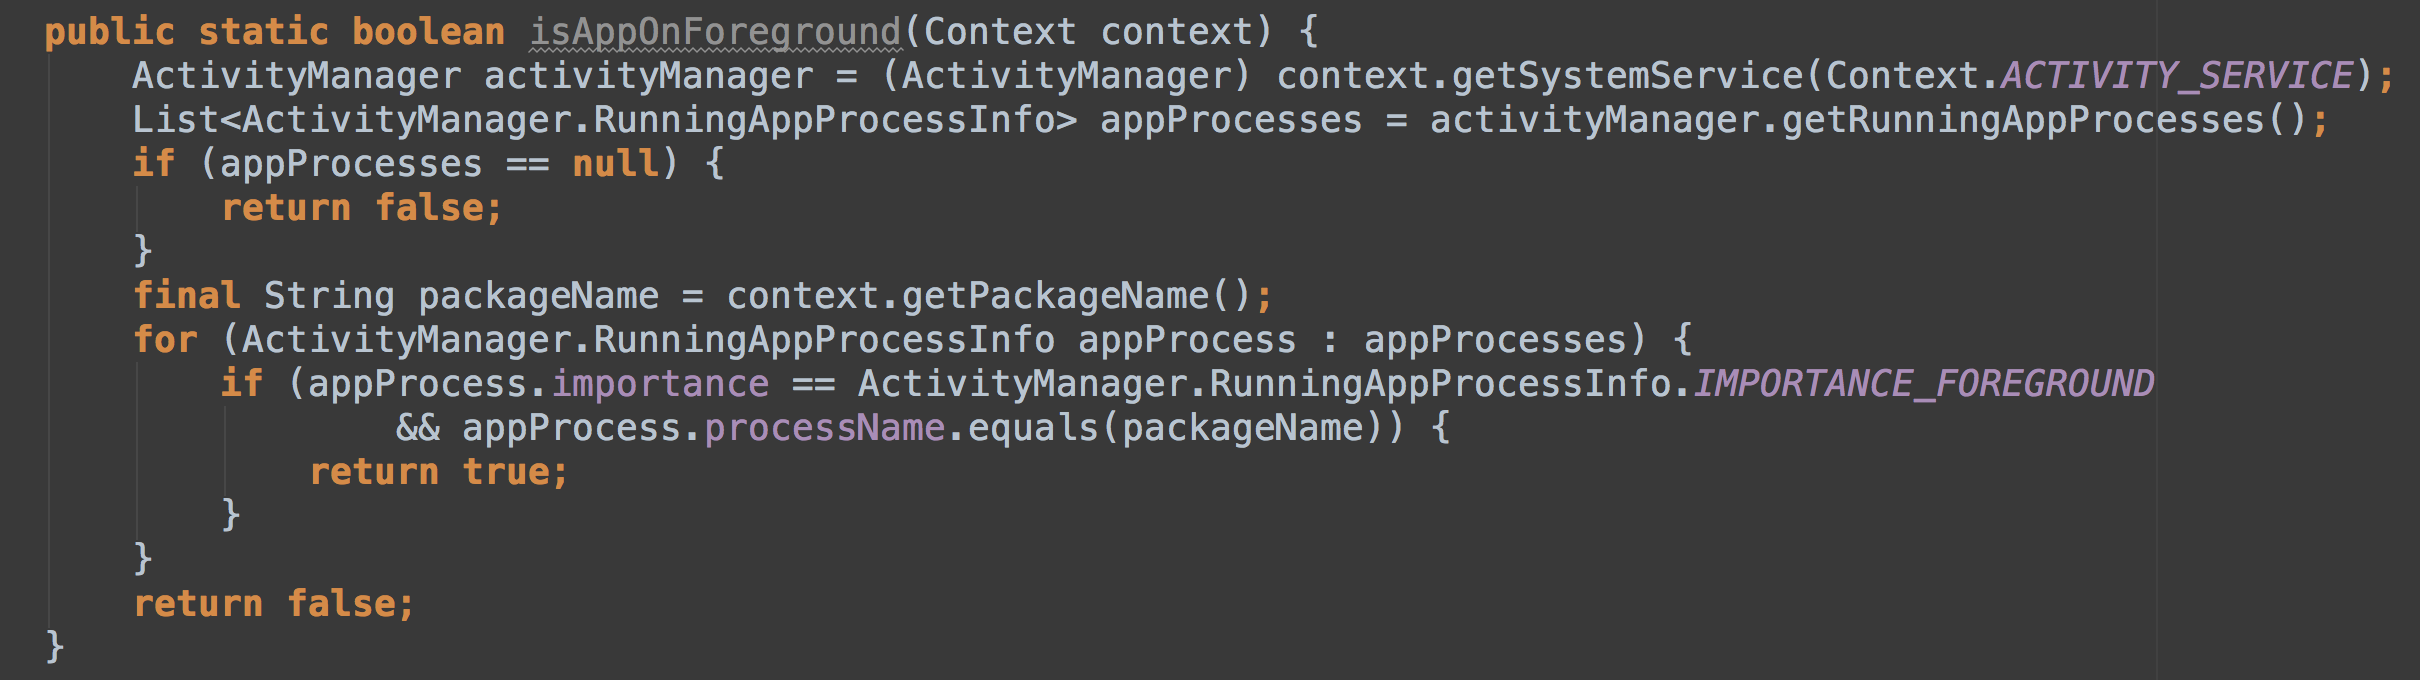 判斷App是否在後台運行,判斷App後台運行
判斷App是否在後台運行,判斷App後台運行 在一些場景中,經常會需要判斷App是否在後台運行,比如是否顯示解鎖界面,收到新消息是否顯示Notificatio
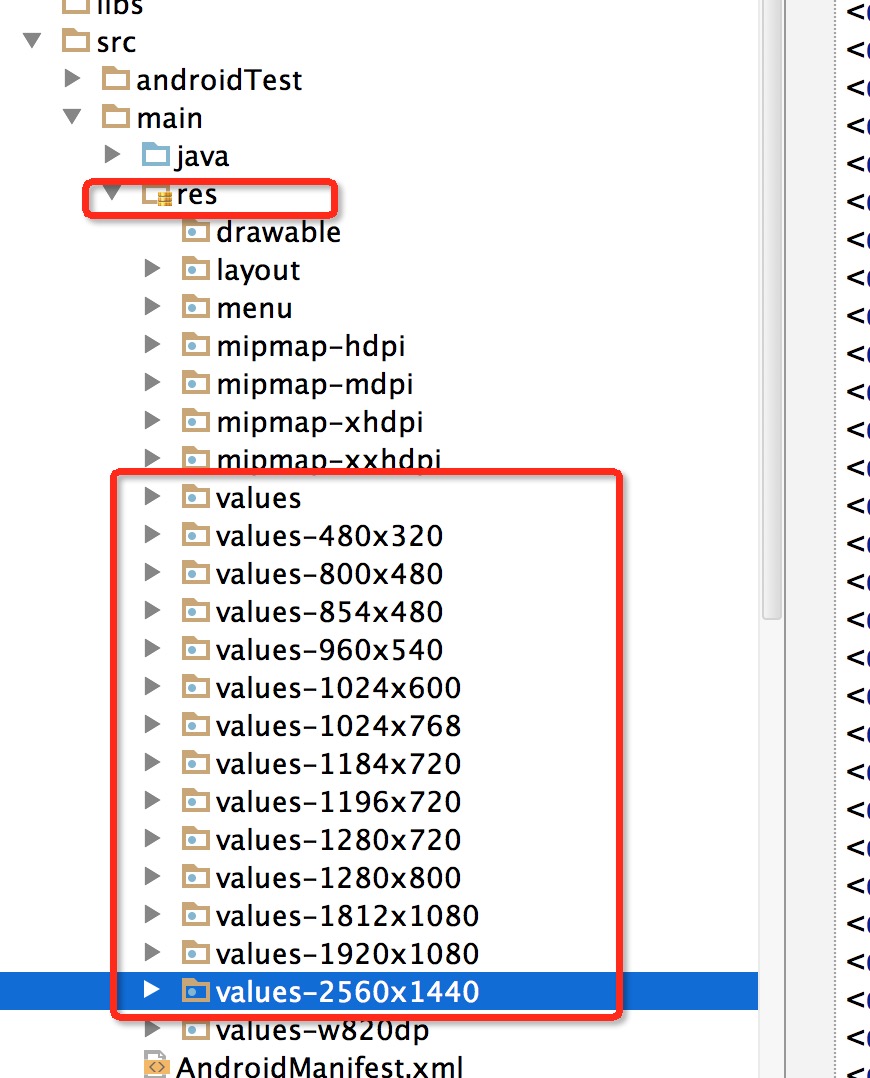 Android屏幕適配方案
Android屏幕適配方案 1、概述 大家在Android開發時,肯定會覺得屏幕適配是個尤其痛苦的事,各種屏幕尺寸適配起來蛋疼無比。如果我們換個角度我們看下這個問題,不知