編輯:Android開發實例
本文實例講述了Android編程實現二級下拉菜單及快速搜索的方法。分享給大家供大家參考,具體如下:
一、我們要做什麼?
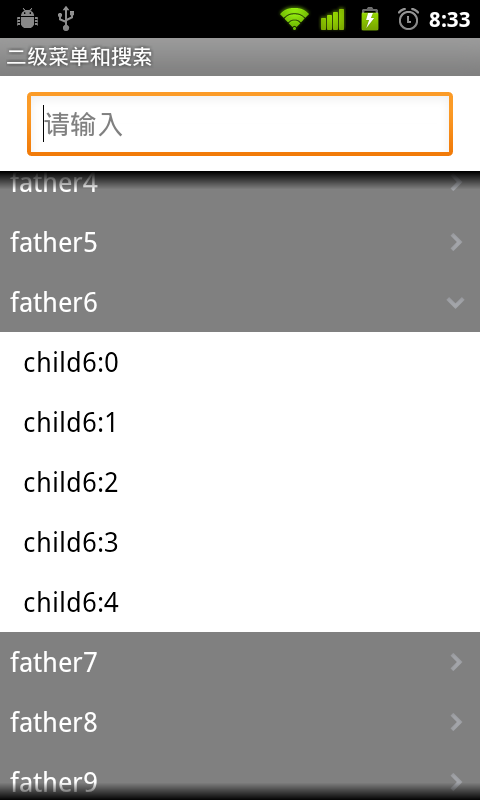
上面有個搜索框,下面是一個二級下拉菜單。
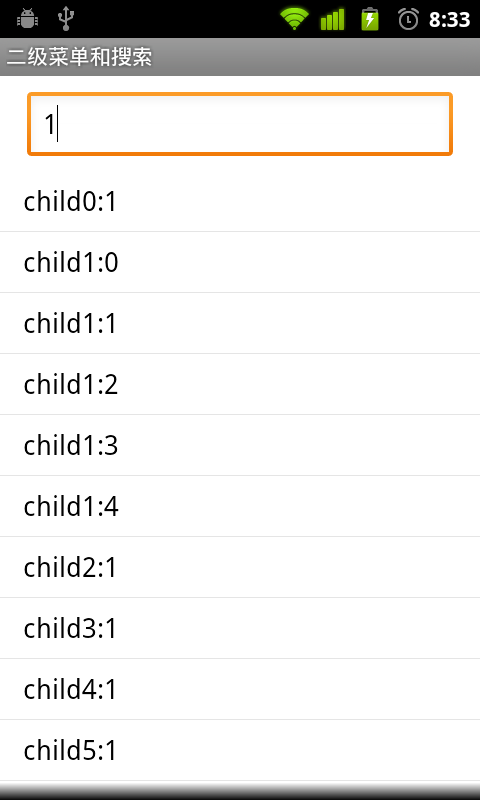
輸入查詢內容,下面列表將顯示查詢結果。
二、界面設計
(1)這是主框架(部分屬性已經省去,請看源碼),從上至下分別是文本框,列表,二級列表。
<?xml version="1.0" encoding="utf-8"?>
<LinearLayout>
 <LinearLayout
  android:id="@+id/city_middle">
  <EditText
   android:id="@+id/txtfind"
   android:hint="請輸入" >
  </EditText>
  <ListView
   android:id="@+id/listfind" >
  </ListView>
  <ExpandableListView
   android:id="@+id/exList" />
 </LinearLayout>
</LinearLayout>
(2)一級菜單欄樣式,圖片將區別是否展開
<?xml version="1.0" encoding="utf-8"?>
<LinearLayout >
 <TextView
  android:id="@+id/group" >
 </TextView>
 <ImageView
  android:id="@+id/tubiao">
 </ImageView>
</LinearLayout>
(3)二級菜單欄樣式
<?xml version="1.0" encoding="utf-8"?>
<LinearLayout >
 <TextView
  android:id="@+id/child">
 </TextView>
</LinearLayout>
三、代碼設計
(1) 定義菜單對應數據
public static List<BasicNameValuePair> fatherList = new ArrayList<BasicNameValuePair>();
public static List<List<BasicNameValuePair>> childList = new ArrayList<List<BasicNameValuePair>>();
生成測試數據
for (int i = 0; i < 20; i++) {
 fatherList.add(new BasicNameValuePair("father" + i, "father" + i));
 List<BasicNameValuePair> cList = new ArrayList<BasicNameValuePair>();
 for (int j = 0; j < 5; j++) {
  cList.add(new BasicNameValuePair("child" + i + ":" + j, "child"
    + i + ":" + j));
 }
 childList.add(cList);
}
(2)定義列表適配器
protected class ListAdapter extends BaseAdapter {
  private LayoutInflater mInflater;
  //查詢結果列表
  private List<BasicNameValuePair> list = new ArrayList<BasicNameValuePair>();
  public ListAdapter(Context context, String strin) {
   mInflater = LayoutInflater.from(context);
   //查詢匹配
   for (int i = 0; i < childList.size(); i++) {
    for (int j = 0; j < childList.get(i).size(); j++) {
     String tmp = childList.get(i).get(j).getValue();
     if (tmp.indexOf(strin) >= 0) {
      list.add(new BasicNameValuePair(childList.get(i).get(j)
        .getName(), tmp));
     }
    }
   }
  }
  public int getCount() {
   return list.size();
  }
  public Object getItem(int position) {
   return position;
  }
  public long getItemId(int position) {
   return position;
  }
  public View getView(final int position, View convertView,
    ViewGroup parent) {
   convertView = mInflater.inflate(R.layout.child, null);
   TextView title = (TextView) convertView.findViewById(R.id.child);
   title.setText(list.get(position).getValue());
   return convertView;
  }
 }
初始化列表,默認為隱藏
list = (ListView) findViewById(R.id.listfind);
list.setVisibility(View.GONE);
(3)定義二級列表適配器
protected class ExAdapter extends BaseExpandableListAdapter {
  @Override
  public int getGroupCount() {
   return fatherList.size();
  }
  @Override
  public int getChildrenCount(int groupPosition) {
   return childList.get(groupPosition).size();
  }
  @Override
  public Object getGroup(int groupPosition) {
   return fatherList.get(groupPosition).getValue();
  }
  @Override
  public Object getChild(int groupPosition, int childPosition) {
   return childList.get(groupPosition).get(childPosition).getValue();
  }
  @Override
  public long getGroupId(int groupPosition) {
   return groupPosition;
  }
  @Override
  public long getChildId(int groupPosition, int childPosition) {
   return childPosition;
  }
  @Override
  public View getGroupView(int groupPosition, boolean isExpanded,
    View convertView, ViewGroup parent) {
   View view = convertView;
   if (view == null) {
    LayoutInflater inflater = (LayoutInflater) getSystemService(Context.LAYOUT_INFLATER_SERVICE);
    view = inflater.inflate(R.layout.group, null);
   }
   TextView t = (TextView) view.findViewById(R.id.group);
   t.setText(fatherList.get(groupPosition).getValue());
   //展開,改變圖片
   ImageView gImg = (ImageView) view.findViewById(R.id.tubiao);
   if (isExpanded)
    gImg.setBackgroundResource(R.drawable.mm_submenu_down_normal);
   else
    gImg.setBackgroundResource(R.drawable.mm_submenu_normal);
   return view;
  }
  @Override
  public View getChildView(int groupPosition, int childPosition,
    boolean isLastChild, View convertView, ViewGroup parent) {
   View view = convertView;
   if (view == null) {
    LayoutInflater inflater = (LayoutInflater) getSystemService(Context.LAYOUT_INFLATER_SERVICE);
    view = inflater.inflate(R.layout.child, null);
   }
   TextView t = (TextView) view.findViewById(R.id.child);
   t.setText(childList.get(groupPosition).get(childPosition)
     .getValue());
   return view;
  }
  @Override
  public boolean hasStableIds() {
   return true;
  }
  @Override
  public boolean isChildSelectable(int groupPosition, int childPosition) {
   return true;
  }
}
初始化二級菜單
exList = (ExpandableListView) findViewById(R.id.exList);
exList.setAdapter(new ExAdapter());
exList.setGroupIndicator(null);
exList.setDivider(null);
(4)搜索事件,輸入改變即觸發
txtFind = (EditText) findViewById(R.id.txtfind);
txtFind.addTextChangedListener(new TextWatcher() {
 @Override
 public void beforeTextChanged(CharSequence s, int start, int count,
   int after) {
 }
 @Override
 public void onTextChanged(CharSequence s, int start, int before,
   int count) {
 }
 @Override
 public void afterTextChanged(Editable s) {
  if (s != null && !s.toString().equals("")) {
   list.setAdapter(new ListAdapter(DWinterDemoActivity.this, s
     .toString()));
   list.setVisibility(View.VISIBLE);
   exList.setVisibility(View.GONE);
  } else {
   list.setVisibility(View.GONE);
   exList.setVisibility(View.VISIBLE);
  }
 }
});
(5)去除焦點自動彈出輸入
getWindow().setSoftInputMode(
WindowManager.LayoutParams.SOFT_INPUT_STATE_ALWAYS_HIDDEN);
希望本文所述對大家Android程序設計有所幫助。
 Java4Android開發教程(四)java的變量
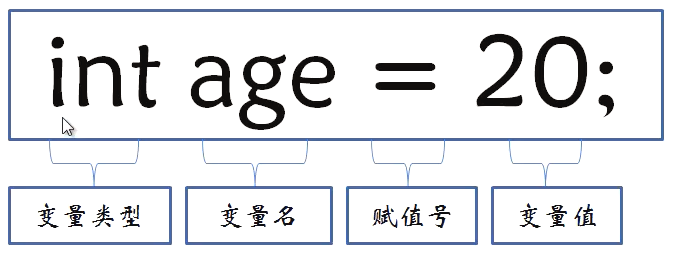
什麼是變量? 在計算機中用來存儲信息,通過聲明語句來指明存儲位置和所需空間。 變量的聲明方法及賦值 分號:語句結束標志 賦值號:將=右邊的值賦給左邊的變量 變量
 Android文件選擇器的實例分享
本文給大家講解下Android文件選擇器的使用。實際上就是獲取用戶在SD卡中選擇的文件或文件夾的路
 代碼分析Android實現側滑菜單
Android 側滑菜單的實現,參考網上的代碼,實現側滑菜單。最重要的是這個動畫類UgcAnimations,如何使用動畫類來側滑的封裝FlipperLayout
 Android實現自定義滑動式抽屜效果菜單
在Andoird使用Android自帶的那些組件,像SlidingDrawer和DrawerLayout都是抽屜效果的菜單,但是在項目很多要實現的功能都收到And