編輯:Android開發實例
本文實例講述了Android中數據庫常見操作。分享給大家供大家參考,具體如下:
android中數據庫操作是非常常見了,我們會經常用到,操作的方法也有很多種形式,這裡我就把最常見的兩種形式記錄下來了,以備以後用到方便查看。我就不寫注釋和解釋了,因為android數據庫的操作和其它數據庫操作本質上都是一樣的,大同小異。需要的一些基本解釋都在代碼中,直接上代碼了。
簡單的代碼文件目錄:
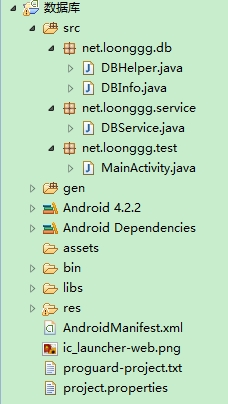
首先這個類是數據庫幫助類,DBHelper.java,代碼如下:
package net.loonggg.db;
import android.content.Context;
import android.database.sqlite.SQLiteDatabase;
import android.database.sqlite.SQLiteOpenHelper;
/**
 * 數據庫幫助類,繼承android自帶的SQLiteOpenHelper 主要用於數據庫的創建與更新
 *
 * @author loonggg
 *
 */
public class DBHelper extends SQLiteOpenHelper {
 public DBHelper(Context context) {
  super(context, DBInfo.DB.DB_NAME, null, DBInfo.DB.DB_VERSION);
 }
 @Override
 public void onCreate(SQLiteDatabase db) {
  db.execSQL(DBInfo.Table.USER_INFO_CREATE);
 }
 @Override
 public void onUpgrade(SQLiteDatabase db, int oldVersion, int newVersion) {
  db.execSQL(DBInfo.Table.USER_INFO_DROP);
  onCreate(db);
 }
}
其次是數據庫信息類,DBInfo.java,代碼如下:
package net.loonggg.db;
/**
 * 數據庫信息類,主要是保存一些數據庫的版本,名字,及數據庫表的創建語句和表的信息等,通過這個類記錄,方便操作
 *
 * @author loonggg
 *
 */
public class DBInfo {
 /**
  * 數據庫信息
  *
  * @author loonggg
  *
  */
 public static class DB {
  // 數據庫名稱
  public static final String DB_NAME = "test.db";
  // 數據庫的版本號
  public static final int DB_VERSION = 1;
 }
 /**
  * 數據庫表的信息
  *
  * @author loonggg
  *
  */
 public static class Table {
  public static final String USER_INFO_TB_NAME = "user_table";
  public static final String USER_INFO_CREATE = "CREATE TABLE IF NOT EXISTS "
    + USER_INFO_TB_NAME
    + " ( _id INTEGER PRIMARY KEY,userId text,userName text)";
  public static final String USER_INFO_DROP = "DROP TABLE"
    + USER_INFO_TB_NAME;
 }
}
再次是數據庫操作類,DBService.java,代碼如下:
package net.loonggg.service;
import java.util.ArrayList;
import java.util.HashMap;
import java.util.List;
import net.loonggg.db.DBHelper;
import net.loonggg.db.DBInfo.Table;
import android.content.ContentValues;
import android.content.Context;
import android.database.Cursor;
import android.database.sqlite.SQLiteDatabase;
/**
 * 數據庫操作類,這個類主要的功能是:存放數據庫操作的一些方法 這裡有一些例子:包含數據庫的增刪改查,分別有兩種方法的操作,各有優缺點,都在解釋中
 *
 * @author loonggg
 *
 */
public class DBService {
 private DBHelper dbHelper = null;
 public DBService(Context context) {
  dbHelper = new DBHelper(context);
 }
 /**
  * 添加一條記錄到數據庫
  *
  * @param id
  * @param name
  */
 public void add(String id, String name) {
  SQLiteDatabase db = dbHelper.getWritableDatabase();
  // 不好之處:無返回值,無法判斷是否插入成功
  db.execSQL("insert into user_table (userId,userName) values (?,?)",
    new Object[] { id, name });
  db.close();
 }
 public long addAndroid(String id, String name) {
  SQLiteDatabase db = dbHelper.getWritableDatabase();
  ContentValues values = new ContentValues();
  values.put("userId", id);
  values.put("userName", name);
  // 好處:有返回值
  long result = db.insert(Table.USER_INFO_TB_NAME, null, values);// 返回值是插入的是第幾行,大於0代表添加成功
  db.close();
  return result;
 }
 /**
  * 查詢某條記錄是否存在
  *
  * @param name
  * @return
  */
 public boolean find(String name) {
  SQLiteDatabase db = dbHelper.getReadableDatabase();
  Cursor cursor = db.rawQuery(
    "select * from user_table where userName = ?",
    new String[] { name });
  boolean result = cursor.moveToNext();
  db.close();
  return result;
 }
 public boolean findAndroid(String name) {
  SQLiteDatabase db = dbHelper.getReadableDatabase();
  Cursor cursor = db.query(Table.USER_INFO_TB_NAME, null, "userName = ?",
    new String[] { name }, null, null, null);
  boolean result = cursor.moveToNext();// true代表查找到了
  db.close();
  return result;
 }
 /**
  * 修改一條記錄
  *
  * @param id
  * @param name
  */
 public void update(String id, String name) {
  SQLiteDatabase db = dbHelper.getWritableDatabase();
  // 缺點無返回值
  db.execSQL("update user_table set userName = ? where userId = ?",
    new Object[] { name, id });
  db.close();
 }
 public int updateAndroid(String id, String name) {
  SQLiteDatabase db = dbHelper.getWritableDatabase();
  ContentValues values = new ContentValues();
  values.put("userName", name);
  // 返回值大於0代表修改更新成功
  int result = db.update(Table.USER_INFO_TB_NAME, values, "userId = ?",
    new String[] { id });
  db.close();
  return result;
 }
 /**
  * 刪除一條記錄
  *
  * @param name
  */
 public void delete(String name) {
  SQLiteDatabase db = dbHelper.getWritableDatabase();
  db.execSQL("delete from user_table where userName = ?",
    new String[] { name });
  db.close();
 }
 public int deleteAndroid(String name) {
  SQLiteDatabase db = dbHelper.getWritableDatabase();
  int result = db.delete(Table.USER_INFO_TB_NAME, "userName = ?",
    new String[] { name });// 返回值為受影響的行數,大於0代表成功
  db.close();
  return result;
 }
 /**
  * 返回所有的數據庫信息
  *
  * @return
  */
 public List<HashMap<String, String>> findAll() {
  List<HashMap<String, String>> list = null;
  SQLiteDatabase db = dbHelper.getReadableDatabase();
  Cursor cursor = db.rawQuery("select * from user_table", null);
  if (cursor.getCount() > 0) {
   list = new ArrayList<HashMap<String, String>>();
   while (cursor.moveToNext()) {
    String id = cursor.getString(cursor.getColumnIndex("userId"));
    String name = cursor.getString(cursor
      .getColumnIndex("userName"));
    HashMap<String, String> map = new HashMap<String, String>();
    map.put("id", id);
    map.put("name", name);
    list.add(map);
   }
  }
  cursor.close();
  db.close();
  return list;
 }
 public List<HashMap<String, String>> findAllAndroid() {
  List<HashMap<String, String>> list = null;
  SQLiteDatabase db = dbHelper.getReadableDatabase();
  Cursor cursor = db.query(Table.USER_INFO_TB_NAME, new String[] {
    "userId", "userName" }, null, null, null, null, null);
  if (cursor.getCount() > 0) {
   list = new ArrayList<HashMap<String, String>>();
   while (cursor.moveToNext()) {
    String id = cursor.getString(cursor.getColumnIndex("userId"));
    String name = cursor.getString(cursor
      .getColumnIndex("userName"));
    HashMap<String, String> map = new HashMap<String, String>();
    map.put("id", id);
    map.put("name", name);
    list.add(map);
   }
  }
  cursor.close();
  db.close();
  return list;
 }
}
最後是MainActivity,簡單的調用了一下,這些操作,代碼如下:
package net.loonggg.test;
import net.loonggg.service.DBService;
import android.app.Activity;
import android.os.Bundle;
import android.view.View;
import android.widget.Button;
public class MainActivity extends Activity {
 private Button queryOne;
 private Button insert;
 private Button update;
 private Button delete;
 private Button findAll;
 private DBService service;
 @Override
 protected void onCreate(Bundle savedInstanceState) {
  super.onCreate(savedInstanceState);
  setContentView(R.layout.activity_main);
  queryOne = (Button) findViewById(R.id.queryOne);
  insert = (Button) findViewById(R.id.insert);
  update = (Button) findViewById(R.id.update);
  delete = (Button) findViewById(R.id.delete);
  findAll = (Button) findViewById(R.id.findAll);
  queryOne.setOnClickListener(new ButtonListener());
  insert.setOnClickListener(new ButtonListener());
  update.setOnClickListener(new ButtonListener());
  delete.setOnClickListener(new ButtonListener());
  findAll.setOnClickListener(new ButtonListener());
  service = new DBService(this);
 }
 class ButtonListener implements View.OnClickListener {
  @Override
  public void onClick(View v) {
   switch (v.getId()) {
   case R.id.queryOne:
    // service.find("loonggg");
    service.findAndroid("loonggg");
    break;
   case R.id.insert:
    // service.add("1", "loonggg");
    service.addAndroid("2", "heihei");
    break;
   case R.id.update:
    // service.update("1", "timmy");
    service.updateAndroid("1", "haha");
    break;
   case R.id.delete:
    // service.delete("timmy");
    service.deleteAndroid("heihei");
    break;
   case R.id.findAll:
    // service.findAll();
    service.findAllAndroid();
    break;
   default:
    break;
   }
  }
 }
}
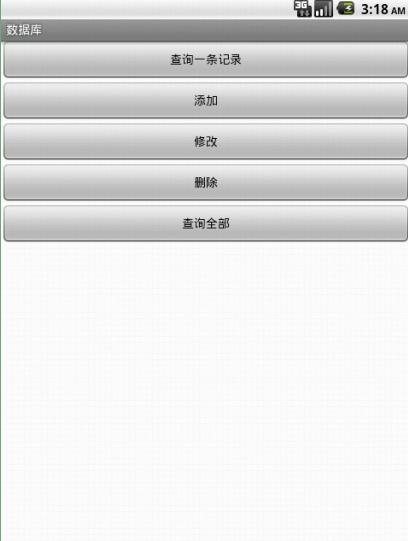
還有MainActivity對應的布局文件,activity_main.xml:
<LinearLayout xmlns:android="http://schemas.android.com/apk/res/android"
 xmlns:tools="http://schemas.android.com/tools"
 android:layout_width="match_parent"
 android:layout_height="match_parent"
 android:orientation="vertical" >
 <Button
  android:id="@+id/queryOne"
  android:layout_width="fill_parent"
  android:layout_height="wrap_content"
  android:text="查詢一條記錄" />
 <Button
  android:id="@+id/insert"
  android:layout_width="fill_parent"
  android:layout_height="wrap_content"
  android:text="添加" />
 <Button
  android:id="@+id/update"
  android:layout_width="fill_parent"
  android:layout_height="wrap_content"
  android:text="修改" />
 <Button
  android:id="@+id/delete"
  android:layout_width="fill_parent"
  android:layout_height="wrap_content"
  android:text="刪除" />
 <Button
  android:id="@+id/findAll"
  android:layout_width="fill_parent"
  android:layout_height="wrap_content"
  android:text="查詢全部" />
</LinearLayout>
到這裡就介紹完了,這些代碼並不高深,之所以記錄下來,是留著以後用到的時候方便查看,當然這個代碼對於初學者,還是非常有幫助的。
希望本文所述對大家Android程序設計有所幫助。
 android編程之XML文件解析方法詳解(附源碼)
本文實例講述了android編程之XML文件解析方法。分享給大家供大家參考,具體如下: 在android開發中,經常用到去解析xml文件,常見的解析xml的方式有
 Android登錄實例
登錄應用程序的屏幕,詢問憑據登錄到一些特定的應用。可能需要登錄到Facebook,微博等本章介紹了,如何創建一個登錄界面,以及如何管理安全問題和錯誤嘗試。首先,必須定義兩
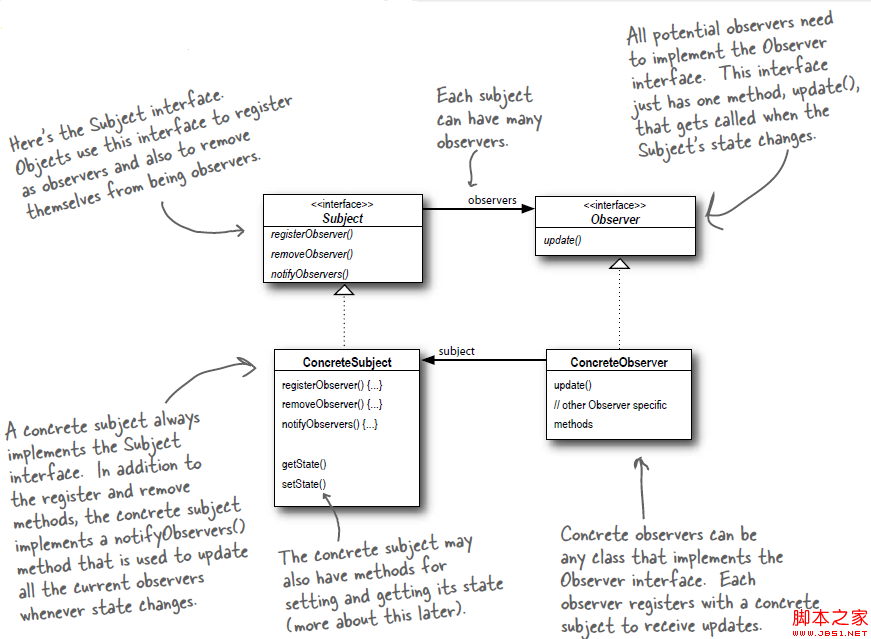 Android源碼學習之觀察者模式應用及優點介紹
觀察者模式定義: Define a one-to-many dependency between objects so that when one object
 基於Android設計模式之
策略模式其實特別簡單(聽到這句話,大家是不是心裡一下子放松了?)。比如排序,官方告訴大家我這裡有一個排序的接口ISort的sort()方法,然後民間各盡其能,實現