編輯:Android開發實例
本文實例講述了Android編程防止進程被第三方軟件殺死的方法。分享給大家供大家參考,具體如下:
項目測試的時候發現,按home鍵回到桌面,再用360清理內存,軟件被結束,再次進入的時候報錯,看了下log,以為是有的地方沒有控制好,但是又不知道360結束的是什麼(這個現在還沒弄明白)。使用小米系統的進程管理優化內存就不報錯。
後來想到用Service防止軟件被kill掉,查了下資料,發現google 管方就有,ForegroundService 前台服務,讓服務一直以前台任務的方式運行,可以在service 的oncreate來實現前台服務, 通過這個方法必須發送一個通知欄,讓用戶知道服務在運行。
Notification notification = new Notification(R.drawable.icon, "服務開啟", System.currentTimeMillis());
notification.flags|= Notification.FLAG_NO_CLEAR;
notification.flags=Notification.FLAG_ONGOING_EVENT;
Intent notificationIntent = new Intent(this, MainActivity.class);
PendingIntent pendingIntent = PendingIntent.getActivity(this, 0, notificationIntent, 0);
notification.setLatestEventInfo(this, "service", "防止服務被任務管理器所殺", pendingIntent);
startForeground(ONGOING_NOTIFICATION, notification);
這樣就能保持service 運行,可是通知欄不能清除 ,一清除就會被kill。
後來一次 做自定義Notification的時候,通知欄沒有顯示通知,查看後發現 service 也沒被kill 。所以就進一步去研究了下 最後發現 只用兩行代碼就能保持服務不會被kill,並且不會有通知欄通知代碼如下:
Notification notification = new Notification();
startForeground(1, notification);
完整代碼如下:
public class TestService extends Service {
 private static final Class[] mStartForegroundSignature = new Class[] {
   int.class, Notification.class };
 private static final Class[] mStopForegroundSignature = new Class[] { boolean.class };
 private NotificationManager mNM;
 private Method mStartForeground;
 private Method mStopForeground;
 private Object[] mStartForegroundArgs = new Object[2];
 private Object[] mStopForegroundArgs = new Object[1];
 @Override
 public IBinder onBind(Intent intent) {
  return null;
 }
 @Override
 public void onCreate() {
  super.onCreate();
  mNM = (NotificationManager) getSystemService(Context.NOTIFICATION_SERVICE);
  try {
   mStartForeground = TestService.class.getMethod("startForeground",
     mStartForegroundSignature);
   mStopForeground = TestService.class.getMethod("stopForeground",
     mStopForegroundSignature);
  } catch (NoSuchMethodException e) {
   mStartForeground = mStopForeground = null;
  }
  // 我們並不需要為 notification.flags 設置 FLAG_ONGOING_EVENT,因為
  // 前台服務的 notification.flags 總是默認包含了那個標志位
  Notification notification =new Notification();
  // 注意使用 startForeground ,id 為 0 將不會顯示 notification
  startForegroundCompat(1, notification);
 }
 @Override
 public void onDestroy() {
  super.onDestroy();
  stopForegroundCompat(1);
 }
 // 以兼容性方式開始前台服務
 private void startForegroundCompat(int id, Notification n) {
  if (mStartForeground != null) {
   mStartForegroundArgs[0] = id;
   mStartForegroundArgs[1] = n;
   try {
    mStartForeground.invoke(this, mStartForegroundArgs);
   } catch (IllegalArgumentException e) {
    e.printStackTrace();
   } catch (IllegalAccessException e) {
    e.printStackTrace();
   } catch (InvocationTargetException e) {
    e.printStackTrace();
   }
   return;
  }
  mNM.notify(id, n);
 }
 // 以兼容性方式停止前台服務
 private void stopForegroundCompat(int id) {
  if (mStopForeground != null) {
   mStopForegroundArgs[0] = Boolean.TRUE;
   try {
    mStopForeground.invoke(this, mStopForegroundArgs);
   } catch (IllegalArgumentException e) {
    e.printStackTrace();
   } catch (IllegalAccessException e) {
    e.printStackTrace();
   } catch (InvocationTargetException e) {
    e.printStackTrace();
   }
   return;
  }
  // 在 setForeground 之前調用 cancel,因為我們有可能在取消前台服務之後
  // 的那一瞬間被kill掉。這個時候 notification 便永遠不會從通知一欄移除
  mNM.cancel(id);
 }
}
經測試,360手機助手,騰訊手機管家都不能kill這個service,但是手動結束後,再次打開發現音頻還在播放(跟音頻有關的客戶端),感覺有點小別扭
希望本文所述對大家Android程序設計有所幫助。
 Android ApiDemo示例解讀系列之八:App
我們在前面介紹過Hello world示例,這裡的Hello world 的Layout定義稍有不
 Android編程實現ImageView圖片拋物線動畫效果的方法
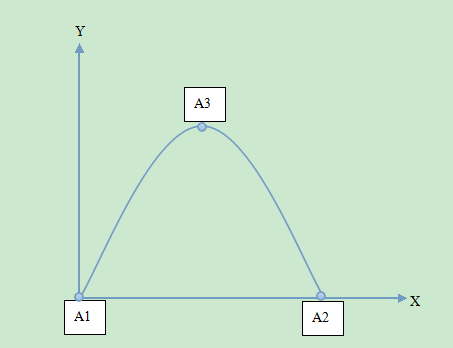
本文實例講述了Android編程實現ImageView圖片拋物線動畫效果的方法。分享給大家供大家參考,具體如下: 想實現拋物線動畫,必須知道拋物線的方程,這時候數
 Android使用ImageView 制作透明圓弧實例代碼
這幾天因為項目需求,需要在ImageView上面疊加一層透明圓弧,並且在沿著圓弧的方向顯示相應的文字,效果如下圖所示: 拿到這個需求,首先想到的是自定義
 Android開發四大組件之實現電話攔截和電話錄音
一、問題描述 使用BordercastReceiver和Service組件實現下述功能: 1.當手機處於來電狀態,啟動監聽服務,對來電進行監聽錄音。 2.設置