編輯:關於Android編程
一、概述
前面一篇文章Android通過AIDL實現跨進程更新UI我們學習了aidl跨進程更新ui,這種傳統方式實現跨進程更新UI是可行的,但有以下弊端:
接下來我們通過RemoteViews實現跨進程更新UI
二、實現效果圖
在同一個應用中有兩個Activity,MainActivity和Temp2Activity,這兩個Activity不在同一個進程中。

現在需要通過Temp2Activity來改變MainActivity中的視圖,即在MainActivity中添加兩個Button,也就是實現跨進程更新UI這麼一個功能。
在MainActivity裡點擊“跳轉到新進程ACTIVITY”按鈕,會啟動一個新進程的Temp2Activity,我們先點擊“綁定服務”,這樣我們就啟動了服務,再點擊“AIDL更新”按鈕,通過調用handler來實現跨進程更新UI,點擊返回,我們發現MainActivity頁面中新添加了兩個按鈕,並且按鈕還具有點擊事件。
三、核心代碼
IremoteViewsManager.aidl
裡面提供了兩個方法,一個是根據id更新TextView裡面的內容,一個是根據id添加view視圖
// IremoteViewsManager.aidl.aidl
package com.czhappy.remoteviewdemo;

interface IremoteViewsManager {
  void addRemoteView(in RemoteViews remoteViews);
}
RemoteViewsAIDLService.Java
package com.czhappy.remoteviewdemo.service;

import android.app.Service;
import android.content.Intent;
import android.os.Binder;
import android.os.Bundle;
import android.os.IBinder;
import android.os.Message;
import android.os.RemoteException;
import android.widget.RemoteViews;

import com.czhappy.remoteviewdemo.IremoteViewsManager;
import com.czhappy.remoteviewdemo.activity.MainActivity;

/**
 * Description:
 * User: chenzheng
 * Date: 2017/2/10 0010
 * Time: 10:56
 */
public class RemoteViewsAIDLService extends Service {
  private static final String TAG = "RemoteViewsAIDLService";

  private Binder remoteViewsBinder = new IremoteViewsManager.Stub(){
    @Override
    public void addRemoteView(RemoteViews remoteViews) throws RemoteException {
      Message message = new Message();
      message.what = 1;
      Bundle bundle = new Bundle();
      bundle.putParcelable("remoteViews",remoteViews);
      message.setData(bundle);
      new MainActivity.MyHandler(RemoteViewsAIDLService.this,getMainLooper()).sendMessage(message);
    }
  };

  public RemoteViewsAIDLService() {

  }

  @Override
  public IBinder onBind(Intent intent) {
    return remoteViewsBinder;
  }

}
MainActivity.java
package com.czhappy.remoteviewdemo.activity;

import android.content.Context;
import android.content.Intent;
import android.os.Bundle;
import android.os.Handler;
import android.os.Looper;
import android.os.Message;
import android.support.v7.app.AppCompatActivity;
import android.util.Log;
import android.view.LayoutInflater;
import android.view.View;
import android.widget.LinearLayout;
import android.widget.RemoteViews;
import android.widget.TextView;

import com.czhappy.remoteviewdemo.R;

import java.lang.ref.WeakReference;

public class MainActivity extends AppCompatActivity {

  private static String TAG = "MainActivity";
  private static LinearLayout mLinearLayout;

  @Override
  protected void onCreate(Bundle savedInstanceState) {
    super.onCreate(savedInstanceState);
    setContentView(R.layout.activity_main);

    mLinearLayout = (LinearLayout) this.findViewById(R.id.mylayout);
  }

  public static class MyHandler extends Handler {
    WeakReference<Context> weakReference;
    public MyHandler(Context context, Looper looper) {
      super(looper);
      weakReference = new WeakReference<>(context);
    }
    @Override
    public void handleMessage(Message msg) {
      super.handleMessage(msg);
      Log.i(TAG, "handleMessage");
      switch (msg.what) {
        case 1: //RemoteViews的AIDL實現
          RemoteViews remoteViews = msg.getData().getParcelable("remoteViews");
          if (remoteViews != null) {
            Log.i(TAG, "updateUI");

            View view = remoteViews.apply(weakReference.get(), mLinearLayout);
            mLinearLayout.addView(view);
          }
          break;
        default:
          break;
      }
    }

  };

  public void readyGo(View view){
    Intent intent = new Intent(MainActivity.this, Temp2Activity.class);
    startActivity(intent);
  }

}
Temp2Activity.java
package com.czhappy.remoteviewdemo.activity;

import android.app.PendingIntent;
import android.content.ComponentName;
import android.content.Context;
import android.content.Intent;
import android.content.ServiceConnection;
import android.os.Bundle;
import android.os.IBinder;
import android.os.RemoteException;
import android.support.annotation.Nullable;
import android.support.v7.app.AppCompatActivity;
import android.util.Log;
import android.view.View;
import android.widget.RemoteViews;

import com.czhappy.remoteviewdemo.IremoteViewsManager;
import com.czhappy.remoteviewdemo.R;
import com.czhappy.remoteviewdemo.service.RemoteViewsAIDLService;

/**
 * Description:
 * User: chenzheng
 * Date: 2017/2/9 0009
 * Time: 16:05
 */
public class Temp2Activity extends AppCompatActivity {

  private String TAG = "Temp2Activity";

  private IremoteViewsManager remoteViewsManager;
  private boolean isBind = false;


  private ServiceConnection remoteViewServiceConnection = new ServiceConnection() {
    @Override
    public void onServiceConnected(ComponentName name, IBinder service) {
      Log.i(TAG,"onServiceConnected");
      remoteViewsManager = IremoteViewsManager.Stub.asInterface(service);

    }

    @Override
    public void onServiceDisconnected(ComponentName name) {
      //回收
      remoteViewsManager = null;
    }
  };

  @Override
  protected void onCreate(@Nullable Bundle savedInstanceState) {
    super.onCreate(savedInstanceState);
    this.setContentView(R.layout.activity_temp);
  }

  /**
   * 綁定服務
   */
  public void bindService(View view) {
    Intent viewServiceIntent = new Intent(this,RemoteViewsAIDLService.class);
    isBind = bindService(viewServiceIntent,remoteViewServiceConnection, Context.BIND_AUTO_CREATE);
  }

  /**
   * 更新UI
   */
  public void UpdateUI(View view){
    RemoteViews remoteViews = new RemoteViews(Temp2Activity.this.getPackageName(),R.layout.button_layout);

    Intent intentClick = new Intent(Temp2Activity.this,FirstActivity.class);
    PendingIntent openFirstActivity = PendingIntent.getActivity(Temp2Activity.this,0,intentClick,0);
    remoteViews.setOnClickPendingIntent(R.id.firstButton,openFirstActivity);

    Intent secondClick = new Intent(Temp2Activity.this,SecondActivity.class);
    PendingIntent openSecondActivity = PendingIntent.getActivity(Temp2Activity.this,0,secondClick,0);
    remoteViews.setOnClickPendingIntent(R.id.secondButton,openSecondActivity);

    remoteViews.setCharSequence(R.id.secondButton,"setText","想改就改");
    try {
      remoteViewsManager.addRemoteView(remoteViews);
    } catch (RemoteException e) {
      e.printStackTrace();
    }
  }

  @Override
  protected void onDestroy() {
    super.onDestroy();
    if(isBind){
      unbindService(remoteViewServiceConnection);
      isBind = false;
    }

  }

}
AndroidManifest.xml
<?xml version="1.0" encoding="utf-8"?>
<manifest xmlns:android="http://schemas.android.com/apk/res/android"
  package="com.czhappy.remoteviewdemo">

  <application
    android:allowBackup="true"
    android:icon="@mipmap/ic_launcher"
    android:label="@string/app_name"
    android:supportsRtl="true"
    android:theme="@style/AppTheme">
    <activity android:name=".activity.MainActivity">
      <intent-filter>
        <action android:name="android.intent.action.MAIN" />

        <category android:name="android.intent.category.LAUNCHER" />
      </intent-filter>
    </activity>
    <activity android:name=".activity.FirstActivity" />
    <activity android:name=".activity.SecondActivity" />
    <activity
      android:name=".activity.Temp2Activity"
      android:process=":remote2" />

    <service android:name="com.czhappy.remoteviewdemo.service.RemoteViewsAIDLService" />


  </application>

</manifest>
四、總結
RemoteViews就是為跨進程更新UI而生的,內部封裝了很多方法用來實現跨進程更新UI。但這並不代表RemoteViews是就是萬能的了,它也有不足之處,目前支持的布局和View有限
layout:
FrameLayout LinearLayout RelativeLayout GridLayout
View:
AnalogClock button Chronometer ImageButton ImageView ProgressBar TextView ViewFlipper ListView GridView StackView AdapterViewFlipper ViewStub
不支持自定義View 所以具體使用RemoteViews還是aidl或者BroadCastReceiver還得看實際的需求。
以上就是本文的全部內容,希望對大家的學習有所幫助,也希望大家多多支持本站。
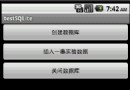 Android提高之SQLite分頁表格實現方法
繼前一篇文章講到Android上的SQLite分頁讀取,其功能只是用文本框顯示數據而已。本文就講得更加深入些,實現並封裝一個SQL分頁表格控件,不僅支持分頁還是以表格的形
 Android設計模式之一個例子讓你徹底明白工廠模式(Factory Pattern)
提出疑問這幾天研究工廠模式的時候,看到網上的一些文章中舉的例子我就很疑惑,我相信這也是許多人的疑惑:工廠模式的功能就是創建實例,我們創建實例直接new不就完了嗎,干嘛還得
 Android 自定義view仿支付寶咻一咻功能
支付寶上有一個咻一咻的功能,就是點擊圖片後四周有水波紋的這種效果,今天也寫一個類似的功能。效果如下所示:思路:就是幾個圓的半徑不斷在變大,這個可以使用動畫縮放實現,還有透
 Android學習筆記之Menu一級菜單、二級菜單的使用
(1)布局文件沒有做更改 (2)在res--menu目錄下的main.xml文件中代碼如下: