編輯:關於Android編程
本文實例講述了Android編程使用自定義View實現水波進度效果。分享給大家供大家參考,具體如下:
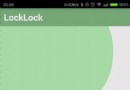
首先上效果圖:

簡介:
1.自動適應屏幕大小;
2.水波自動橫向滾動;
3.各種繪制參數可通過修改常量進行控制。
代碼不多,注釋也比較詳細,全部貼上:
(一)自定義組件:
/**
 * 水波進度效果.
 */
public class WaterWaveView extends View {
  //邊框寬度
  private int STROKE_WIDTH;
  //組件的寬,高
  private int width, height;
  /**
   * 進度條最大值和當前進度值
   */
  private float max, progress;
  /**
   * 繪制波浪的畫筆
   */
  private Paint progressPaint;
  //波紋振幅與半徑之比。(建議設置:<0.1)
  private static final float A = 0.05f;
  //繪制文字的畫筆
  private Paint textPaint;
  //繪制邊框的畫筆
  private Paint circlePaint;
  /**
   * 圓弧圓心位置
   */
  private int centerX, centerY;
  //內圓所在的矩形
  private RectF circleRectF;
  public WaterWaveView(Context context) {
    super(context);
    init();
  }
  public WaterWaveView(Context context, AttributeSet attrs) {
    super(context, attrs);
    init();
  }
  public WaterWaveView(Context context, AttributeSet attrs, int defStyleAttr) {
    super(context, attrs, defStyleAttr);
    init();
  }
  //初始化
  private void init() {
    progressPaint = new Paint();
    progressPaint.setColor(Color.parseColor("#77cccc88"));
    progressPaint.setAntiAlias(true);
    textPaint = new Paint();
    textPaint.setColor(Color.WHITE);
    textPaint.setAntiAlias(true);
    circlePaint = new Paint();
    circlePaint.setStyle(Paint.Style.STROKE);
    circlePaint.setAntiAlias(true);
    circlePaint.setColor(Color.parseColor("#33333333"));
    autoRefresh();
  }
  @Override
  protected void onMeasure(int widthMeasureSpec, int heightMeasureSpec) {
    super.onMeasure(widthMeasureSpec, heightMeasureSpec);
    if (width == 0 || height == 0) {
      width = getWidth();
      height = getHeight();
      //計算圓弧半徑和圓心點
      int circleRadius = Math.min(width, height) >> 1;
      STROKE_WIDTH = circleRadius / 10;
      circlePaint.setStrokeWidth(STROKE_WIDTH);
      centerX = width / 2;
      centerY = height / 2;
      VALID_RADIUS = circleRadius - STROKE_WIDTH;
      RADIANS_PER_X = (float) (Math.PI / VALID_RADIUS);
      circleRectF = new RectF(centerX - VALID_RADIUS, centerY - VALID_RADIUS,
          centerX + VALID_RADIUS, centerY + VALID_RADIUS);
    }
  }
  private Rect textBounds = new Rect();
  //x方向偏移量
  private int xOffset;
  @Override
  protected void onDraw(Canvas canvas) {
    super.onDraw(canvas);
    //繪制圓形邊框
    canvas.drawCircle(centerX, centerY, VALID_RADIUS + (STROKE_WIDTH >> 1), circlePaint);
    //繪制水波曲線
    canvas.drawPath(getWavePath(xOffset), progressPaint);
    //繪制文字
    textPaint.setTextSize(VALID_RADIUS >> 1);
    String text1 = String.valueOf(progress);
    //測量文字長度
    float w1 = textPaint.measureText(text1);
    //測量文字高度
    textPaint.getTextBounds("8", 0, 1, textBounds);
    float h1 = textBounds.height();
    float extraW = textPaint.measureText("8") / 3;
    canvas.drawText(text1, centerX - w1 / 2 - extraW, centerY + h1 / 2, textPaint);
    textPaint.setTextSize(VALID_RADIUS / 6);
    textPaint.getTextBounds("M", 0, 1, textBounds);
    float h2 = textBounds.height();
    canvas.drawText("M", centerX + w1 / 2 - extraW + 5, centerY - (h1 / 2 - h2), textPaint);
    String text3 = "共" + String.valueOf(max) + "M";
    float w3 = textPaint.measureText(text3, 0, text3.length());
    textPaint.getTextBounds("M", 0, 1, textBounds);
    float h3 = textBounds.height();
    canvas.drawText(text3, centerX - w3 / 2, centerY + (VALID_RADIUS >> 1) + h3 / 2, textPaint);
    String text4 = "流量剩余";
    float w4 = textPaint.measureText(text4, 0, text4.length());
    textPaint.getTextBounds(text4, 0, text4.length(), textBounds);
    float h4 = textBounds.height();
    canvas.drawText(text4, centerX - w4 / 2, centerY - (VALID_RADIUS >> 1) + h4 / 2, textPaint);
  }
  //繪制水波的路徑
  private Path wavePath;
  //每一個像素對應的弧度數
  private float RADIANS_PER_X;
  //去除邊框後的半徑(即內圓半徑)
  private int VALID_RADIUS;
  /**
   * 獲取水波曲線(包含圓弧部分)的Path.
   *
   * @param xOffset x方向像素偏移量.
   */
  private Path getWavePath(int xOffset) {
    if (wavePath == null) {
      wavePath = new Path();
    } else {
      wavePath.reset();
    }
    float[] startPoint = new float[2]; //波浪線起點
    float[] endPoint = new float[2]; //波浪線終點
    for (int i = 0; i <= VALID_RADIUS * 2; i += 2) {
      float x = centerX - VALID_RADIUS + i;
      float y = (float) (centerY + VALID_RADIUS * (1.0f + A) * 2 * (0.5f - progress / max)
          + VALID_RADIUS * A * Math.sin((xOffset + i) * RADIANS_PER_X));
      //只計算內圓內部的點,邊框上的忽略
      if (calDistance(x, y, centerX, centerY) > VALID_RADIUS) {
        if (x < centerX) {
          continue; //左邊框,繼續循環
        } else {
          break; //右邊框,結束循環
        }
      }
      //第1個點
      if (wavePath.isEmpty()) {
        startPoint[0] = x;
        startPoint[1] = y;
        wavePath.moveTo(x, y);
      } else {
        wavePath.lineTo(x, y);
      }
      endPoint[0] = x;
      endPoint[1] = y;
    }
    if (wavePath.isEmpty()) {
      if (progress / max >= 0.5f) {
        //滿格
        wavePath.moveTo(centerX, centerY - VALID_RADIUS);
        wavePath.addCircle(centerX, centerY, VALID_RADIUS, Path.Direction.CW);
      } else {
        //空格
        return wavePath;
      }
    } else {
      //添加圓弧部分
      float startDegree = calDegreeByPosition(startPoint[0], startPoint[1]); //0~180
      float endDegree = calDegreeByPosition(endPoint[0], endPoint[1]); //180~360
      wavePath.arcTo(circleRectF, endDegree - 360, startDegree - (endDegree - 360));
    }
    return wavePath;
  }
  private float calDistance(float x1, float y1, float x2, float y2) {
    return (float) Math.sqrt((x1 - x2) * (x1 - x2) + (y1 - y2) * (y1 - y2));
  }
  //根據當前位置,計算出進度條已經轉過的角度。
  private float calDegreeByPosition(float currentX, float currentY) {
    float a1 = (float) (Math.atan(1.0f * (centerX - currentX) / (currentY - centerY)) / Math.PI * 180);
    if (currentY < centerY) {
      a1 += 180;
    } else if (currentY > centerY && currentX > centerX) {
      a1 += 360;
    }
    return a1 + 90;
  }
  public void setMax(int max) {
    this.max = max;
    invalidate();
  }
  //直接設置進度值(同步)
  public void setProgressSync(float progress) {
    this.progress = progress;
    invalidate();
  }
  /**
   * 自動刷新頁面,創造水波效果。組件銷毀後該線城將自動停止。
   */
  private void autoRefresh() {
    new Thread(new Runnable() {
      @Override
      public void run() {
        while (!detached) {
          xOffset += (VALID_RADIUS >> 4);
          SystemClock.sleep(100);
          postInvalidate();
        }
      }
    }).start();
  }
  //標記View是否已經銷毀
  private boolean detached = false;
  @Override
  protected void onDetachedFromWindow() {
    super.onDetachedFromWindow();
    detached = true;
  }
}
(二)使用方法:
在xml布局中引入上述組件,然後在activity或fragment中設置屬性:
WaterWaveView bar = (WaterWaveView) getActivity().findViewById(R.id.water_wave_view);
    bar.setMax(500);
    bar.setProgressSync(361.8f);
更多關於Android相關內容感興趣的讀者可查看本站專題:《Android開發動畫技巧匯總》、《Android編程之activity操作技巧總結》、《Android視圖View技巧總結》、《Android布局layout技巧總結》、《Android開發入門與進階教程》、《Android資源操作技巧匯總》及《Android控件用法總結》
希望本文所述對大家Android程序設計有所幫助。
 Android 活動的生命周期
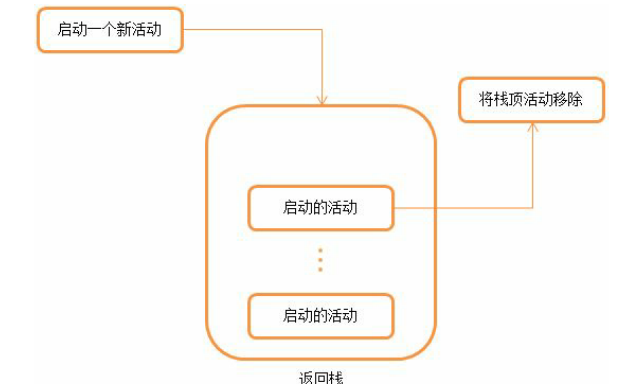
1.返回棧Android 是使用任務(Task)來管理活動的,一個任務就是一組存放在棧裡的活動的集合,這個棧也被稱作返回棧(Back Stack)。棧是一種後進先出的數據
 弄明白Android 接口回調機制
以前對於這個機制理解不夠深刻,現在重新整理下思路。 一、建模 我理解的接口回調就是,我這個類實現了一個接口裡的方法doSomething,然後注冊到你這裡,然後我就去做別
 Android自定義view制作絢麗的驗證碼
廢話不多說了,先給大家展示下自定義view效果圖,如果大家覺得還不錯的話,請繼續往下閱讀。怎麼樣,這種驗證碼是不是很常見呢,下面我們就自己動手實現這種效果,自己動手,豐衣
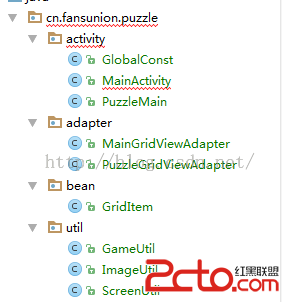 Android群英傳-拼圖游戲puzzle-代碼設計和實現
上個周末,3個小時總體上讀完了《Android群英傳》,本周主要在研究代碼層次的設計和實現。編譯安裝在手機上,玩了幾把,結合代碼,一周時間才掌握了整體的思路。大部分時間,