編輯:關於Android編程
Fragment在Android3.0開始提供,並且在兼容包中也提供了Fragment特性的支持。Fragment的推出讓我們編寫和管理用戶界面更快捷更方便了。
但當我們實例化自定義Fragment時,為什麼官方推薦Fragment.setArguments(Bundle bundle)這種方式來傳遞參數,而不推薦通過構造方法直接來傳遞參數呢?為了弄清這個問題,我們可以做一個測試,分別測試下這兩種方式的不同
首先,我們來測試下通過構造方法傳遞參數的情況
public class FramentTestActivity extends ActionBarActivity {
  @Override
  protected void onCreate(Bundle savedInstanceState) {
    super.onCreate(savedInstanceState);
    setContentView(R.layout.activity_main);
    if (savedInstanceState == null) {
      getSupportFragmentManager().beginTransaction()
          .add(R.id.container, new TestFragment("param")).commit();
    }
  }
  public static class TestFragment extends Fragment {
    private String mArg = "non-param";
    public TestFragment() {
      Log.i("INFO", "TestFragment non-parameter constructor");
    }
    public TestFragment(String arg){
      mArg = arg;
      Log.i("INFO", "TestFragment construct with parameter");
    }
    @Override
    public View onCreateView(LayoutInflater inflater, ViewGroup container,
        Bundle savedInstanceState) {
      View rootView = inflater.inflate(R.layout.fragment_main, container,
          false);
      TextView tv = (TextView) rootView.findViewById(R.id.tv);
      tv.setText(mArg);
      return rootView;
    }
  }
}
可以看到我們傳遞過來的數據正確的顯示了,現在來考慮一個問題,如果設備配置參數發生變化,這裡以橫豎屏切換來說明問題,顯示如下
發生了什麼問題呢?我們傳遞的參數哪去了?為什麼會顯示默認值?不急著討論這個問題,接下來我們來看看Fragment.setArguments(Bundle bundle)這種方式的運行情況
public class FramentTest2Activity extends ActionBarActivity {
    @Override
    protected void onCreate(Bundle savedInstanceState) {
       super.onCreate(savedInstanceState);
       setContentView(R.layout. activity_main);
       if (savedInstanceState == null) {
          getSupportFragmentManager().beginTransaction()
                 .add(R.id. container, TestFragment.newInstance("param")).commit();
       }
    }
    public static class TestFragment extends Fragment {
       private static final String ARG = "arg";
       public TestFragment() {
          Log. i("INFO", "TestFragment non-parameter constructor" );
       }
       public static Fragment newInstance(String arg){
          TestFragment fragment = new TestFragment();
          Bundle bundle = new Bundle();
          bundle.putString( ARG, arg);
          fragment.setArguments(bundle);
           return fragment;
       }
       @Override
       public View onCreateView(LayoutInflater inflater, ViewGroup container,
              Bundle savedInstanceState) {
          View rootView = inflater.inflate(R.layout. fragment_main, container,
                 false);
          TextView tv = (TextView) rootView.findViewById(R.id. tv);
          tv.setText(getArguments().getString( ARG));
           return rootView;
       }
    }
}
我們再來看看橫豎屏切換後的運行情況
看到了吧,我們傳遞的參數在橫豎屏切換的情況下完好保存了下來,正確的顯示給用戶
那麼這到底是怎麼回事呢,我們知道設備橫豎屏切換的話,當前展示給用戶的Activity默認情況下會重新創建並展現給用戶,那依附於Activity的Fragment會進行如何處理呢,我們可以通過源碼來查看
先來看看Activity的onCreate(Bundle saveInstance)方法
 protected void onCreate(Bundle savedInstanceState) {
  if (DEBUG_LIFECYCLE ) Slog.v( TAG, "onCreate " + this + ": " + savedInstanceState);
  if (mLastNonConfigurationInstances != null) {
    mAllLoaderManagers = mLastNonConfigurationInstances .loaders ;
  }
  if (mActivityInfo .parentActivityName != null) {
    if (mActionBar == null) {
      mEnableDefaultActionBarUp = true ;
    } else {
      mActionBar .setDefaultDisplayHomeAsUpEnabled( true);
    }
  }
  if (savedInstanceState != null) {
    Parcelable p = savedInstanceState.getParcelable( FRAGMENTS_TAG );
    mFragments .restoreAllState(p, mLastNonConfigurationInstances != null
        ? mLastNonConfigurationInstances .fragments : null);
  }
  mFragments .dispatchCreate();
  getApplication().dispatchActivityCreated( this , savedInstanceState);
  mCalled = true ;
}
由於我們的Fragment是由FragmentManager來管理,所以可以跟進FragmentManager.restoreAllState()方法,通過對當前活動的Fragmnet找到下面的代碼塊
 for (int i=0; i<fms.mActive.length; i++) {
      FragmentState fs = fms.mActive[i];
      if (fs != null) {
       Fragment f = fs.instantiate(mActivity, mParent);
        if (DEBUG) Log.v(TAG, "restoreAllState: active #" + i + ": " + f);
        mActive.add(f);
        // Now that the fragment is instantiated (or came from being
        // retained above), clear mInstance in case we end up re-restoring
        // from this FragmentState again.
        fs.mInstance = null;
      } else {
        mActive.add(null);
        if (mAvailIndices == null) {
          mAvailIndices = new ArrayList<Integer>();
        }
        if (DEBUG) Log.v(TAG, "restoreAllState: avail #" + i);
        mAvailIndices.add(i);
      }
}
接下來我們可以看看FragmentState.instantitate()方法的實現
public Fragment instantiate(Activity activity, Fragment parent) {
    if (mInstance != null) {
      return mInstance ;
    }
    if (mArguments != null) {
      mArguments .setClassLoader(activity.getClassLoader());
    }
    mInstance = Fragment.instantiate(activity, mClassName , mArguments );
    if (mSavedFragmentState != null) {
      mSavedFragmentState .setClassLoader(activity.getClassLoader());
      mInstance .mSavedFragmentState = mSavedFragmentState ;
    }
    mInstance .setIndex(mIndex , parent);
    mInstance .mFromLayout = mFromLayout ;
    mInstance .mRestored = true;
    mInstance .mFragmentId = mFragmentId ;
    mInstance .mContainerId = mContainerId ;
    mInstance .mTag = mTag ;
    mInstance .mRetainInstance = mRetainInstance ;
    mInstance .mDetached = mDetached ;
    mInstance .mFragmentManager = activity.mFragments;
    if (FragmentManagerImpl.DEBUG) Log.v(FragmentManagerImpl.TAG,
        "Instantiated fragment " + mInstance );
    return mInstance ;
  }
可以看到最終轉入到Fragment.instantitate()方法
public static Fragment instantiate(Context context, String fname, Bundle args) {
  try {
    Class<?> clazz = sClassMap .get(fname);
    if (clazz == null) {
      // Class not found in the cache, see if it's real, and try to add it
      clazz = context.getClassLoader().loadClass(fname);
      sClassMap .put(fname, clazz);
    }
    Fragment f = (Fragment)clazz.newInstance();
    if (args != null) {
      args.setClassLoader(f.getClass().getClassLoader());
      f. mArguments = args;
    }
    return f;
  } catch (ClassNotFoundException e) {
    throw new InstantiationException( "Unable to instantiate fragment " + fname
        + ": make sure class name exists, is public, and has an"
        + " empty constructor that is public" , e);
  } catch (java.lang.InstantiationException e) {
    throw new InstantiationException( "Unable to instantiate fragment " + fname
        + ": make sure class name exists, is public, and has an"
        + " empty constructor that is public" , e);
  } catch (IllegalAccessException e) {
    throw new InstantiationException( "Unable to instantiate fragment " + fname
        + ": make sure class name exists, is public, and has an"
        + " empty constructor that is public" , e);
  }
通過此方法可以看到,最終會通過反射無參構造實例化一個新的Fragment,並且給mArgments初始化為原先的值,而原來的Fragment實例的數據都丟失了,並重新進行了初始化
通過上面的分析,我們可以知道Activity重新創建時,會重新構建它所管理的Fragment,原先的Fragment的字段值將會全部丟失,但是通過Fragment.setArguments(Bundle bundle)方法設置的bundle會保留下來。所以盡量使用Fragment.setArguments(Bundle bundle)方式來傳遞參數
以上所述是小編給大家介紹的Android 中為什麼要用Fragment.setArguments(Bundle bundle)來傳遞參數,希望對大家有所幫助,如果大家有任何疑問歡迎給我給我留言,小編會及時回復大家的!
 viewpager實現圖片輪番(本地圖片)
(項目中需要實現圖片輪番效果,就查資料著重學習,本地圖片實現)原理就是利用定時任務器定時切換ViewPager的頁面,根據圖片個數動態生成下端的圓點。效果圖: 1、獲取本
 Android控件系列之XML靜態資源使用介紹
學習目的: 1、了解在Android中如何設置和調用XML資源 2、掌握如何利用XML和JAVA代碼進行協同開發界面 3、理解R文件的作用 開發Android時,總能看到
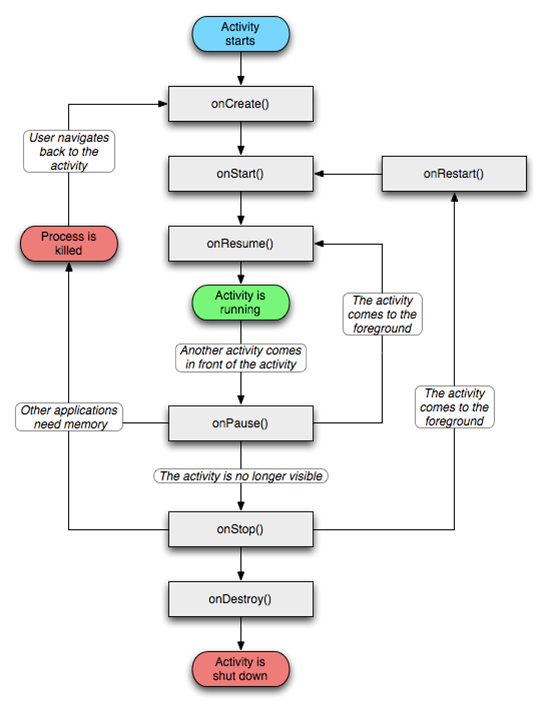 Android開發系列二之窗口Activity的生命周期
在上篇文章給大家介紹了android開發系列一之用按鈕實現顯示時間,感興趣的朋友可以點擊閱讀詳情。在Activity從創建到銷毀的過程中需要在不同的階段調用7個生命周期的
 Android ART運行時無縫替換Dalvik虛擬機的過程分析
Android 4.4發布了一個ART運行時,准備用來替換掉之前一直使用的Dalvik虛擬機,希望籍此解決飽受诟病的性能問題。老羅不打算分析ART的實現原理,只是很有興趣