編輯:關於Android編程
先上效果圖:

這個效果一開始我是想直接讓UI給個切圖,後來發現這樣不行,適配很差,達不到效果。所以就自己動手寫代碼,其實思路也很簡單:在這個布局的父布局上面再手動添加一個view(通常LinearLayout比較方便),然後把這個linearlayout的背景設置成#88000000,之後就是給這個linearlayout動態增加子view,初步效果就能達到。
下面直接上代碼:
public void showGuideView() {

  View view = getWindow().getDecorView().findViewById(R.id.activity_main);
  if (view == null) return;

  ViewParent viewParent = view.getParent();
  if (viewParent instanceof FrameLayout) {
    final FrameLayout frameParent = (FrameLayout) viewParent;//整個父布局

    final LinearLayout linearLayout = new LinearLayout(this);//新建一個LinearLayout
    linearLayout.setLayoutParams(new LinearLayout.LayoutParams(ViewGroup.LayoutParams.MATCH_PARENT, ViewGroup.LayoutParams.MATCH_PARENT));
    linearLayout.setOrientation(LinearLayout.VERTICAL);
    linearLayout.setBackgroundResource(#88000000);//背景設置灰色透明
    linearLayout.setGravity(Gravity.CENTER_HORIZONTAL);
    linearLayout.setOnClickListener(new View.OnClickListener() {
      @Override
      public void onClick(View v) {
       frameParent.removeView(linearLayout);
      }
    });

    Rect rect = new Rect();
    Point point = new Point();
    nearby.getGlobalVisibleRect(rect, point);
    //獲得nearby這個控件的寬高以及XY坐標 nearby這個控件對應就是需要高亮顯示的地方

    ImageView topGuideview = new ImageView(this);
    topGuideview.setLayoutParams(new ViewGroup.LayoutParams(rect.width(), rect.height()));
     topGuideview.setBackgroundResource(R.drawable.iv_topguide);

     Rect rt = new Rect();
     getWindow().getDecorView().getWindowVisibleDisplayFrame(rt);
    topGuideview.setY(point.y - rt.top);//rt.top是手機狀態欄的高度
    ImageView bottomGuideview = new ImageView(this);
    bottomGuideview.setLayoutParams(new ViewGroup.LayoutParams(WRAP_CONTENT, WRAP_CONTENT));
    bottomGuideview.setBackgroundResource(R.drawable.iv_bottomguide);
    bottomGuideview.setY(point.y + topGuideview.getHeight());

    linearLayout.addView(topGuideview);
    linearLayout.addView(bottomGuideview);
    frameParent.addView(linearLayout);
  }
}
以上就是本文的全部內容,希望對大家的學習有所幫助,也希望大家多多支持本站。
 Android知識普及
hybrid app編輯 Hybrid App(混合模式移動應用)是指介於web-app、native-app這兩者之間的app,兼具“Native App良
 Android實踐--Android Http 客戶端編程之GET
Android Http 客戶端編程之GET 說起Http編程,不盡然想起GET和POST兩種請求方式,本文以簡潔明了的的步驟和說明,將Android中常用
 Android音頻開發(7):使用 OpenSL ES API(下)
本文是我的《Android音頻開發》系列的第七篇文章,上一篇文章總整體上介紹了 Android OpenSL ES API 的基本概況,告訴了大家這個框架有什麼特性,可以
 設計模式 - 命令模式(command pattern) 詳解
命令模式(command pattern) 詳解本文地址: http://blog.csdn.net/caroline_wendy命令模式(command pattern
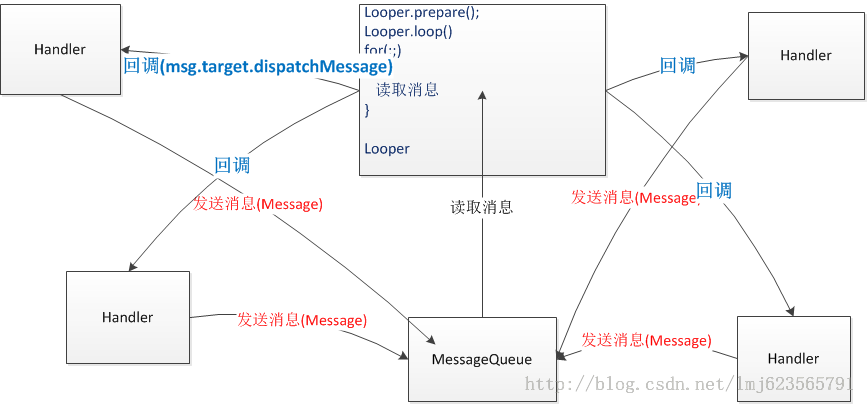
 AndRoid源碼分析----------Handler消息機制(1)Handler獲取Message對象及Message的復用
在研究源碼之前,我們對Handler的了解一般是這樣的概念:在主線程中,