編輯:關於Android編程
Android 調用系統相機拍攝獲取照片的兩種方法實現實例
在我們Android開發中經常需要做這個一個功能,調用系統相機拍照,然後獲取拍攝的照片。下面是我總結的兩種方法獲取拍攝之後的照片,一種是通過Bundle來獲取壓縮過的照片,一種是通過SD卡獲取的原圖。
下面是演示代碼:
布局文件:
<LinearLayout xmlns:android="http://schemas.android.com/apk/res/android"
  xmlns:tools="http://schemas.android.com/tools"
  android:layout_width="match_parent"
  android:layout_height="match_parent"
  android:orientation="vertical"
  android:gravity="center_horizontal"
  >

  <Button
    android:id="@+id/button1"
    android:layout_width="wrap_content"
    android:layout_height="wrap_content"
    android:text="拍照獲取縮略圖" />

  <Button
    android:id="@+id/button2"
    android:layout_width="wrap_content"
    android:layout_height="wrap_content"
    android:layout_marginTop="14dp"
    android:text="拍照獲取原圖" />

  <ImageView
    android:id="@+id/imageView1"
    android:layout_width="match_parent"
    android:layout_height="match_parent"
    android:src="@drawable/ic_launcher" />

</LinearLayout>
java代碼:
package com.example.cameardemo;

import java.io.File;
import java.io.FileInputStream;
import java.io.FileNotFoundException;
import java.io.IOException;

import android.content.Intent;
import android.graphics.Bitmap;
import android.graphics.BitmapFactory;
import android.net.Uri;
import android.os.Bundle;
import android.os.Environment;
import android.provider.MediaStore;
import android.support.v7.app.ActionBarActivity;
import android.util.Log;
import android.view.View;
import android.view.View.OnClickListener;
import android.widget.Button;
import android.widget.ImageView;

public class MainActivity extends ActionBarActivity implements OnClickListener {

  private static int REQUEST_THUMBNAIL = 1;// 請求縮略圖信號標識
  private static int REQUEST_ORIGINAL = 2;// 請求原圖信號標識
  private Button button1, button2;
  private ImageView mImageView;
  private String sdPath;//SD卡的路徑
  private String picPath;//圖片存儲路徑

  @Override
  protected void onCreate(Bundle savedInstanceState) {
    super.onCreate(savedInstanceState);
    setContentView(R.layout.fragment_main);

    button1 = (Button) findViewById(R.id.button1);
    button2 = (Button) findViewById(R.id.button2);
    mImageView = (ImageView) findViewById(R.id.imageView1);

    button1.setOnClickListener(this);
    button2.setOnClickListener(this);
    //獲取SD卡的路徑
    sdPath = Environment.getExternalStorageDirectory().getPath();
    picPath = sdPath + "/" + "temp.png";
    Log.e("sdPath1",sdPath);
  }

  @Override
  public void onClick(View view) {
    switch (view.getId()) {
    case R.id.button1://第一種方法,獲取壓縮圖
      Intent intent1 = new Intent(MediaStore.ACTION_IMAGE_CAPTURE);
      // 啟動相機
      startActivityForResult(intent1, REQUEST_THUMBNAIL);
      break;

    case R.id.button2://第二種方法,獲取原圖
      Intent intent2 = new Intent(MediaStore.ACTION_IMAGE_CAPTURE);
      Uri uri = Uri.fromFile(new File(picPath));
      //為拍攝的圖片指定一個存儲的路徑
      intent2.putExtra(MediaStore.EXTRA_OUTPUT, uri);
      startActivityForResult(intent2, REQUEST_ORIGINAL);
      break;

    default:
      break;
    }
  }

  /**
   * 返回應用時回調方法
   */
  @Override
  protected void onActivityResult(int requestCode, int resultCode, Intent data) {
    super.onActivityResult(requestCode, resultCode, data);

    if (resultCode == RESULT_OK) {
      if (requestCode == REQUEST_THUMBNAIL) {//對應第一種方法
        /**
         * 通過這種方法取出的拍攝會默認壓縮,因為如果相機的像素比較高拍攝出來的圖會比較高清,
         * 如果圖太大會造成內存溢出(OOM),因此此種方法會默認給圖片盡心壓縮
         */
        Bundle bundle = data.getExtras();
        Bitmap bitmap = (Bitmap) bundle.get("data");
        mImageView.setImageBitmap(bitmap);
      }
      else if(resultCode == REQUEST_ORIGINAL){//對應第二種方法
        /**
         * 這種方法是通過內存卡的路徑進行讀取圖片,所以的到的圖片是拍攝的原圖
         */
        FileInputStream fis = null;
        try {
          Log.e("sdPath2",picPath);
          //把圖片轉化為字節流
          fis = new FileInputStream(picPath);
          //把流轉化圖片
          Bitmap bitmap = BitmapFactory.decodeStream(fis);
          mImageView.setImageBitmap(bitmap);
        } catch (FileNotFoundException e) {
          e.printStackTrace();
        }finally{
          try {
            fis.close();//關閉流
          } catch (IOException e) {
            e.printStackTrace();
          }
        }
      }
    }
  }

}
最後不要忘記在清單文件上添加上讀取SD卡的權限:
<?xml version="1.0" encoding="utf-8"?>
<manifest xmlns:android="http://schemas.android.com/apk/res/android"
  package="com.example.cameardemo"
  android:versionCode="1"
  android:versionName="1.0" >

  <uses-sdk
    android:minSdkVersion="8"
    android:targetSdkVersion="19" />
  <!-- 操作sd卡的權限 -->
  <uses-permission android:name="android.permission.WRITE_EXTERNAL_STORAGE"/>

  <application
    android:allowBackup="true"
    android:icon="@drawable/ic_launcher"
    android:label="@string/app_name"
    android:theme="@style/AppTheme" >
    <activity
      android:name="com.example.cameardemo.MainActivity"
      android:label="@string/app_name" >
      <intent-filter>
        <action android:name="android.intent.action.MAIN" />

        <category android:name="android.intent.category.LAUNCHER" />
      </intent-filter>

      <!-- 具有相機功能 -->
      <intent-filter >
        <action android:name="android.media.action.IMAGE_CAPTURE"/>

        <category android:name="android.intent.category.DEFAULT" />
      </intent-filter>
    </activity>
  </application>

</manifest>
感謝閱讀,希望能幫助到大家,謝謝大家對本站的支持!
 谷歌市場Day1
准備階段 將WebInfos文件夾放在手機存儲卡的根目錄下,用Eclipse導入項目WebSerser,運行到手機中。 將WebInfos文件夾放在手機存
 Android 開發之BottomBar+ViewPager+Fragment實現炫酷的底部導航效果
BottomBar BottomBar是Github上的一個開源框架,因為從1.3.3開始不支持fragments了,要自己配置,弄了很久,不管是app的fragmen
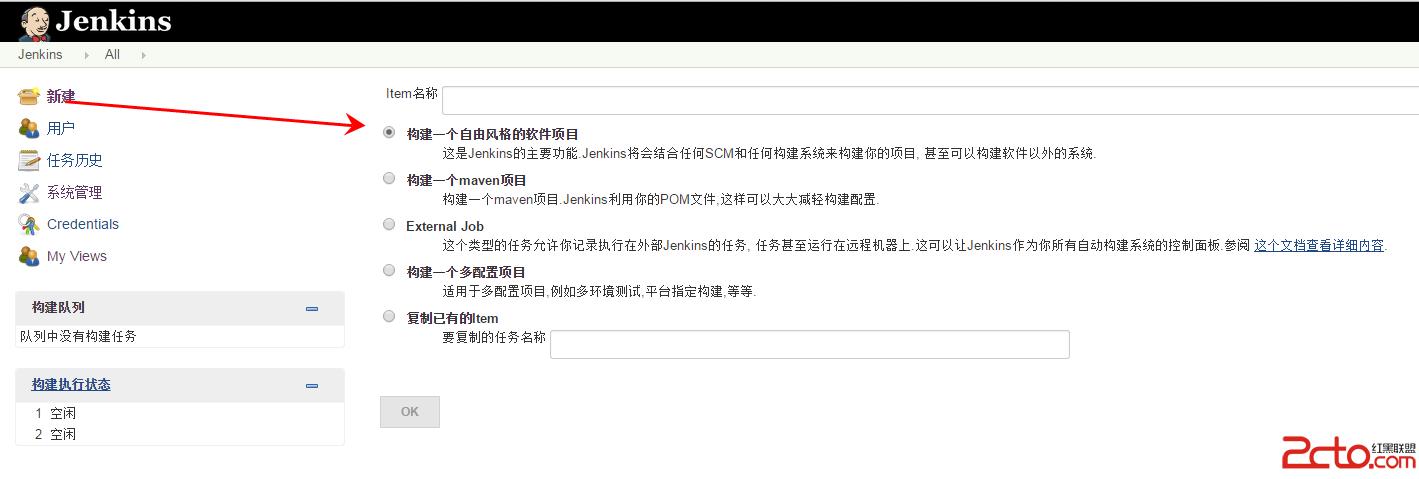 Jenkins構建Android項目持續集成之創建項目
新建項目前面,已經介紹了,系統相關配置,接下來就可以開始創建項目了。選擇新建—>構建一個自由風格的軟件項目,然後填寫項目名稱。項目如下:注意:項目配置源
 Android studio下增量升級功能的NDK開發
最近研究Android應用的增量升級功能,期間涉及到了NDK開發的內容,整理記錄在此。先說幾個問題。一、NDK開發就是JNI開發啊,臥槽我原來都不知道啊,一直以為是兩個東