編輯:關於Android編程
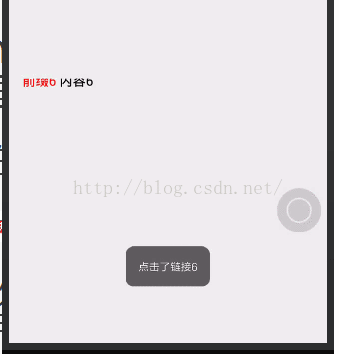
京東客戶端的輪播文字效果:

本次要實現的只是後面滾動的文字(前面的用ImageView或者TextView實現即可),看一下實現的效果
實現思路
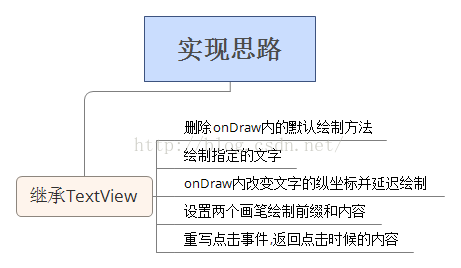
上圖只是一個大概的思路,要實現還需要完善更多的細節,下面會一步步的來實現這個效果:
1.封裝數據源:從圖上可以看到,輪播的文字是分為兩個部分的,暫且把它們分別叫做前綴和內容,而且實際的使用過程中點擊輪播圖肯定是需要跳轉頁面的,而且大部分應該是WebView,不妨我們就設置點擊時候需要獲取的內容就是一個鏈接,那麼數據源的結構就很明了了
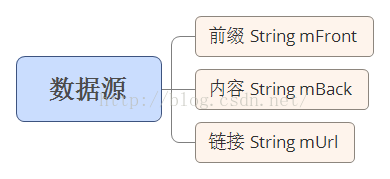
創建ADEnity類並完善一些基本的方法,代碼如下
public class ADEnity {
 private String mFront ; //前面的文字
 private String mBack ; //後面的文字
 private String mUrl ;//包含的鏈接

 public ADEnity(String mFront, String mBack,String mUrl) {
  this.mFront = mFront;
  this.mBack = mBack;
  this.mUrl = mUrl;
 }

 public String getmUrl() {
  return mUrl;
 }

 public void setmUrl(String mUrl) {
  this.mUrl = mUrl;
 }

 public String getmFront() {
  return mFront;
 }

 public void setmFront(String mFront) {
  this.mFront = mFront;
 }

 public String getmBack() {
  return mBack;
 }

 public void setmBack(String mBack) {
  this.mBack = mBack;
 }
}
2.接下來應該是定制這個自定義View了,首先理一下思路,看一個構造圖
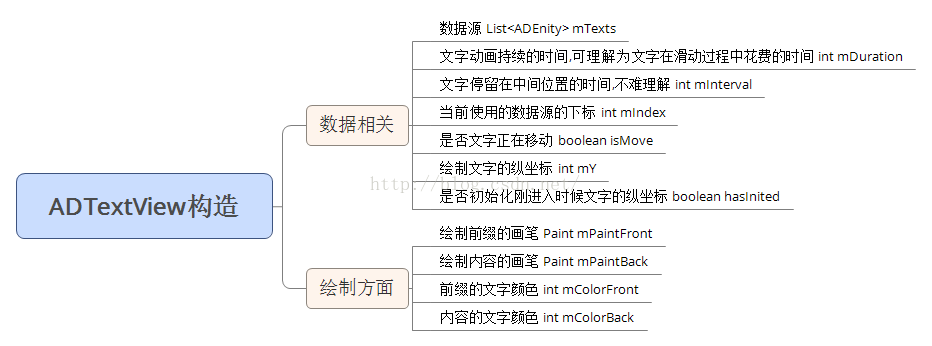
實現這個自定義View的所有參數都在上表列出了,大部分參數很容易理解,個別參數加進去是很有必要的,比如說是否初始化進入文字的縱坐標,文字是否在移動中這兩個參數,之後的內容會詳細的敘述一下. 在動手繪制之前還得需要知道一點基礎的知識,就是關於繪制文字的方法,裡面有很多細節需要處理

方法都比較好理解,繪制指定字符串(可以指定范圍)在坐標( x , y )處,但是其中的x,y並不是我們所理解的應該是文字左上角的坐標點.其中的x坐標是根據Paint的屬性可變換的,默認的x是文字的左邊坐標,如果Paint設置了paint.setTextAlign(Paint.Align.CENTER);那就是字符的中心位置.Y坐標是文字的baseline的y坐標. 關於繪制文字的baseline:
用圖來說話吧
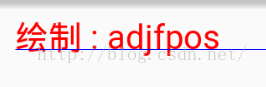
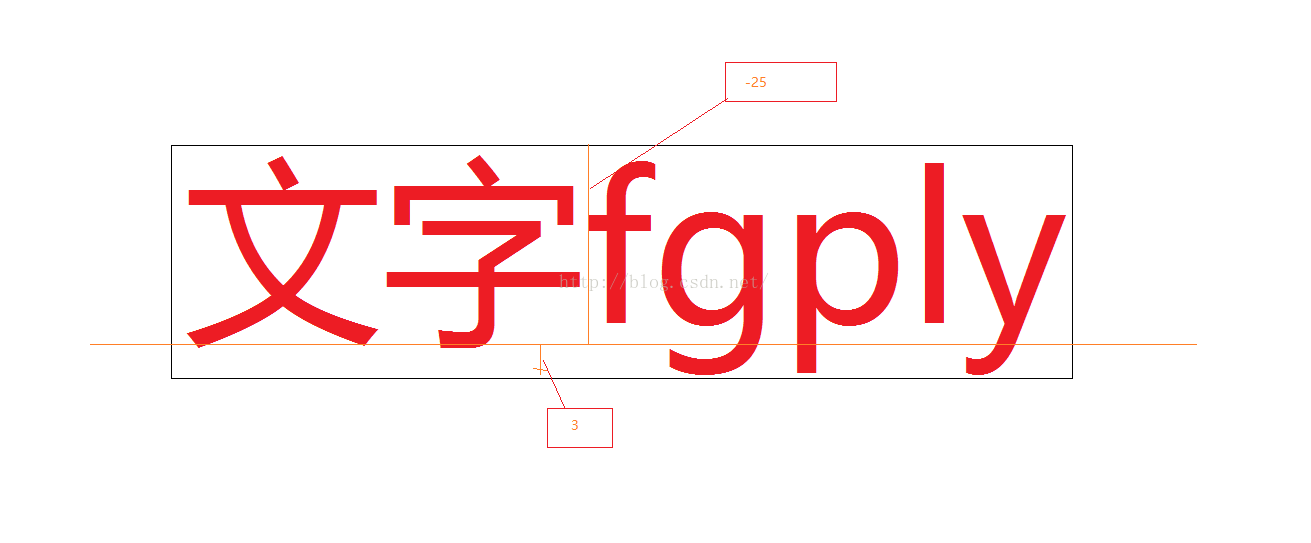
圖中藍色的線即為baseline,可以看出他既不是頂部坐標也不是底部坐標,那麼當我們繪制文字的時候肯定是希望能把文字繪制在正中間.這時候就要引入paint.getTextBound()方法了 getTextBounds(String text, int start, int end, Rect bounds),傳入一個Rect對象,調用此方法之後則會填充這個rect對象,而填充的內容就是所繪制的文字相對於baseline的偏移坐標,將這個Rect加上baseline的坐標,繪制後是這樣的:
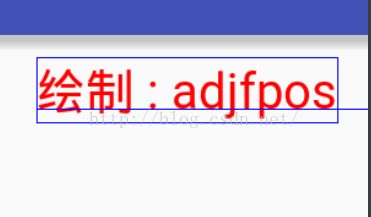
但其實他的值只是(2,-25,76,3),是相對於baseline的位置,畫個圖會比較好理解
那麼要將文字繪制在中間那麼實際繪制baseline的坐標應該是組件的中心加上文字中心即圖中框的中間坐標相對於baseline的偏移值">那麼要將文字繪制在中間,那麼實際繪制baseline的坐標應該是組件的中心,加上文字中心(即圖中框的中間坐標)相對於baseline的偏移值
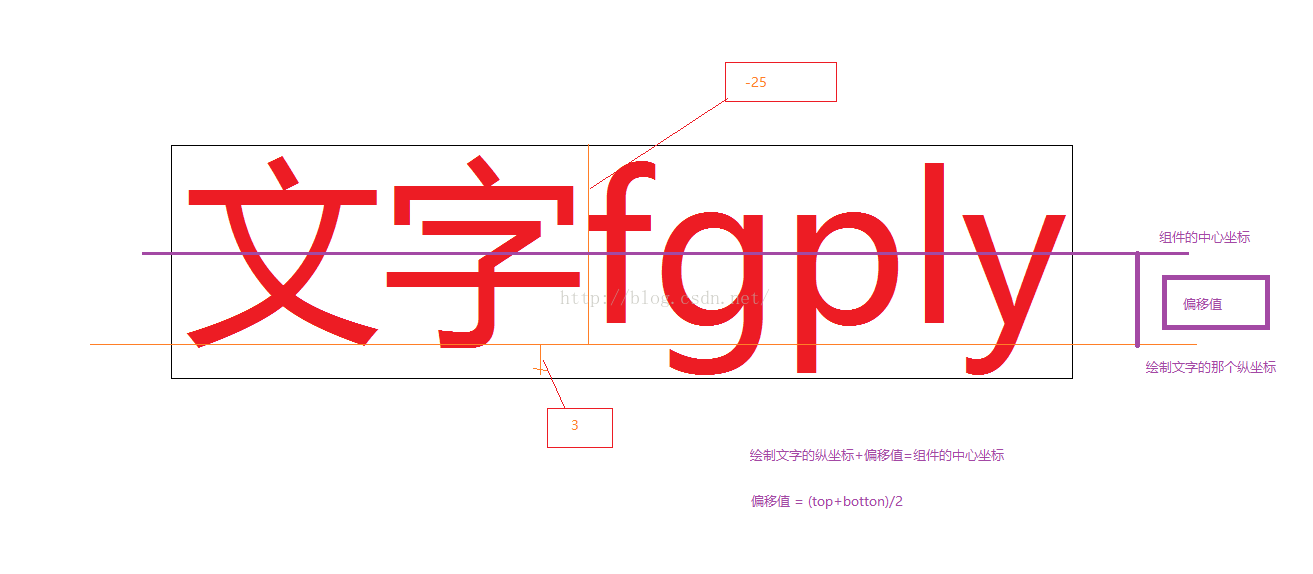
這張圖中應該會好理解實際繪制文字的坐標與組件中心坐標的關系.關於偏移值的計算,按常規的幾何計算方法,應該是組件的中心坐標+偏移值的絕對值==baseline坐標(即實際繪制的坐標),但是由於框的坐標值都是相對於baseline來計算的,top為負值,botton為正值,那麼這個偏移值就可以直接用(top+bottom)/2來表示,沒看懂的同學可以畫個草圖,用top=-25,bottom=3來算一下,看是否結果是一致的.
經過上面的理解,那我們來繪制正確繪制文字的方法也就確定了
已獲得組件的高度int mHeight , 文字外框Rect bound的情況下
繪制文字在正中間
 mHeight / 2 - (bound.top + bound.bottom) / 2
//在縱坐標為mY的地方繪制文字
//計算方式
//mheight /2 = mY + (bound.top + bound.bottom) / 2 ;
文字滾動到最高點
mY == 0 - bound.bottom
//在縱坐標為mY的地方繪制,此時文字剛好移動到最高點
//計算方式
//mY + bound.bottom = 0 ;
文字滾動到最低點,剛好滾出組件
 mY = mHeight - indexBound.top;
//在縱坐標為mY的地方繪制,此時文字剛好移動到最高點
//計算方式
//mY + bound.top = mHeight ;
知道了如何正確的繪制文字和邊界情況的坐標判斷,下面就到了繪制文字的步驟了
首先初始化數據,設置默認值
//初始化默認值
private void init() {
 mDuration = 500;
 mInterval = 1000;
 mIndex = 0;
 mPaintFront = new Paint();
 mPaintFront.setAntiAlias(true);
 mPaintFront.setDither(true);
 mPaintFront.setTextSize(30);


 mPaintBack = new Paint();
 mPaintBack.setAntiAlias(true);
 mPaintBack.setDither(true);
 mPaintBack.setTextSize(30);

}
前面的敘述中我們知道,剛開始進入的時候文字應該是位於組件的底部的,但是這個值是需要獲取組件的高度和當前顯示文字的情況下來判斷的,所以應該放在onDraw內來初始化這個值,所以需要前面的是否初始化的屬性,判斷當mY==0並且未初始化的時候給mY賦值.
接下來就是onDraw內的處理
獲取當前的數據
//獲取當前的數據
ADEnity model = mTexts.get(mIndex);
String font = model.getmFront();
String back = model.getmBack();
// 繪制前綴的外框
Rect indexBound = new Rect();
mPaintFront.getTextBounds(font, 0, font.length(), indexBound);

//繪制內容的外框
Rect contentBound = new Rect();
mPaintBack.getTextBounds(back, 0, back.length(), contentBound);
對mY進行初始化
if (mY == 0 && hasInit == false) {
 mY = getMeasuredHeight() - indexBound.top;
 hasInit = true;
}
對邊界情況的處理
/
/移動到最上面
if (mY == 0 - indexBound.bottom) {
 Log.i(TAG, "onDraw: " + getMeasuredHeight());
 mY = getMeasuredHeight() - indexBound.top;//返回底部
 mIndex++;//換下一組數據
}
//移動到中間
if (mY == getMeasuredHeight() / 2 - (indexBound.top + indexBound.bottom) / 2) {
 isMove = false;//停止移動
 Timer timer = new Timer();
 timer.schedule(new TimerTask() {
  @Override
  public void run() {
   postInvalidate();//通知重繪
   isMove = true;//設置移動為true
  }
 }, mInterval);//停頓多少毫秒之後再次移動
}
移動的處理與數據源的處理
mY -= 1;//每次只移動一個像素,盡量保證平滑顯示
//循環使用數據
if (mIndex == mTexts.size()) {
 mIndex = 0;
}
//如果是處於移動狀態時的,則延遲繪制
//計算公式為一個比例,一個時間間隔移動組件高度,則多少毫秒來移動1像素
if (isMove) {
 postInvalidateDelayed(mDuration / getMeasuredHeight());
}
至此對邏輯的處理就完成了,接下來要設置點擊事件
public interface onClickLitener {
 public void onClick(String mUrl);
}

private onClickLitener onClickLitener;

public void setOnClickLitener(TextViewAd.onClickLitener onClickLitener) {
 this.onClickLitener = onClickLitener;
}
//重寫onTouchEvent事件,並且要返回true,表明當前的點擊事件由這個組件自身來處理
@Override
public boolean onTouchEvent(MotionEvent event) {
 int action = event.getAction();

 switch (action) {
  case MotionEvent.ACTION_DOWN:
   //調用回調,將當前數據源的鏈接傳出去
   if (onClickLitener != null) {
    onClickLitener.onClick(mTexts.get(mIndex).getmUrl());
   }

   break;
 }
 return true;
}
暴露一些其他屬性的設置方式
//設置數據源
public void setmTexts(List mTexts) {
 this.mTexts = mTexts;
}

//設置廣告文字的停頓時間
public void setmInterval(int mInterval) {
 this.mInterval = mInterval;
}

//設置文字從出現到消失的時長
public void setmDuration(int mDuration) {
 this.mDuration = mDuration;
}

//設置前綴的文字顏色
public void setFrontColor(int mFrontColor) {
 mPaintFront.setColor(mFrontColor);
}

//設置正文內容的顏色
public void setBackColor(int mBackColor) {
 mPaintBack.setColor(mBackColor);
}
有興趣的同學可以將這些屬性設置到attrs.xml文件中然後就可以在布局文件中設置屬性了,這裡就不演示了,因為覺得每次copy這個View還得把xml文件也copy比較麻煩,畢竟as有自動補全,可以很方便的看到暴露在外面的方法.(個人感受而已).
貼一下完整的ADTextView的代碼,方便查看
package com.qiyuan.jindongshangcheng.view;

import android.content.Context;
import android.graphics.Canvas;
import android.graphics.Paint;
import android.graphics.Rect;
import android.util.AttributeSet;
import android.util.Log;
import android.view.MotionEvent;
import android.widget.TextView;

import com.qiyuan.jindongshangcheng.enity.ADEnity;

import java.util.List;
import java.util.Timer;
import java.util.TimerTask;

/**
 * Created by huanghaojie on 2016/9/30.
 */

public class TextViewAd extends TextView {

 private int mDuration; //文字從出現到顯示消失的時間
 private int mInterval; //文字停留在中間的時長切換的間隔
 private List<ADEnity> mTexts; //顯示文字的數據源
 private int mY = 0; //文字的Y坐標
 private int mIndex = 0; //當前的數據下標
 private Paint mPaintBack; //繪制內容的畫筆
 private Paint mPaintFront; //繪制前綴的畫筆
 private boolean isMove = true; //文字是否移動
 private String TAG = "ADTextView";
 private boolean hasInit = false;//是否初始化剛進入時候文字的縱坐標

 public interface onClickLitener {
  public void onClick(String mUrl);
 }

 private onClickLitener onClickLitener;

 public void setOnClickLitener(TextViewAd.onClickLitener onClickLitener) {
  this.onClickLitener = onClickLitener;
 }

 public TextViewAd(Context context) {
  this(context, null);
 }

 public TextViewAd(Context context, AttributeSet attrs) {
  super(context, attrs);
  init();
 }
 //重寫onTouchEvent事件,並且要返回true,表明當前的點擊事件由這個組件自身來處理
 @Override
 public boolean onTouchEvent(MotionEvent event) {
  int action = event.getAction();

  switch (action) {
   case MotionEvent.ACTION_DOWN:
    //調用回調,將當前數據源的鏈接傳出去
    if (onClickLitener != null) {
     onClickLitener.onClick(mTexts.get(mIndex).getmUrl());
    }

    break;
  }
  return true;
 }

 //設置數據源
 public void setmTexts(List mTexts) {
  this.mTexts = mTexts;
 }

 //設置廣告文字的停頓時間
 public void setmInterval(int mInterval) {
  this.mInterval = mInterval;
 }

 //設置文字從出現到消失的時長
 public void setmDuration(int mDuration) {
  this.mDuration = mDuration;
 }

 //設置前綴的文字顏色
 public void setFrontColor(int mFrontColor) {
  mPaintFront.setColor(mFrontColor);
 }

 //設置正文內容的顏色
 public void setBackColor(int mBackColor) {
  mPaintBack.setColor(mBackColor);
 }

 //初始化默認值
 private void init() {
  mDuration = 500;
  mInterval = 1000;
  mIndex = 0;
  mPaintFront = new Paint();
  mPaintFront.setAntiAlias(true);
  mPaintFront.setDither(true);
  mPaintFront.setTextSize(30);


  mPaintBack = new Paint();
  mPaintBack.setAntiAlias(true);
  mPaintBack.setDither(true);
  mPaintBack.setTextSize(30);

 }

 @Override
 protected void onSizeChanged(int w, int h, int oldw, int oldh) {
  super.onSizeChanged(w, h, oldw, oldh);
  Log.i(TAG, "onSizeChanged: " + h);
 }

 @Override
 protected void onDraw(Canvas canvas) {
  if (mTexts != null) {
   Log.i(TAG, "onDraw: " + mY);
   //獲取當前的數據
   ADEnity model = mTexts.get(mIndex);
   String font = model.getmFront();
   String back = model.getmBack();
   // 繪制前綴的外框
   Rect indexBound = new Rect();
   mPaintFront.getTextBounds(font, 0, font.length(), indexBound);

   //繪制內容的外框
   Rect contentBound = new Rect();
   mPaintBack.getTextBounds(back, 0, back.length(), contentBound);
   //剛開始進入的時候文字應該是位於組件的底部的 ,但是這個值是需要獲取組件的高度和當前顯示文字的情況下來判斷的,
   // 所以應該放在onDraw內來初始化這個值,所以需要前面的是否初始化的屬性,判斷當mY==0並且未初始化的時候給mY賦值.
   if (mY == 0 && hasInit == false) {
    mY = getMeasuredHeight() - indexBound.top;
    hasInit = true;
   }
   //移動到最上面
   if (mY == 0 - indexBound.bottom) {
    Log.i(TAG, "onDraw: " + getMeasuredHeight());
    mY = getMeasuredHeight() - indexBound.top;//返回底部
    mIndex++;//換下一組數據
   }
   canvas.drawText(back, 0, back.length(), (indexBound.right - indexBound.left) + 20, mY, mPaintBack);
   canvas.drawText(font, 0, font.length(), 10, mY, mPaintFront);
   //移動到中間
   if (mY == getMeasuredHeight() / 2 - (indexBound.top + indexBound.bottom) / 2) {
    isMove = false;//停止移動
    Timer timer = new Timer();
    timer.schedule(new TimerTask() {
     @Override
     public void run() {
      postInvalidate();//通知重繪
      isMove = true;//設置移動為true
     }
    }, mInterval);//停頓多少毫秒之後再次移動
   }
   //移動的處理與數據源的處理
   mY -= 1;//每次只移動一個像素,盡量保證平滑顯示
   //循環使用數據
   if (mIndex == mTexts.size()) {
    mIndex = 0;
   }
   //如果是處於移動狀態時的,則延遲繪制
   //計算公式為一個比例,一個時間間隔移動組件高度,則多少毫秒來移動1像素
   if (isMove) {
    postInvalidateDelayed(mDuration / getMeasuredHeight());
   }
  }

 }
}

怎麼使用呢?
1,現在xml文件裡引入這個自定義控件
<?xml version="1.0" encoding="utf-8"?>
<LinearLayout xmlns:android="http://schemas.android.com/apk/res/android"
 android:layout_width="match_parent"
 android:layout_height="match_parent"
 android:orientation="vertical">
 <com.qiyuan.jindongshangcheng.view.TextViewAd
  android:id="@+id/textad"
  android:layout_width="match_parent"
  android:layout_height="wrap_content" />

</LinearLayout>

2.在MainActivity中使用
/**
 * Created by huanghaojie on 2016/9/30.
 */

public class MainActivity extends Activity {
 private TextViewAd textViewAd;
 private List<ADEnity> mList;

 @Override
 protected void onCreate(Bundle savedInstanceState) {
  super.onCreate(savedInstanceState);
  setContentView(R.layout.activity_main4);
  textViewAd = (TextViewAd) findViewById(R.id.textad);
  mList = new ArrayList<>();
  for (int i = 0; i < 10; i++) {
   ADEnity adEnity = new ADEnity("前綴" + i, "後綴" + i, "http://www.baidu.com"+i);
   mList.add(adEnity);
  }
  textViewAd.setmTexts(mList);
  textViewAd.setFrontColor(Color.RED);
  textViewAd.setBackColor(Color.BLUE);
  textViewAd.setmDuration(1000);
  textViewAd.setmInterval(1000);
  textViewAd.setOnClickLitener(new TextViewAd.onClickLitener() {
   @Override
   public void onClick(String mUrl) {
    Toast.makeText(MainActivity.this,"點擊了"+mUrl,Toast.LENGTH_LONG).show();
   }
  });
 }
}
以上就是本文的全部內容,希望對大家的學習有所幫助,也希望大家多多支持本站。
 [Android] SQLite數據庫之增刪改查基礎操作
在編程中經常會遇到數據庫的操作,而Android系統內置了SQLite,它是一款輕型數據庫,遵守事務ACID的關系型數據庫管理系統,它占用的資源非常低,能夠支持Windo
 Android開發之利用Activity實現Dialog對話框
前言在Android中經常要使用Dialog來實現一些提示以及一些特殊的效果,而且樣式也不一樣,每次都得查一大堆資料,還不一定能解決。對話框是個好東西,創建簡單有實用。當
 Android開發:利用AlarmManager不間斷向服務器發送請求以及notification通知
一.前言嗯,其實需求很簡單,但是因為服務器不會主動聯系客戶端,所以客戶端必須不間斷的向服務器請求以便得到一些數據,突然不知道怎麼描述這個問題了,總之,我是通過AlarmM
 android:數據存貯方式-SharedPreference
SharedPreference:1.是一種輕型的數據存貯方式2.本質是基於xml文件存貯key_value鍵值對數據3.通常用來存貯一些簡單的配置信息(密碼,窗口狀態,