編輯:關於Android編程
本文實例講述了Android編程實現可滑動的開關效果。分享給大家供大家參考,具體如下:
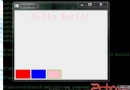
閒著沒事,把之前寫的一個Demo放上來分享下。就是一個開關,實現可滑動和動畫效果。不是圖片切換。
好了,先上圖:

完整實例代碼點擊此處本站下載。
直接把自定義的這個View代碼放上來,有注釋應該很好理解:
首先是布局:
<?xml version="1.0" encoding="utf-8"?>
<RelativeLayout xmlns:android="http://schemas.android.com/apk/res/android"
  android:id="@+id/sv_container"
  android:layout_width="230dip"
  android:layout_height="38dip"
  android:background="@drawable/usage_list_dark" >
  <ImageView
    android:id="@+id/iv_switch_cursor"
    android:layout_width="120dip"
    android:layout_height="36dip"
    android:layout_centerVertical="true"
    android:layout_marginLeft="0.5dip"
    android:layout_marginRight="0.5dip"
    android:background="@drawable/usage_list_green" />
  <LinearLayout
    android:layout_width="fill_parent"
    android:layout_height="fill_parent"
    android:gravity="center" >
    <TextView
      android:id="@+id/switch_text_true"
      android:layout_width="wrap_content"
      android:layout_height="wrap_content"
      android:layout_weight="1"
      android:gravity="center"
      android:text="開" />
    <TextView
      android:id="@+id/switch_text_false"
      android:layout_width="wrap_content"
      android:layout_height="wrap_content"
      android:layout_weight="1"
      android:gravity="center"
      android:text="關" />
  </LinearLayout>
</RelativeLayout>
接著是這個View的代碼,繼承自LinearLayout :
package com.lxb.switchdemo;
import android.content.Context;
import android.graphics.Color;
import android.os.Handler;
import android.os.Message;
import android.view.LayoutInflater;
import android.view.MotionEvent;
import android.view.View;
import android.view.View.OnClickListener;
import android.view.animation.Animation;
import android.view.animation.Animation.AnimationListener;
import android.view.animation.LinearInterpolator;
import android.view.animation.TranslateAnimation;
import android.widget.ImageView;
import android.widget.LinearLayout;
import android.widget.RelativeLayout;
import android.widget.TextView;
public class SwitchView extends LinearLayout implements OnClickListener {
  private static final int FLAG_MOVE_TRUE = 1; // 向左滑動標識
  private static final int FLAG_MOVE_FALSE = 2; // 向右滑動標識
  private static final int HANDLE_LAYOUT_CURSOR = 100; // 處理調用開關的layout方法
  private Context context; // 上下文對象
  private RelativeLayout sv_container; // SwitchView的外層Layout
  private ImageView iv_switch_cursor; // 開關郵標的ImageView
  private TextView switch_text_true; // true的文字信息控件
  private TextView switch_text_false; // false的文字信息控件
  private boolean isChecked = true; // 是否已開
  private boolean checkedChange = false; // isChecked是否有改變
  private OnCheckedChangeListener onCheckedChangeListener; // 用於監聽isChecked是否有改變
  private int margin = 1; // 游標離邊緣位置(這個值視圖片而定, 主要是為了圖片能顯示正確)
  private int bg_left; // 背景左
  private int bg_right; // 背景右
  private int cursor_left; // 游標左部
  private int cursor_top; // 游標頂部
  private int cursor_right; // 游標右部
  private int cursor_bottom; // 游標底部
  private Animation animation; // 移動動畫
  private int currentFlag = FLAG_MOVE_TRUE; // 當前移動方向flag
  public SwitchView(Context context) {
    super(context);
    this.context = context;
    initView();
  }
  @Override
  protected void onLayout(boolean changed, int l, int t, int r, int b) {
    super.onLayout(changed, l, t, r, b);
    // 獲取所需要的值
    bg_left = sv_container.getLeft();
    bg_right = sv_container.getRight();
    cursor_left = iv_switch_cursor.getLeft();
    cursor_top = iv_switch_cursor.getTop();
    cursor_right = iv_switch_cursor.getRight();
    cursor_bottom = iv_switch_cursor.getBottom();
  }
  private Handler mHandler = new Handler() {
    @Override
    public void handleMessage(Message msg) {
      switch(msg.what) {
      case HANDLE_LAYOUT_CURSOR:
        iv_switch_cursor.layout(cursor_left, cursor_top, cursor_right, cursor_bottom);
        break;
      }
    }
  };
  public void onClick(View v) {
    // 控件點擊時觸發改變checked值
    if(v == this) {
      changeChecked(!isChecked);
    }
  }
  /**
   * 初始化控件
   */
  private void initView() {
    LayoutInflater inflater = (LayoutInflater) context.getSystemService(Context.LAYOUT_INFLATER_SERVICE);
    View view = inflater.inflate(R.layout.switch_view, this);
    view.setOnClickListener(this);
    sv_container = (RelativeLayout) view.findViewById(R.id.sv_container);
    switch_text_true = (TextView) view.findViewById(R.id.switch_text_true);
    switch_text_false = (TextView) view.findViewById(R.id.switch_text_false);
    changeTextColor();
    iv_switch_cursor = (ImageView) view.findViewById(R.id.iv_switch_cursor);
    iv_switch_cursor.setClickable(false);
    iv_switch_cursor.setOnTouchListener(new OnTouchListener() {
      int lastX; // 最後的X坐標
      public boolean onTouch(View v, MotionEvent event) {
        switch(event.getAction()) {
        case MotionEvent.ACTION_DOWN:
          lastX = (int) event.getRawX();
          cursor_left = v.getLeft();
          cursor_top = v.getTop();
          cursor_right = v.getRight();
          cursor_bottom = v.getBottom();
          break;
        case MotionEvent.ACTION_MOVE:
          int dx = (int) event.getRawX() - lastX;
          cursor_left = v.getLeft() + dx;
          cursor_right = v.getRight() + dx;
          // 超出邊界處理
          if(cursor_left <= bg_left + margin) {
            cursor_left = bg_left + margin;
            cursor_right = cursor_left + v.getWidth();
          }
          if(cursor_right >= bg_right - margin) {
            cursor_right = bg_right - margin;
            cursor_left = cursor_right - v.getWidth();
          }
          v.layout(cursor_left, cursor_top, cursor_right, cursor_bottom);
          lastX = (int) event.getRawX();
          break;
        case MotionEvent.ACTION_UP:
          calculateIscheck();
          break;
        }
        return true;
      }
    });
  }
  /**
   * 計算處於true或是false區域, 並做改變處理
   */
  private void calculateIscheck() {
    float center = (float) ((bg_right - bg_left) / 2.0);
    float cursor_center = (float) ((cursor_right - cursor_left) / 2.0);
    if(cursor_left + cursor_center <= center) {
      changeChecked(true);
    } else {
      changeChecked(false);
    }
  }
  /**
   * 改變checked, 根據checked移動游標
   * @param isChecked
   */
  private void changeChecked(boolean isChecked) {
    if(this.isChecked != isChecked) {
      checkedChange = true;
    } else {
      checkedChange = false;
    }
    if(isChecked) {
      currentFlag = FLAG_MOVE_TRUE;
    } else {
      currentFlag = FLAG_MOVE_FALSE;
    }
    cursorMove();
  }
  /**
   * 游標移動
   */
  private void cursorMove() {
    // 這裡說明一點, 動畫本可設置animation.setFillAfter(true)
    // 令動畫進行完後停在最後位置. 但這裡使用這樣方式的話.
    // 再次拖動圖片會出現異常(具體原因我沒找到)
    // 所以最後只能使用onAnimationEnd回調方式再layout游標
    animation = null;
    final int toX;
    if(currentFlag == FLAG_MOVE_TRUE) {
      toX = cursor_left - bg_left - margin;
      animation = new TranslateAnimation(0, -toX, 0, 0);
    } else {
      toX = bg_right - margin - cursor_right;
      animation = new TranslateAnimation(0, toX, 0, 0);
    }
    animation.setDuration(100);
    animation.setInterpolator(new LinearInterpolator());
    animation.setAnimationListener(new AnimationListener() {
      public void onAnimationStart(Animation animation) {
      }
      public void onAnimationRepeat(Animation animation) {
      }
      public void onAnimationEnd(Animation animation) {
        // 計算動畫完成後游標應在的位置
        if(currentFlag == FLAG_MOVE_TRUE) {
          cursor_left -= toX;
          cursor_right = cursor_left + iv_switch_cursor.getWidth();
        } else {
          cursor_right = bg_right - margin;
          cursor_left = cursor_right - iv_switch_cursor.getWidth();
        }
        // 這裡不能馬上layout游標正確位置, 否則會有一點點閃屏
        // 為了美觀, 這裡遲了一點點調用layout方法, 便不會閃屏
        mHandler.sendEmptyMessageDelayed(HANDLE_LAYOUT_CURSOR, 5);
        // 這裡是根據是不是改變了isChecked值進行一些操作
        if(checkedChange) {
          isChecked = !isChecked;
          if(onCheckedChangeListener != null) {
            onCheckedChangeListener.onCheckedChanged(isChecked);
          }
          changeTextColor();
        }
      }
    });
    iv_switch_cursor.startAnimation(animation);
  }
  /**
   * 改變字體顯示顏色
   */
  private void changeTextColor() {
    if(isChecked) {
      switch_text_true.setTextColor(Color.WHITE);
      switch_text_false.setTextColor(Color.GRAY);
    } else {
      switch_text_true.setTextColor(Color.GRAY);
      switch_text_false.setTextColor(Color.WHITE);
    }
  }
  /**
   * layout游標
   */
  private void layoutCursor() {
    if(isChecked) {
      cursor_left = bg_left + margin;
      cursor_right = bg_left + margin + iv_switch_cursor.getWidth();
    } else {
      cursor_left = bg_right - margin - iv_switch_cursor.getWidth();
      cursor_right = bg_right - margin;
    }
    iv_switch_cursor.layout(cursor_left, cursor_top, cursor_right, cursor_bottom);
  }
  /**
   * isChecked值改變監聽器
   */
  public interface OnCheckedChangeListener {
    void onCheckedChanged(boolean isChecked);
  }
  public boolean isChecked() {
    return isChecked;
  }
  public void setChecked(boolean isChecked) {
    if(this.isChecked != isChecked) {
      this.isChecked = isChecked;
      if(onCheckedChangeListener != null) {
        onCheckedChangeListener.onCheckedChanged(isChecked);
      }
      layoutCursor();
    }
  }
  public void setOnCheckedChangeListener(
      OnCheckedChangeListener onCheckedChangeListener) {
    this.onCheckedChangeListener = onCheckedChangeListener;
  }
}
最後是Activity使用這個View:
package com.lxb.switchdemo;
import android.app.Activity;
import android.os.Bundle;
import android.view.View;
import android.view.View.OnClickListener;
import android.widget.Button;
import android.widget.LinearLayout;
import android.widget.TextView;
import android.widget.Toast;
import com.lxb.switchdemo.SwitchView.OnCheckedChangeListener;
public class Switch_demoActivity extends Activity implements OnClickListener {
  private LinearLayout layout;
  private TextView tv_showcheck;
  private SwitchView sv;
  private Button btn_set_true;
  private Button btn_set_false;
  private Button btn_getstate;
  @Override
  public void onCreate(Bundle savedInstanceState) {
    super.onCreate(savedInstanceState);
    setContentView(R.layout.main);
    layout = (LinearLayout) findViewById(R.id.layout);
    tv_showcheck = (TextView) findViewById(R.id.tv_showcheck);
    sv = new SwitchView(this);
    tv_showcheck.setText("當前狀態: " + getState(sv.isChecked()));
    sv.setOnCheckedChangeListener(new OnCheckedChangeListener() {
      public void onCheckedChanged(boolean isChecked) {
        tv_showcheck.setText("當前狀態: " + getState(isChecked));
      }
    });
    layout.addView(sv);
    btn_set_true = (Button) findViewById(R.id.btn_set_true);
    btn_set_false = (Button) findViewById(R.id.btn_set_false);
    btn_getstate = (Button) findViewById(R.id.btn_getstate);
    btn_set_true.setOnClickListener(this);
    btn_set_false.setOnClickListener(this);
    btn_getstate.setOnClickListener(this);
  }
  public void onClick(View v) {
    switch(v.getId()) {
    case R.id.btn_set_true:
      sv.setChecked(true);
      break;
    case R.id.btn_set_false:
      sv.setChecked(false);
      break;
    case R.id.btn_getstate:
      Toast.makeText(Switch_demoActivity.this,
          sv.isChecked() + "", Toast.LENGTH_SHORT).show();
      break;
    }
  }
  private String getState(boolean state) {
    if(state) {
      return "開";
    }
    return "關";
  }
}
實現起來還是很簡單的,主要還是坐標什麼的需要計算與調整。
當然可能還會有一些BUG存在,有需要的可以下下來自行修改,也可以和我討論。
更多關於Android相關內容感興趣的讀者可查看本站專題:《Android通信方式總結》、《Android調試技巧與常見問題解決方法匯總》、《Android開發入門與進階教程》、《Android多媒體操作技巧匯總(音頻,視頻,錄音等)》、《Android基本組件用法總結》、《Android視圖View技巧總結》、《Android布局layout技巧總結》及《Android控件用法總結》
希望本文所述對大家Android程序設計有所幫助。
 Android加殼原理分析
0x00閱讀本文前,建議讀者首先閱讀Android加殼原理,參考文章Android中的Apk的加固(加殼)原理解析和實現。如果沒有看過這篇文章,本文理解起來比較困難。0x
 Qt on Android: Qt Quick 組件與對象動態創建詳解
在《Qt on Android: Qt Quick 事件處理之信號與槽》一文中介紹自定義信號時,舉了一個簡單的例子,定義了一個顏色選擇組件,當用戶在組建內點擊鼠標時,該組
 Android Studio如何更改JDK和SDK的路徑?
這個對於很多剛轉到Android Studio上的來說,確實是一個問題。可能你在設置裡面找了很久都沒找到這個選項。 直接上圖吧,按下圖就可以找到設置的地兒了,然後直接設置
 Android Activity之間傳遞圖片(Bitmap)的方法
在Android開發中;Activity之間傳遞參數是常見的事;如果我們要在Activity之間傳遞圖片;1。MainActivity中包括一個ImageView;當我們