編輯:關於Android編程
本文實例講述了Android中使用Service實現後台發送郵件功能。分享給大家供大家參考,具體如下:
程序如下:
import android.app.Activity;
import android.content.Intent;
import android.content.res.Resources.NotFoundException;
import android.os.Bundle;
import android.widget.TextView;
public class A05Activity extends Activity {
 private TextView tv;
 private String[] receiver;
 private String subject;
 private String body;
  /** Called when the activity is first created. */
  @Override
  public void onCreate(Bundle savedInstanceState) {
    super.onCreate(savedInstanceState);
    setContentView(R.layout.main);
    tv=(TextView)findViewById(R.id.tv);
    tv.setText("等待接收郵件中···");
    try {
     //取得短信傳來的Bundle
  Bundle b=this.getIntent().getExtras();
  if(b!=null){
  //將Bundle中的字符串取出
  String s=b.getString("input");
  receiver=new String[]{"1650967185@163.com"};
  subject="郵箱發送";
  body=s.toString();
  //自定義一個Intent業執行發送E-mail的工作
  Intent i=new Intent(android.content.Intent.ACTION_SEND);
  i.setType("plain/text");//設置郵件格式為“plain/text”
  i.putExtra(android.content.Intent.EXTRA_EMAIL,receiver);//傳入收件人地址
  i.putExtra(android.content.Intent.EXTRA_SUBJECT, subject);//傳入郵件主題
  i.putExtra(android.content.Intent.EXTRA_TEXT, body);//傳入郵件內容
  startActivity(Intent.createChooser(i, getResources().getString(R.string.message)));
  }
  else{
  finish();
  }
 } catch (NotFoundException e) {
  // TODO Auto-generated catch block
  e.printStackTrace();
 }
  }
}
import android.content.BroadcastReceiver;
import android.content.Context;
import android.content.Intent;
import android.os.Bundle;
import android.telephony.gsm.SmsMessage;//用來收取短信
import android.widget.Toast;//告知用戶收到短信
@SuppressWarnings("deprecation")
public class ServiceA05 extends BroadcastReceiver{
 public static final String mAction="android.provider.Telephony.SMS_RECEIVED";
  private String str_receiver="收到短信";
 @Override
 public void onReceive(Context arg0, Intent arg1) {
 // TODO Auto-generated method stub
 Toast.makeText(arg0, str_receiver.toString(), Toast.LENGTH_LONG).show();
 if(arg1.getAction().equals(mAction)){
  //建構一字符串集合變量sb
  StringBuilder sb=new StringBuilder();
  //接收數據
  Bundle b=arg1.getExtras();
  //判斷intent傳送數據是否為空
  if(b!=null){
  //pdus為android內置的短信參數indentifier
  /*
   * 通過bundle.get("")返回一個包含pdus的對象*/
  Object[] myOBJpuds=(Object[])b.get("pdus");
  //構造短信對象數組,並根據短信內容大小來確定數組的大小
  SmsMessage[] sm=new SmsMessage[myOBJpuds.length];
  for(int i=0;i<myOBJpuds.length;i++){
   sm[i]=SmsMessage.createFromPdu((byte[])myOBJpuds[i]);
  }
  //將短信合並自定義信息於StringBuilder當中
  for(SmsMessage sm01:sm){
   sb.append("接收到來自:\n");
   //收信人的電話號碼
   sb.append(sm01.getDisplayOriginatingAddress());
   sb.append("\n--------傳來的短信---------\n");
   //取得傳來短信的內容
   sb.append(sm01.getDisplayMessageBody());
   //用Toast來顯示來電信息
   Toast.makeText(arg0, sb.toString(), Toast.LENGTH_LONG).show();
  }
  }
  Toast.makeText(arg0, sb.toString(), Toast.LENGTH_LONG).show();
  //返回主Activity
  Intent i=new Intent(arg0,A05Activity.class);
  //定義一個Bundle
  Bundle b01=new Bundle();
  //將短信以putString()方法存入Bundle中
  b01.putString("input", sb.toString());
  //將Bundle放入Intent中
  i.putExtras(b01);
  //設置Intent的Flag以一個全新的task來運行
  i.setFlags(Intent.FLAG_ACTIVITY_NEW_TASK);
  arg0.startActivity(i);
 }
 }
}
AndroidManifest.xml如下:
<?xml version="1.0" encoding="utf-8"?>
<manifest xmlns:android="http://schemas.android.com/apk/res/android"
  package="com.my.a05"
  android:versionCode="1"
  android:versionName="1.0" >
  <uses-sdk android:minSdkVersion="10" />
  <application
    android:icon="@drawable/ic_launcher"
    android:label="@string/app_name" >
    <activity
      android:name=".A05Activity"
      android:label="@string/app_name" >
      <intent-filter>
        <action android:name="android.intent.action.MAIN" />
        <category android:name="android.intent.category.LAUNCHER" />
      </intent-filter>
    </activity>
    <receiver android:name="ServiceA05">
      <intent-filter>
        <action android:name="android.provider.Telephony.SMS_RECEIVED"/>
      </intent-filter>
    </receiver>
  </application>
  <uses-permission android:name="android.permission.RECEIVE_SMS"/>
</manifest>
在android中注冊一個BroadcastReceiver,並設置這個receiver的intent-filter(Android.provider.Telephony.SMS_RECEIVED),讓它針對短信事件做出反應。並且還要添加一個權限:android.permission.RECEIVE_SMS。
更多關於Android相關內容感興趣的讀者可查看本站專題:《Android控件用法總結》及《Android開發入門與進階教程》
希望本文所述對大家Android程序設計有所幫助。
 Android手把手教你集成高德定位
關於定位,相信大家都不陌生。現在很多App基本都少不了定位的功能,Android本身也提供了定位的功能(LocationManager),但是由於Google牆太厚了,所
 Android中在GridView網格視圖上實現item拖拽交換的方法
GridView基礎新建一個HelloGridView的工程修改main.xml代碼如下:<?xml version=1.0 encoding=utf-8&
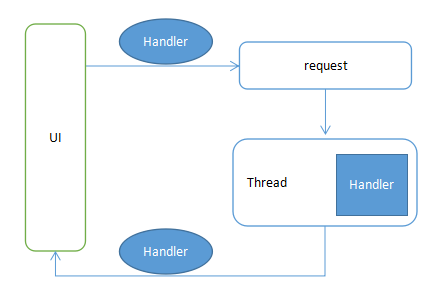 利用Handler進行網絡請求
那麼我們就來用Handler制作一個簡易的網絡請求框架。如下圖:解釋一下:UI在request的時候傳入UI中的Handler,同時將請求的Runnable推入到工作線程
 Android自定義Adapter的ListView的思路及代碼
在開發中,我們經常使用到ListView這個控件。Android的API也提供了許多創建ListView適配器的快捷方式。例如ArrayAdapter、Sim