編輯:關於Android編程
網格布局標簽是GridLayout。這個布局是android4.0新增的布局。這個布局只有4.0之後的版本才能使用。
不過新增了一些東東
①跟LinearLayout(線性布局)一樣,他可以設置容器中組件的對齊方式
②容器中的組件可以跨多行也可以跨多列(相比TableLayout直接放組件,占一行相比較)
因為是android 4.0新增的,API Level 14,在這個版本以前的sdk
都需要導入項目,等下會詳細介紹
常用屬性:
排列對齊:
①設置組件的排列方式: android:orientation="" vertical(豎直,默認)或者horizontal(水平)
②設置組件的對齊方式: android:layout_gravity="" center,left,right,buttom啊,這些,如果想同時用兩種的話:eg: buttom|left
學習導圖

(一)簡介
網格布局由GridLayout所代表,在android4.0之後新增加的布局管理器,因此需要android4.0之後的版本中使用,如果在更早的平台使用該布局管理器,則需要導入相應的支持庫<android.support.v7.widget.GridLayout>
(二)案列----計算器
<?xml version="1.0" encoding="utf-8"?>
<GridLayout
  xmlns:android="http://schemas.android.com/apk/res/android"
  android:layout_width="match_parent"
  android:layout_height="match_parent"
  android:rowCount="6"
  android:columnCount="4"
  android:layout_gravity="fill">
  <TextView
    android:layout_width="match_parent"
    android:layout_height="wrap_content"
    android:text="0"
    android:textSize="80sp"
    android:layout_marginRight="5dp"
    android:layout_marginLeft="5dp"
    android:layout_columnSpan="4"
    android:background="#eee"
    android:padding="3sp"
    android:editable="false"
    android:textColor="#000"
    />
 <Button
   android:layout_width="match_parent"
   android:layout_height="wrap_content"
   android:layout_columnSpan="4"
   android:text="清除"
   android:textColor="#000"
   android:textSize="24dp"
   android:layout_marginLeft="5dp"
   android:layout_marginRight="5dp"
   android:background="@android:color/background_light"
   />
  <Button
    android:layout_marginTop="20dp"
    android:layout_width="wrap_content"
    android:layout_height="wrap_content"
    android:text="7"
    android:textColor="#000"
    android:textSize="24dp"
    android:layout_marginLeft="5dp"
    android:layout_marginRight="5dp"
    android:background="@android:color/background_light"
    />
  <Button
    android:layout_marginTop="20dp"
    android:layout_width="wrap_content"
    android:layout_height="wrap_content"
    android:text="8"
    android:textColor="#000"
    android:textSize="24dp"
    android:layout_marginLeft="10dp"
    android:background="@android:color/background_light"
    />
  <Button
    android:layout_marginTop="20dp"
    android:layout_width="wrap_content"
    android:layout_height="wrap_content"
    android:text="9"
    android:textColor="#000"
    android:textSize="24dp"
    android:layout_marginLeft="10dp"
    android:background="@android:color/background_light"
    />
  <Button
    android:layout_marginTop="20dp"
    android:layout_width="wrap_content"
    android:layout_height="wrap_content"
    android:text="+"
    android:textColor="#000"
    android:textSize="24dp"
    android:layout_marginLeft="10dp"
    android:background="@android:color/background_light"
    />
  <Button
    android:layout_marginTop="20dp"
    android:layout_width="wrap_content"
    android:layout_height="wrap_content"
    android:text="4"
    android:textColor="#000"
    android:textSize="24dp"
    android:layout_marginLeft="5dp"
    android:layout_marginRight="5dp"
    android:background="@android:color/background_light"
    />
  <Button
    android:layout_marginTop="20dp"
    android:layout_width="wrap_content"
    android:layout_height="wrap_content"
    android:text="5"
    android:textColor="#000"
    android:textSize="24dp"
    android:layout_marginLeft="10dp"
    android:background="@android:color/background_light"
    />
  <Button
    android:layout_marginTop="20dp"
    android:layout_width="wrap_content"
    android:layout_height="wrap_content"
    android:text="6"
    android:textColor="#000"
    android:textSize="24dp"
    android:layout_marginLeft="10dp"
    android:background="@android:color/background_light"
    />
  <Button
    android:layout_marginTop="20dp"
    android:layout_width="wrap_content"
    android:layout_height="wrap_content"
    android:text="-"
    android:textColor="#000"
    android:textSize="24dp"
    android:layout_marginLeft="10dp"
    android:background="@android:color/background_light"
    />
  <Button
    android:layout_marginTop="20dp"
    android:layout_width="wrap_content"
    android:layout_height="wrap_content"
    android:text="1"
    android:textColor="#000"
    android:textSize="24dp"
    android:layout_marginLeft="5dp"
    android:layout_marginRight="5dp"
    android:background="@android:color/background_light"
    />
  <Button
    android:layout_marginTop="20dp"
    android:layout_width="wrap_content"
    android:layout_height="wrap_content"
    android:text="2"
    android:textColor="#000"
    android:textSize="24dp"
    android:layout_marginLeft="10dp"
    android:background="@android:color/background_light"
    />
  <Button
    android:layout_marginTop="20dp"
    android:layout_width="wrap_content"
    android:layout_height="wrap_content"
    android:text="3"
    android:textColor="#000"
    android:textSize="24dp"
    android:layout_marginLeft="10dp"
    android:background="@android:color/background_light"
    />
  <Button
    android:layout_marginTop="20dp"
    android:layout_width="wrap_content"
    android:layout_height="wrap_content"
    android:text="*"
    android:textColor="#000"
    android:textSize="24dp"
    android:layout_marginLeft="10dp"
    android:background="@android:color/background_light"
    />
  <Button
    android:layout_marginTop="20dp"
    android:layout_width="wrap_content"
    android:layout_height="wrap_content"
    android:text="."
    android:textColor="#000"
    android:textSize="24dp"
    android:layout_marginLeft="5dp"
    android:layout_marginRight="5dp"
    android:background="@android:color/background_light"
    />
  <Button
    android:layout_marginTop="20dp"
    android:layout_width="wrap_content"
    android:layout_height="wrap_content"
    android:text="0"
    android:textColor="#000"
    android:textSize="24dp"
    android:layout_marginLeft="10dp"
    android:background="@android:color/background_light"
    />
  <Button
    android:layout_marginTop="20dp"
    android:layout_width="wrap_content"
    android:layout_height="wrap_content"
    android:text="="
    android:textColor="#000"
    android:textSize="24dp"
    android:layout_marginLeft="10dp"
    android:background="@android:color/background_light"
    />
  <Button
    android:layout_marginTop="20dp"
    android:layout_width="wrap_content"
    android:layout_height="wrap_content"
    android:text="/"
    android:textColor="#000"
    android:textSize="24dp"
    android:layout_marginLeft="10dp"
    android:background="@android:color/background_light"
    />
</GridLayout>
以上內容是小編給大家介紹的Android布局之GridLayout網格布局相關知識,希望大家喜歡。
 Android Studio導入Eclipse項目的兩種方法
Android Studio導入Eclipse項目有兩種方法,一種是直接把Eclipse項目導入Android Studio,另一種是在Eclipse項目裡面進行轉換,然
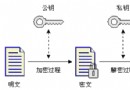 Android 安全加密:非對稱加密詳解
Android安全加密專題文章索引 Android安全加密:對稱加密 Android安全加密:非對稱加密 Android安全加密:消息摘要Message D
 Android DigitalClock組件用法實例
本文實例講述了Android DigitalClock組件用法。分享給大家供大家參考,具體如下:DigitalClock組件的使用很簡單,先看看效果圖:DigitalCl
 Android實現畫板、寫字板功能(附源碼下載)
前言本文給大家分享一個使用Android開發寫字板功能Dem、簡單操作內存中的圖像、對圖像進行簡單的處理、繪制直線、以達到寫字板的效果效果圖如下XML布局代碼<Re