編輯:關於Android編程
本文實例講述了Android編程開發之EditText中不輸入特定字符會顯示相關提示信息的方法。分享給大家供大家參考,具體如下:
先看效果圖:

源碼如下:
布局文件:
<RelativeLayout xmlns:android="http://schemas.android.com/apk/res/android"
  xmlns:tools="http://schemas.android.com/tools"
  android:layout_width="match_parent"
  android:layout_height="match_parent"
  android:paddingBottom="@dimen/activity_vertical_margin"
  android:paddingLeft="@dimen/activity_horizontal_margin"
  android:paddingRight="@dimen/activity_horizontal_margin"
  android:paddingTop="@dimen/activity_vertical_margin"
  tools:context=".MainActivity" >
  <TextView
    android:id="@+id/textView1"
    android:layout_width="wrap_content"
    android:layout_height="wrap_content"
    android:layout_alignParentLeft="true"
    android:layout_alignParentTop="true"
    android:text="@string/text_num" />
  <TextView
    android:id="@+id/textView2"
    android:layout_width="wrap_content"
    android:layout_height="wrap_content"
    android:layout_alignParentLeft="true"
    android:layout_below="@+id/num"
    android:text="@string/text_abc" />
  <EditText
    android:id="@+id/num"
    android:layout_width="wrap_content"
    android:layout_height="wrap_content"
    android:layout_below="@+id/textView1"
    android:digits="0123456789"
    android:ems="10" />
  <EditText
    android:id="@+id/abc"
    android:layout_width="wrap_content"
    android:layout_height="wrap_content"
    android:layout_alignLeft="@+id/textView2"
    android:layout_below="@+id/textView2"
    android:digits="qwertyuiopasdfghjklzxcvbnm"
    android:ems="10" >
  </EditText>
  <TextView
    android:id="@+id/textView3"
    android:layout_width="wrap_content"
    android:layout_height="wrap_content"
    android:layout_alignLeft="@+id/abc"
    android:layout_below="@+id/abc"
    android:layout_marginTop="14dp"
    android:text="@string/text_num2" />
  <EditText
    android:id="@+id/num2"
    android:layout_width="wrap_content"
    android:layout_height="wrap_content"
    android:layout_alignLeft="@+id/textView3"
    android:layout_below="@+id/textView3"
    android:ems="10"
    android:inputType="number|textCapCharacters" >
  </EditText>
  <Button
    android:id="@+id/button1"

    android:layout_width="wrap_content"
    android:layout_height="wrap_content"
    android:layout_above="@+id/textView2"
    android:layout_below="@+id/textView1"
    android:layout_toRightOf="@+id/num"
    android:text="確認1" />
  <Button
    android:id="@+id/button4"

    android:layout_width="wrap_content"
    android:layout_height="wrap_content"
    android:layout_alignBottom="@+id/email"
    android:layout_alignTop="@+id/email"
    android:layout_toRightOf="@+id/email"
    android:text="確認4" />
  <Button
    android:id="@+id/button2"

    android:layout_width="wrap_content"
    android:layout_height="wrap_content"
    android:layout_above="@+id/textView3"
    android:layout_alignLeft="@+id/button1"
    android:layout_below="@+id/textView2"
    android:text="確認2" />
  <Button
    android:id="@+id/button3"

    android:layout_width="wrap_content"
    android:layout_height="wrap_content"
    android:layout_alignBottom="@+id/num2"
    android:layout_alignLeft="@+id/button2"
    android:layout_alignTop="@+id/num2"
    android:text="確認3" />
  <TextView
    android:id="@+id/textView4"
    android:layout_width="wrap_content"
    android:layout_height="wrap_content"
    android:layout_alignParentLeft="true"
    android:layout_centerVertical="true"
    android:text="@string/text_email" />
  <EditText
    android:id="@+id/email"
    android:layout_width="wrap_content"
    android:layout_height="wrap_content"
    android:layout_alignLeft="@+id/textView4"
    android:layout_below="@+id/textView4"
    android:layout_marginTop="21dp"
    android:ems="10"
    android:inputType="textEmailAddress" >
  </EditText>
</RelativeLayout>
MainActivity.java:
package com.example.edittext2;
import android.app.Activity;
import android.os.Bundle;
import android.view.Menu;
import android.view.View;
import android.widget.Button;
import android.widget.EditText;
public class MainActivity extends Activity {
  private EditText num;
  private EditText abc;
  private EditText num2;
  private EditText email;
  private Button button1;
  private Button button2;
  private Button button3;
  private Button button4;
  @Override
  protected void onCreate(Bundle savedInstanceState) {
    super.onCreate(savedInstanceState);
    setContentView(R.layout.activity_main);
    num=(EditText) findViewById(R.id.num);
    abc=(EditText) findViewById(R.id.abc);
    num2=(EditText) findViewById(R.id.num2);
    email=(EditText) findViewById(R.id.email);
    button1=(Button) findViewById(R.id.button1);
    button2=(Button) findViewById(R.id.button2);
    button3=(Button) findViewById(R.id.button3);
    button4=(Button) findViewById(R.id.button4);
    button1.setOnClickListener(new View.OnClickListener() {
      @Override
      public void onClick(View v) {
        String value=num.getText().toString();
        //trim()判斷前後是否有空格
        if(value==null||value.trim().equals("")){
          num.setError("請輸入內容!!");
          return;
        }
      }
    });
    button2.setOnClickListener(new View.OnClickListener() {
      @Override
      public void onClick(View v) {
        String value=abc.getText().toString();
        //trim()判斷前後是否有空格
        if(value==null||value.trim().equals("")){
          abc.setError("請輸入內容!!");
          return;
        }
      }
    });
    button3.setOnClickListener(new View.OnClickListener() {
      @Override
      public void onClick(View v) {
        String value=num2.getText().toString();
        //trim()判斷前後是否有空格
        if(value==null||value.trim().equals("")){
          num2.setError("請輸入內容!!");
          return;
        }
      }
    });
    button4.setOnClickListener(new View.OnClickListener() {
      @Override
      public void onClick(View v) {
        String value=email.getText().toString();
        //trim()判斷前後是否有空格
        if(value==null||value.trim().equals("")){
          email.setError("請輸入內容!!");
          return;
        }
      }
    });
  }
  @Override
  public boolean onCreateOptionsMenu(Menu menu) {
    // Inflate the menu; this adds items to the action bar if it is present.
    getMenuInflater().inflate(R.menu.main, menu);
    return true;
  }
}
希望本文所述對大家Android程序設計有所幫助。
 Chromium on Android: Android L平台上WebView的變化及其對浏覽器廠商的影響分析
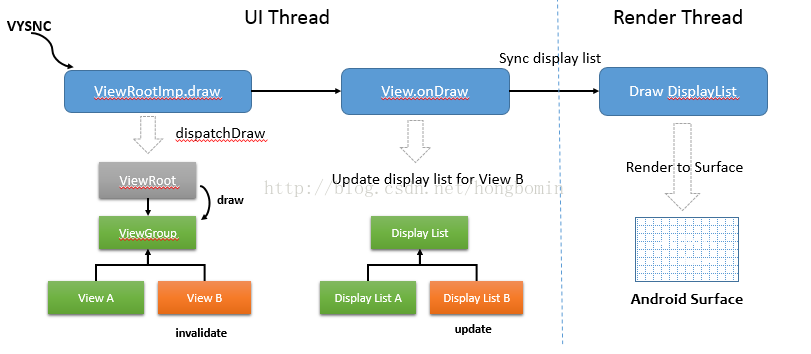
摘要:Android L平台在圖形渲染方面有一項重要的改進,它引入了一個專門的線程用於執行渲染工作,UI線程負責生成的顯示列表(DisplayList),渲染線程負責重放
 詳解Android應用中preference首選項的編寫方法
最近學習android時發現,很多書上都介紹了preference首選項這個東西,但是大部分的書都是直接上來講怎麼用,對其的用途和來歷都是只字不提,筆者本人對於這種做法是
 React-Native系列Android——Touch事件原理及狀態效果
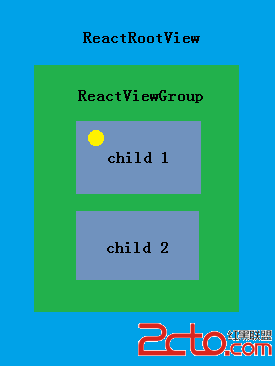
Native原生相比於Hybrid或H5最大優點是具有流暢和復雜的交互效果,觸摸事件便是其中重要一項,包括點擊(Click)、長按(LongClick)、手勢(gestu
 Android Small插件化框架--啟動插件Activity源碼解析(下)
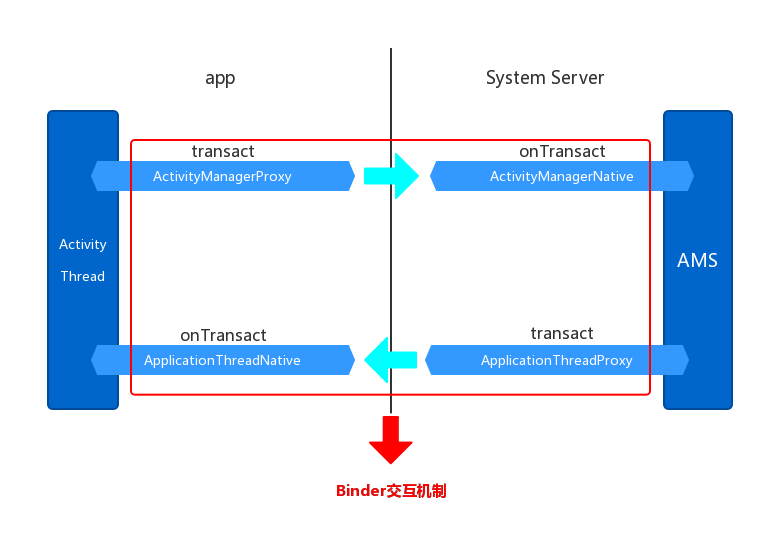
AMS對startActivity請求處理及返回過程根據上一章的分析了解了調用startActivity(),終於把數據和要開啟Activity的請求發送到了AMS了,接