編輯:關於Android編程
示例效果如下:


MainActivity.xml
package sn.qdj.popupwindowdemo;
import android.support.v7.app.ActionBarActivity;
import android.os.Bundle;
import android.view.Gravity;
import android.view.View;
import android.view.View.OnClickListener;
import android.widget.Button;
import android.widget.PopupWindow;
/**
* PopupWindow使用
* @author qingdujun
*
*/
public class MainActivity extends ActionBarActivity {
@Override
protected void onCreate(Bundle savedInstanceState) {
super.onCreate(savedInstanceState);
setContentView(R.layout.activity_main);
/**
* popup.xml 為彈出界面布局
*/
View root = getLayoutInflater().inflate(R.layout.popup, null);
/**
* 彈出界面
* 寬度:400
* 高度:200
*/
final PopupWindow popup = new PopupWindow(root, 400,200);
Button btn = (Button)findViewById(R.id.btn);
Button close = (Button)findViewById(R.id.close);
btn.setOnClickListener(new OnClickListener() {
@Override
public void onClick(View v) {
// TODO Auto-generated method stub
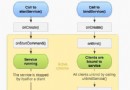
/**
* 在指定位置彈出
*
* 第一個參數指定PopupWindow的錨點view,即依附在哪個view上。
* 第二個參數指定起始點為parent的右下角
* 第三個參數設置以btn的下方為原點,向左、上各偏移0像素。
*/
popup.showAtLocation(findViewById(R.id.btn), Gravity.BOTTOM, 0, 0);
}
});
close.setOnClickListener(new OnClickListener() {
@Override
public void onClick(View v) {
// TODO Auto-generated method stub
/**
* 關閉PopupWindow
*/
popup.dismiss();
}
});
}
}
activity_main.xml
<RelativeLayout xmlns:android="http://schemas.android.com/apk/res/android"
  xmlns:tools="http://schemas.android.com/tools"
  android:layout_width="match_parent"
  android:layout_height="match_parent" >
  <Button
    android:id="@+id/btn"
    android:layout_width="200dp"
    android:layout_height="wrap_content"
    android:layout_alignParentTop="true"
    android:text="彈出" />
  <Button
    android:id="@+id/close"
    android:layout_width="200dp"
    android:layout_height="wrap_content"
 android:layout_toRightOf="@id/btn"
    android:text="關閉" />
</RelativeLayout>
popup.xml
<?xml version="1.0" encoding="utf-8"?>
<LinearLayout xmlns:android="http://schemas.android.com/apk/res/android"
  android:layout_width="match_parent"
  android:layout_height="match_parent"
  android:orientation="vertical" >
  <Button
    android:id="@+id/btn1"
    android:layout_width="match_parent"
    android:layout_height="wrap_content"
    android:text="相冊" />
  <Button
    android:id="@+id/btn2"
    android:layout_width="match_parent"
    android:layout_height="wrap_content"
    android:text="拍照" />
</LinearLayout>
 文卓爺安卓模擬器安裝不上教程
文卓爺(Windroye)產品是在PC上模擬安卓系統,使得安卓應用能運行在Windows平台上。文卓爺模擬器安裝不上怎麼辦?下面是文卓爺安卓模擬器安裝不上解
 Android實現閱讀APP平移翻頁效果
自己做的一個APP需要用到翻頁閱讀,網上看過立體翻頁效果,不過bug太多了還不兼容。看了一下多看閱讀翻頁是采用平移翻頁的,於是就仿寫了一個平移翻頁的控件。效果如下:在翻頁
 Android簡單實現無限滾動自動滾動的ViewPager
經常我們會在應用中看到一個可以自動滾動,並且無限滾動的一個ViewPager,百度谷歌上面也有很多關於這方面的教程,但是感覺都略顯麻煩,而且封裝的都不是很徹底。所以試著封
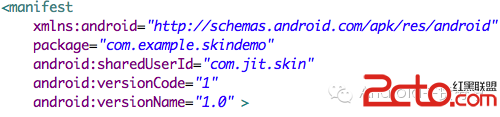 Android實現換膚功能(一)
上周有個朋友給建議說講講換膚吧,真巧這周公司的工作安排也有這個需求,換的地方之多之繁,讓人傷神死了。正所謂磨刀不誤砍柴工,先磨下刀,抽出一個工具類,寫了個關於換膚的簡單d