編輯:關於Android編程
1. 首先在build.gradle引入依賴
compile 'com.squareup.retrofit2:retrofit:2.1.0'
compile 'com.squareup.retrofit2:converter-gson:2.1.0'
compile 'com.squareup.okhttp3:logging-interceptor:3.3.1'
注意,這裡的 logging 用於輸出網絡交互的Log,對於開發調試極其有用。之前retrofit2因為不能輸出Log被人嫌棄了很久,各高手實現了幾種打印Log的方式,現在總算有官方的了。
2. 這是工具類
import okhttp3.HttpUrl;
import okhttp3.Interceptor;
import okhttp3.OkHttpClient;
import okhttp3.Request;
import okhttp3.Response;
import okhttp3.logging.HttpLoggingInterceptor;
import retrofit2.Retrofit;
import retrofit2.converter.gson.GsonConverterFactory;
import com.alex9xu.test.config.AppConfigInterface;
import java.io.IOException;
/** * Created by Alex9Xu@hotmail.com on 2016/7/13 */public class RetrofitBase {
    private static Retrofit mRetrofit;
    public static Retrofit retrofit() {
        if (mRetrofit == null) {
            OkHttpClient client;
            // Notice: The only differ of debug is: HttpLoggingInterceptor
            if(!AppConfigInterface.isDebug) {
                client = new OkHttpClient.Builder()
                        .addInterceptor(new Interceptor() {
                            @Override
                            public Response intercept(Chain chain) throws IOException {
                                Request original = chain.request();
HttpUrl originalHttpUrl = original.url();
                                HttpUrl url = originalHttpUrl.newBuilder()
                                        .addQueryParameter("Id", "123456")
                                        .addQueryParameter("deviceType", "0")
                                        .build();
// Request customization: add request headers
                                Request.Builder requestBuilder = original.newBuilder()
                                        .url(url);
Request request = requestBuilder.build();
                                return chain.proceed(request);                            }
                        })
                        .build();
            } else {
                HttpLoggingInterceptor logging = new HttpLoggingInterceptor();
logging.setLevel(HttpLoggingInterceptor.Level.BODY);
                client = new OkHttpClient.Builder()
                        .addInterceptor(logging)
                        .addInterceptor(new Interceptor() {
                            @Override
                            public Response intercept(Chain chain) throws IOException {
                                Request original = chain.request();
HttpUrl originalHttpUrl = original.url();
                                HttpUrl url = originalHttpUrl.newBuilder()
                                        .addQueryParameter("Id", "123456")
                                        .addQueryParameter("deviceType", "0")
                                        .build();
// Request customization: add request headers
                                Request.Builder requestBuilder = original.newBuilder()
                                        .url(url);
Request request = requestBuilder.build();
                                return chain.proceed(request);                            }
                        })
                        .build();
            }

            mRetrofit = new Retrofit.Builder()
                    .baseUrl(AppConfigInterface.BASE_COM_URL)
                    .addConverterFactory(GsonConverterFactory.create())
                    .client(client)
                    .build();        }
        return mRetrofit;    }

}
講解一下:
(1) 通過addInterceptor實現的打印日志及加入多個公共參數功能。
(2) 除了含有HttpLoggingInterceptor 外,測試的和正式的,沒有任何區別。通過全局變量控制是否為正式環境,如果是正式環境則不輸出網絡交互相關的Log。
(3) 可以通過addQueryParameter("deviceType", "0") 的形式加入多個公共參數,這樣所有的請求都會帶該參數。
(4) 這裡BASE_COM_URL是http://test.hello.com/的形式。
3. 使用方式:
(1) 先寫接口
import android.support.v4.util.ArrayMap;
import com.alex9xu.test.config.AppConfigInterface;
import com.alex9xu.test.model.ClassifyListResult;

import retrofit2.Call;
import retrofit2.http.GET;
import retrofit2.http.QueryMap;
/** * Created by Alex9Xu@hotmail.com on 2016/7/14 */
public interface ClassifyApi {
    @GET(AppConfigInterface.CLASSIFYLIST)
    Call getClassify(@QueryMap ArrayMap paramMap);}
這裡通過Post提交參數,參數存儲在Map裡,可以添加多組參數。注意,我使用了ArrayMap,這是Android裡特有的一種形式,內存占用只有HashMap的十分之一左右。
String CLASSIFYLIST = "query/classify.html";
(2) 再寫返回值結構
import com.alex9xu.test.base.BaseResponse;
import com.alex9xu.test.model.entity.ClassfiyBean;

import java.util.List;
/** * Created by Alex9Xu@hotmail.com on 2016/7/14
 */public class ClassifyListResult extends BaseResponse {
    private DataEntity data;
    public DataEntity getData() {
        return data;    }

    public static class DataEntity {
        private List classifyList;
        public List getClassifyList() {
            return classifyList;        }
    }
}
/** * Created by Alex9Xu@hotmail.com on 2016/7/14
 */public class ClassfiyBean {
    private String icon;    private String name;

    public String getIcon() {
        return icon;    }
    public String getName() {
        return name;    }

}
返回的數據寫成如上形式,以利於復用。
(3) 調用
import com.alex9xu.test.model.ClassifyListResult;
import com.alex9xu.test.model.entity.ClassfiyBean;
import com.alex9xu.test.net.ClassifyApi;
import com.alex9xu.test.net.RetrofitBase;
/** * Created by Alex9Xu@hotmail.com on 2016/7/14
 */
public class MainActivity extends AppCompatActivity{
...
private void getData() {
    ArrayMap paramMap = new ArrayMap<>();
paramMap.put("version", "1.0");
paramMap.put("uid", "654321");
ClassifyApi classifyApi = RetrofitBase.retrofit().create(ClassifyApi.class);
Call call = classifyApi.getClassify(paramMap);
    call.enqueue(new Callback() {
        @Override
        public void onResponse(Call call, Response response) {
            LogHelper.d(TAG, "getClassify, Suc");
LogHelper.d(TAG, "getClassify = " + response.body());
            if(null != response.body() && null != response.body().getData()) {
                List list = response.body().getData().getClassifyList();
                if(null != list && list.size()>0) {
                    mTvwDisplay.setText(list.get(0).getName());
                }
            }
        }

        @Override
        public void onFailure(Call call, Throwable t) {
            LogHelper.e(TAG, "getClassify, Fail");
        }
    });
}
...
講解:會拼接成https://test.hello.com/query/classify.html?uid=654321&version=1.0&Id=123456&deviceType=0 ,注意,其中兩項是公共參數。
好了,這樣就可以正常運行了。
 Unity3d Android SDK接入解析(一)
一、前言論學習心態:每當進入一個新的工作環境,處於一種新的領域時,人總是會變得急功近利,特別是當任務緊急時,人總是會想著不斷的從網上搜尋答案,不斷的去尋問他人,十足的拿來
 Android布局實現圓角邊框效果
首先,在res下面新建一個文件夾drawable,在drawable下面新建三個xml文件:shape_corner_down.xml、shape_corner_up.x
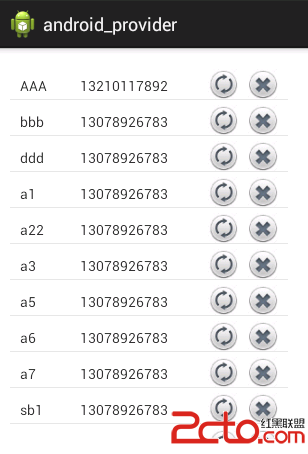 趙雅智_android通過內容提供者實現電話薄顯示更新刪除案例
需求分析: 通過ContentResolver操作內容提供者的數據,將姓名,電話顯示在listView中,並帶有添加和刪除按鈕進行相應操作 實現思路步驟: Adate
 Android中的消息通知(NotificationManager和Notification)
下面來談談notification,這個notification一般用在電話,短信,郵件,鬧鐘鈴聲,在手機的狀態欄上就會出現一個小圖標,提示用戶處理這個通知,這時手從上