編輯:關於Android編程
今天去面試,一面還可以,到了第二面的時候也差不多吧,最後來了一題,說那個360被卸載之後會跳轉到指定的反饋頁面,是怎麼弄的?這個之前沒有研究過,但是這個效果是見過的。當時想到了,Android中卸載應用的時候會發送一個廣播,我們可以接收到這個廣播,然後處理一下。結果他來個反問句:這樣可以嗎?然後仔細想想,既然他這麼問了,應該是有問題,在想想,發現的確是有問題,當應用被卸載了,那個接收到廣播處理之後的邏輯代碼放在那裡執行?好吧,然後就沒戲了~~
回來了,就百度了一下,果然網上似乎有相關的問題的解答,這裡就將他們的步驟在細化一下了:
其實這個問題的核心就在於:應用被卸載了,如果能夠做到後續的代碼邏輯繼續執行
我們再來仔細分析一下場景和流程
一個應用被用戶卸載肯定是有理由的,而開發者卻未必能得知這一重要的理由,畢竟用戶很少會主動反饋建議,多半就是用得不爽就卸,如果能在被卸載後獲取到用戶的一些反饋,那對開發者進一步改進應用是非常有利的。目前據我所知,國內的Android應用中實現這一功能的只有360手機衛士、360平板衛士,那麼如何實現這一功能的?
我們可以把實現卸載反饋的問題轉化為監聽自己是否被卸載,只有得知自己被卸載,才可以設計相應的反饋處理流程。以下的列表是我在研究這一問題的思路:
1、注冊BroadcastReceiver,監聽android.intent.action.PACKAGE_REMOVED系統廣播
結果:NO。未寫代碼,直接分析,卸載的第一步就是退出當前應用的主進程,而此廣播是在已經卸載完成後才發出的,此時主進程都沒有了,去哪onReceive()呢?
2、若能收到將要卸載XX包的系統廣播,在主進程被退出之前就搶先進行反饋處理就好了,可惜沒有這樣的系統廣播,不過經過調研,倒是發現了一個辦法,讀取系統log,當日志中包含android.intent.action.DELETE和自己的包名時,意味著自己將要被卸載。
結果:NO。調試時發現此方法有兩個缺陷,(1)點擊設置中的卸載按鈕即發出此Intent,此時用戶尚未在彈框中確認卸載;(2)pm命令卸載不出發此Intent,意味著被諸如手機安全管家,豌豆莢等軟件卸載時,無法提前得知卸載意圖。
3、由於時間點不容易把控,所以干脆不依賴系統廣播或log,考慮到卸載過程會刪除/data/data/包名目錄,我們可以用線程直接輪詢這個目錄是否存在,以此為依據判斷自己是否被卸載。
結果:NO。同方法1,主進程退出,相應的線程必定退出,線程還沒等到判斷目錄是否存在就已經被銷毀了。
4、改用C端進程輪詢/data/data/包名目錄是否存在
結果:YES。借助Java端進程fork出來的C端進程在應用被卸載後不會被銷毀。
解決的方案確定了,下面來看一下代碼吧:
/* * Copyright (C) 2009 The Android Open Source Project * * Licensed under the Apache License, Version 2.0 (the License); * you may not use this file except in compliance with the License. * You may obtain a copy of the License at * * http://www.apache.org/licenses/LICENSE-2.0 * * Unless required by applicable law or agreed to in writing, software * distributed under the License is distributed on an AS IS BASIS, * WITHOUT WARRANTIES OR CONDITIONS OF ANY KIND, either express or implied. * See the License for the specific language governing permissions and * limitations under the License. * */ #include#include #include #include #include #include #include #include com_example_uninstalldemos_NativeClass.h /* 宏定義begin */ //清0宏 #define MEM_ZERO(pDest, destSize) memset(pDest, 0, destSize) #define LOG_TAG onEvent //LOG宏定義 #define LOGD(fmt, args...) __android_log_print(ANDROID_LOG_INFO, LOG_TAG, fmt, ##args) JNIEXPORT jstring JNICALL Java_com_example_uninstalldemos_NativeClass_init(JNIEnv* env, jobject thiz) { //初始化log LOGD(init start...); //fork子進程,以執行輪詢任務 pid_t pid = fork(); if (pid < 0) { //出錯log LOGD(fork failed...); } else if (pid == 0) { //子進程注冊/data/data/pym.test.uninstalledobserver目錄監聽器 int fileDescriptor = inotify_init(); if (fileDescriptor < 0) { LOGD(inotify_init failed...); exit(1); } int watchDescriptor; watchDescriptor = inotify_add_watch(fileDescriptor,/data/data/com.example.uninstalldemos, IN_DELETE); LOGD(watchDescriptor=%d,watchDescriptor); if (watchDescriptor < 0) { LOGD(inotify_add_watch failed...); exit(1); } //分配緩存,以便讀取event,緩存大小=一個struct inotify_event的大小,這樣一次處理一個event void *p_buf = malloc(sizeof(struct inotify_event)); if (p_buf == NULL) { LOGD(malloc failed...); exit(1); } //開始監聽 LOGD(start observer...); size_t readBytes = read(fileDescriptor, p_buf,sizeof(struct inotify_event)); //read會阻塞進程,走到這裡說明收到目錄被刪除的事件,注銷監聽器 free(p_buf); inotify_rm_watch(fileDescriptor, IN_DELETE); //目錄不存在log LOGD(uninstall); //執行命令am start -a android.intent.action.VIEW -d http://shouji.360.cn/web/uninstall/uninstall.html execlp( am, am, start, -a, android.intent.action.VIEW, -d, http://shouji.360.cn/web/uninstall/uninstall.html, (char *)NULL); //4.2以上的系統由於用戶權限管理更嚴格,需要加上 --user 0 //execlp(am, am, start, --user, 0, -a, //android.intent.action.VIEW, -d, https://www.google.com,(char *) NULL); } else { //父進程直接退出,使子進程被init進程領養,以避免子進程僵死 } return (*env)->NewStringUTF(env, Hello from JNI !); }
這裡面主要是用到了Linux中的inotify,這個相關的內容可以自行百度一下~~
這裡有一個很重要的知識,也是解決這個問題的關鍵所在,就是Linux中父進程死了,但是子進程不會死,而是被init進程領養。所以當我們應用(進程)卸載了,但是我們fork的子進程並不會銷毀,所以我們上述的邏輯代碼就可以放到這裡來做了。(學習了)
Android應用程序代碼:
MyActivity.java
package com.example.uninstalldemos;

import android.app.Activity;
import android.content.Intent;
import android.os.Bundle;
import android.util.Log;

public class MyActivity extends Activity {

	@Override
	public void onCreate(Bundle savedInstanceState) {
		super.onCreate(savedInstanceState);
		setContentView(R.layout.activity_main);

		Intent intent = new Intent(this, SDCardListenSer.class);
		startService(intent);
		NativeClass nativeObj = new NativeClass();
		nativeObj.init();
	}

	static {
		Log.d(onEvent, load jni lib);
		System.loadLibrary(hello-jni);
	}
}
SDCardListenSer.java
package com.example.uninstalldemos;

import android.annotation.SuppressLint;
import android.app.Service;
import android.content.Context;
import android.content.Intent;
import android.net.Uri;
import android.os.Environment;
import android.os.FileObserver;
import android.os.IBinder;
import android.util.Log;
import java.io.File;
import java.io.IOException;

public class SDCardListenSer extends Service {
	SDCardListener[] listenners;

	@SuppressLint(SdCardPath)
	@Override
	public void onCreate() {
		SDCardListener[] listenners = {
				new SDCardListener(/data/data/com.example.uninstalldemos, this),
				new SDCardListener(Environment.getExternalStorageDirectory() + File.separator + 1.txt, this) };
		this.listenners = listenners;

		Log.i(onEvent, =========onCreate============);
		for (SDCardListener listener : listenners) {
			listener.startWatching();
		}

		File file = new File(Environment.getExternalStorageDirectory() + File.separator + 1.txt);
		Log.i(onEvent, dddddddddddddddddddddd nCreate============);
		if (file.exists())
			file.delete();
		/*try {
			file.createNewFile();
		} catch (IOException e) {
			e.printStackTrace();
		}*/
	}

	@Override
	public void onDestroy() {
		for (SDCardListener listener : listenners) {
			listener.stopWatching();
		}
	}

	@Override
	public IBinder onBind(Intent intent) {
		return null;
	}
}

class SDCardListener extends FileObserver {
	private String mPath;
	private final Context mContext;

	public SDCardListener(String parentpath, Context ctx) {
		super(parentpath);
		this.mPath = parentpath;
		this.mContext = ctx;
	}

	@Override
	public void onEvent(int event, String path) {
		int action = event & FileObserver.ALL_EVENTS;
		switch (action) {

		case FileObserver.DELETE:
			Log.i(onEvent, delete path:  + mPath + File.separator + path);
			//openBrowser();
			break;

		case FileObserver.MODIFY:
			Log.i(onEvent, 更改目錄 + mPath + File.separator + path);
			break;

		case FileObserver.CREATE:
			Log.i(onEvent, 創建文件 + mPath + File.separator + path);
			break;

		default:
			break;
		}
	}

	protected void openBrowser() {
		Uri uri = Uri.parse(http://aoi.androidesk.com);
		Intent intent = new Intent(Intent.ACTION_VIEW, uri);
		mContext.startActivity(intent);
	}

	public void exeShell(String cmd) {
		try {
			Runtime.getRuntime().exec(cmd);
		} catch (Throwable t) {
			t.printStackTrace();
		}
	}

}
開啟一個服務,在這個服務中我們可以看到,用到了一個很重要的一個類FileObserver,也是用來監聽文件的變更的,這個和上面的inotify功能差不多。關於這個類的具體用法和介紹,可以自行百度呀~~
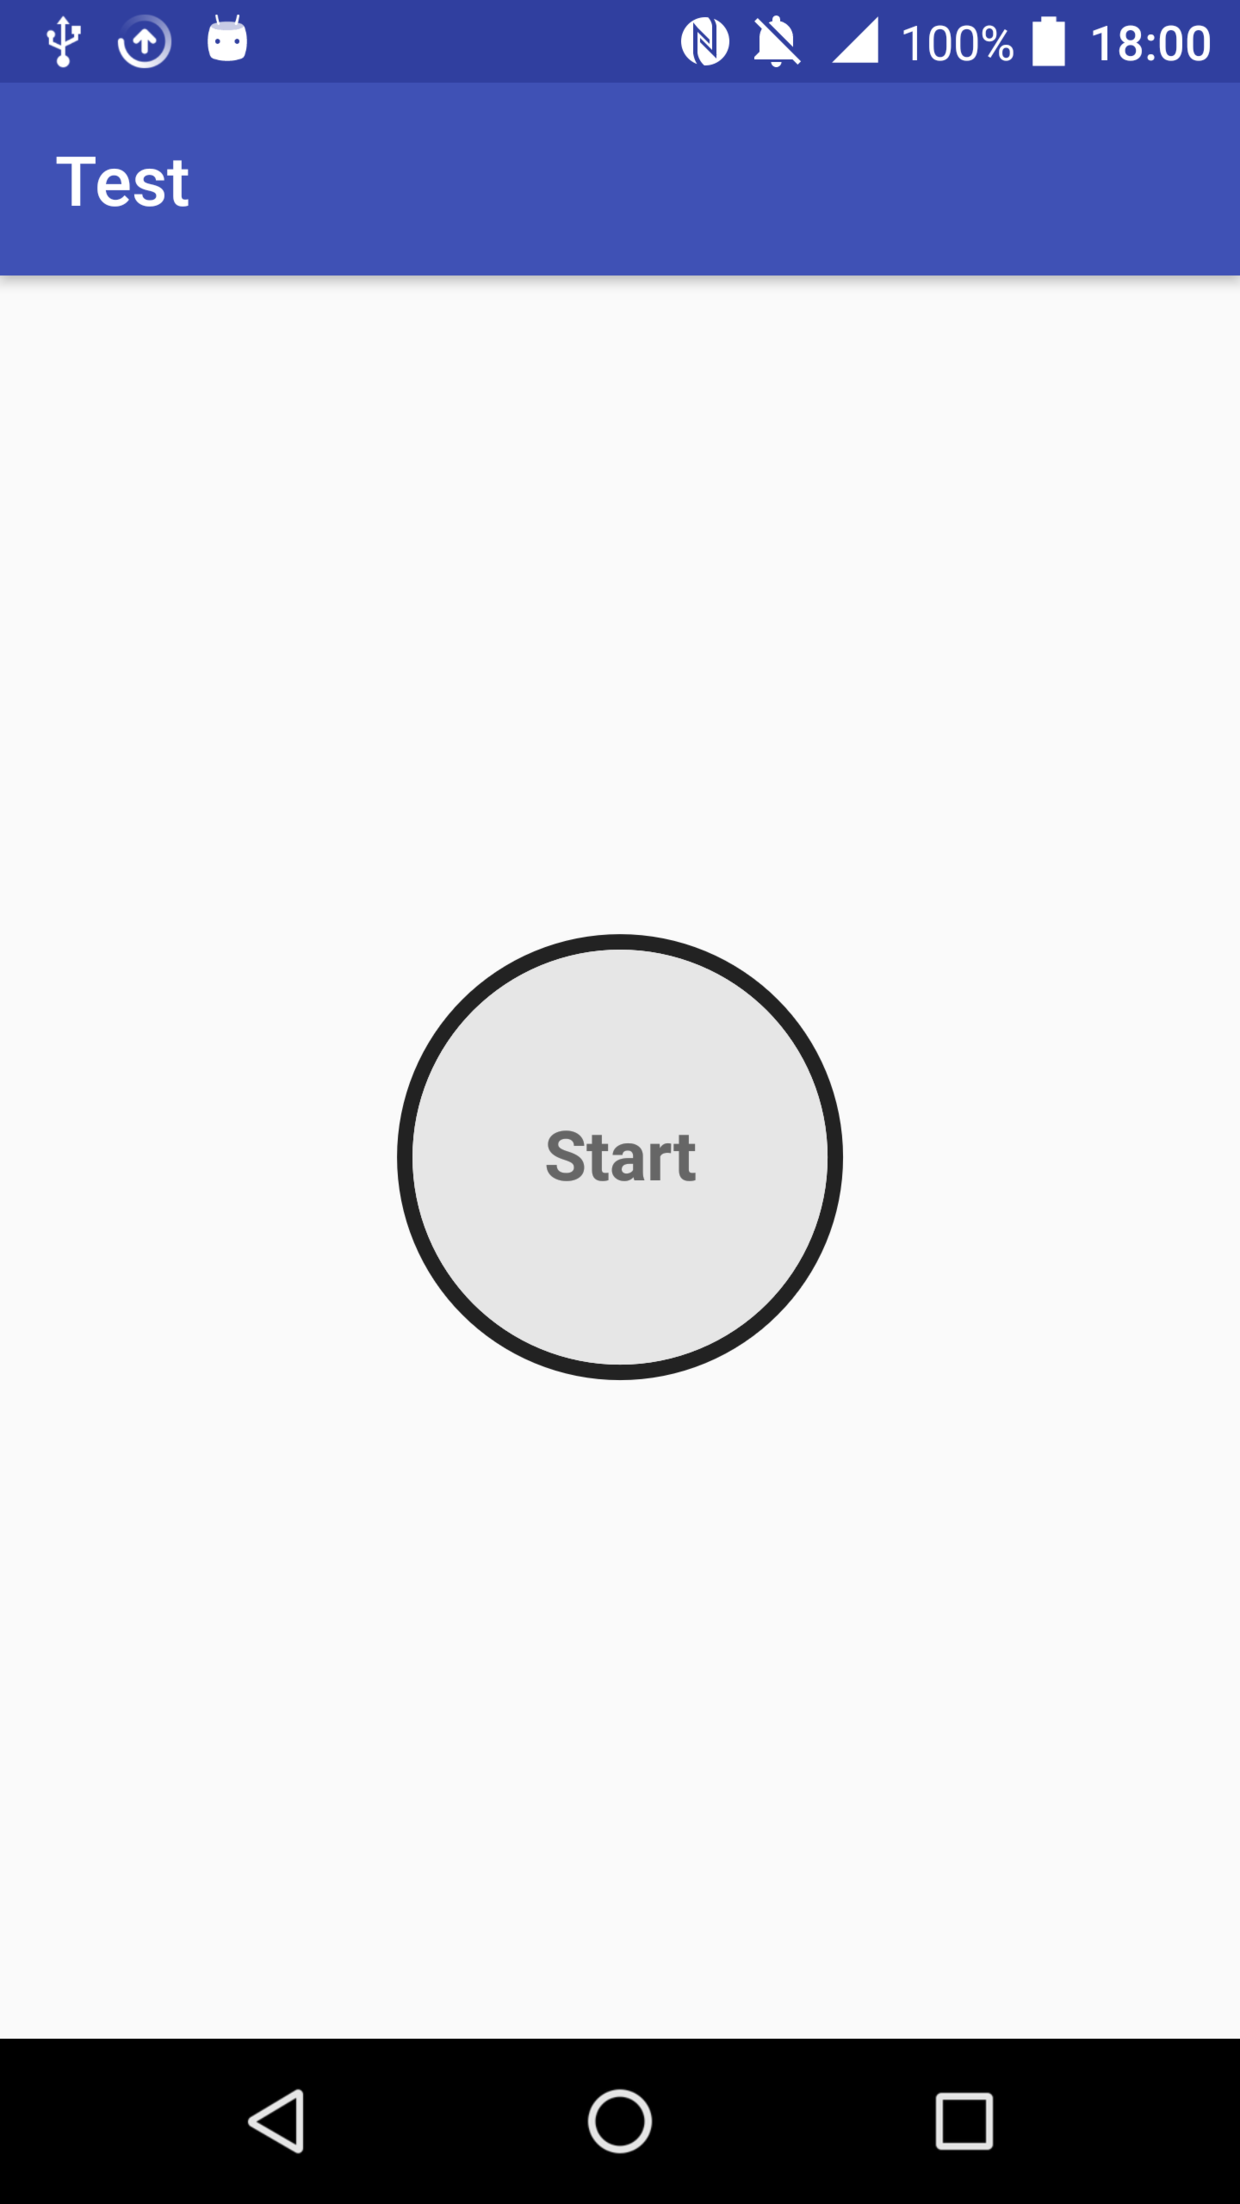
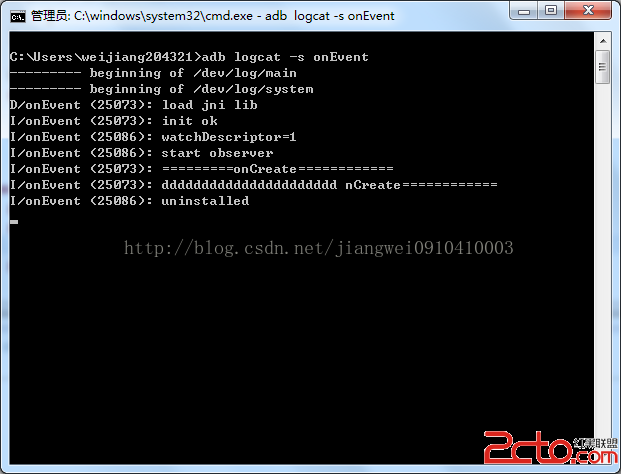
運行:
我們將應用安裝之後,打開log進行檢測日志:
adb logcat -s onEvent
當我們從設置中卸載應用的時候,會彈出如下界面:

注:這裡我特定說了是從設置界面中去卸載應用,因為當我使用小米手機自帶的那種快捷卸載應用的時候並不會跳轉。這個具體的原因還有待解決(當然360的這個問題也沒有解決掉。。)
總結:
我寫這篇文章的目的以及我從這個過程中唯一學習到的一個知識點就是當父進程消亡了,子進程並不會消亡,所以我們可以記住這個知識點,以後遇到像應用被卸載之後的一些邏輯操作都可以采用這種方式去解決。
 Android如何集成極光短信驗證
先借助Android studio工具新建一個新的空項目。步驟一(獲取appkey)1.在極光官網平台上新建短信應用(根據要求包名和應用名稱填寫好)2.獲取得到Jpush
 Android網絡編程(十)Retrofit2後篇[請求參數]
前言在上一篇Android網絡編程(九)Retrofit2前篇[基本使用]中我們了解了Retrofit的最基本的GET方式訪問網絡的寫法以及請求參數的簡單介紹。這一篇我們
 Android編程使用android-support-design實現MD風格對話框功能示例
本文實例講述了Android編程使用android-support-design實現MD風格對話框功能。分享給大家供大家參考,具體如下:首先上效果圖: 測試設備
 andoid打包短信發送到gmail郵箱實現代碼
andriod短信整合備份發送到gmail郵箱,需要在andoid手機配置好gmail郵箱 github代碼 https://github.com/zhwj184/sms