編輯:關於Android編程
接上次的。
首先Launcher實現了LauncherModel.Callbacks接口,APP信息數據加載成功後 ,回調接口把app信息顯示到Launcher的 workspace界面上,這個過程代碼裡面稱為bind。
下面是個類調用過程的時序圖,不是很標准,不過能表達基本調用順序幫助我們理解。
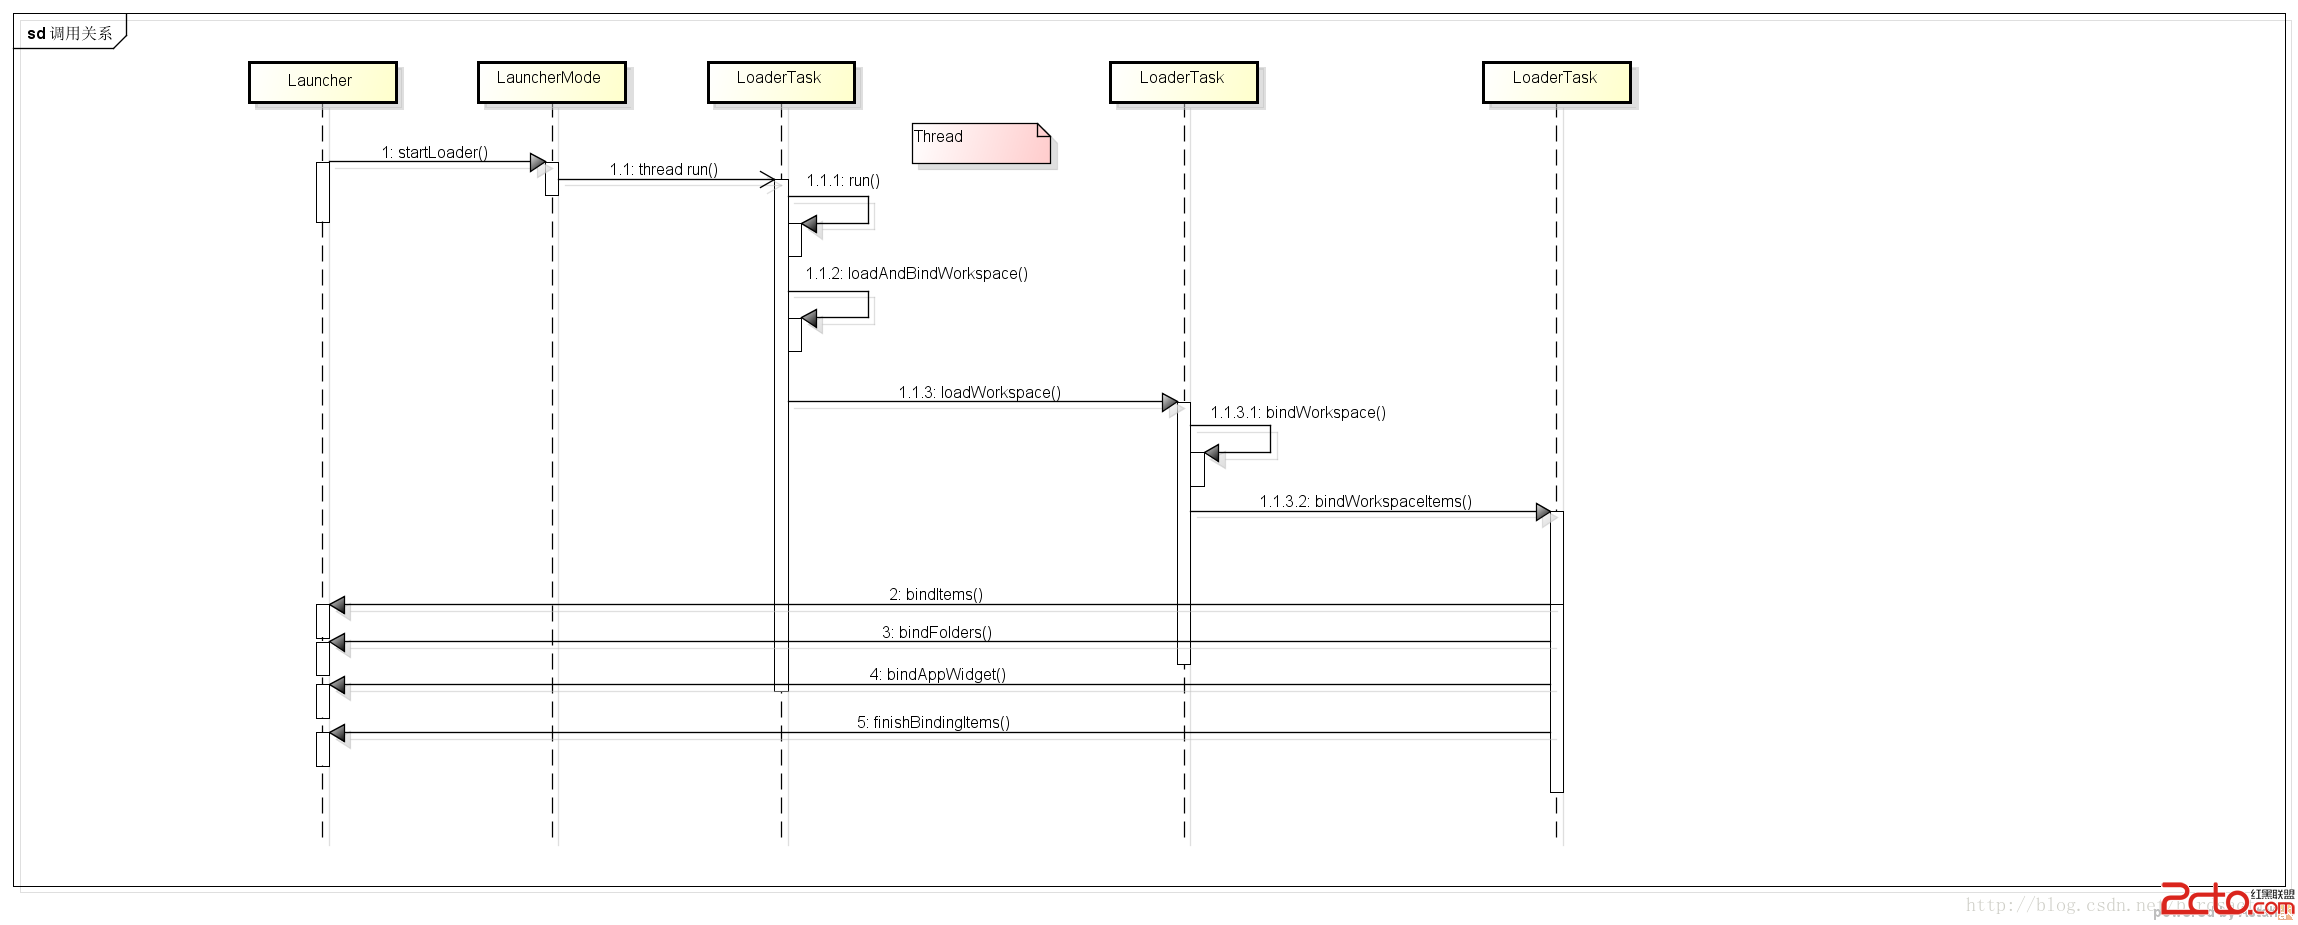
首先就是Launcher OnCreate中調用LauncherMode startLoader方法,這裡只看異步的方式 就是當前的頁面下標為-1,加載所有app信息
mWZ喎?/kf/ware/vc/" target="_blank" class="keylink">vcmtzcGFjZS5nZXRDdXJyZW50UGFnZSgpzqotMbXEx+m/9qGjPGJyPgogbU1vZGVsLnN0YXJ0TG9hZGVyKHRydWUsIC0xKTsgPGJyPgo8L3A+CjxwPjxicj4KPC9wPgo8cD4g1NpMYXVuY2hlck1vZGXA4LXEc3RhcnRMb2FkZXK3vbeowO/D5qOsztLDx9Do0qrKtcD9u6/P37PMwOAgTG9hZGVyVGFza6OstPOyv7fWuaTX97a81NrV4sDvw+bN6rPJLjxicj4KPC9wPgo8cD5ydW63vbeotcS0+sLro7o8L3A+CjxwPjwvcD4KPHByZSBjbGFzcz0="brush:java;"> keep_running: {
// Elevate priority when Home launches for the first time to avoid
// starving at boot time. Staring at a blank home is not cool.
synchronized (mLock) {
if (DEBUG_LOADERS) Log.d(TAG, "Setting thread priority to " +
(mIsLaunching ? "DEFAULT" : "BACKGROUND"));
android.os.Process.setThreadPriority(mIsLaunching
? Process.THREAD_PRIORITY_DEFAULT : Process.THREAD_PRIORITY_BACKGROUND);
}
if (loadWorkspaceFirst) {
if (DEBUG_LOADERS) Log.d(TAG, "step 1: loading workspace");
loadAndBindWorkspace();
} else {
if (DEBUG_LOADERS) Log.d(TAG, "step 1: special: loading all apps");
loadAndBindAllApps();
}
if (mStopped) {
break keep_running;
}
// Whew! Hard work done. Slow us down, and wait until the UI thread has
// settled down.
synchronized (mLock) {
if (mIsLaunching) {
if (DEBUG_LOADERS) Log.d(TAG, "Setting thread priority to BACKGROUND");
android.os.Process.setThreadPriority(Process.THREAD_PRIORITY_BACKGROUND);
}
}
waitForIdle();
// second step
if (loadWorkspaceFirst) {
if (DEBUG_LOADERS) Log.d(TAG, "step 2: loading all apps");
loadAndBindAllApps();
} else {
if (DEBUG_LOADERS) Log.d(TAG, "step 2: special: loading workspace");
loadAndBindWorkspace();
}
// Restore the default thread priority after we are done loading items
synchronized (mLock) {
android.os.Process.setThreadPriority(Process.THREAD_PRIORITY_DEFAULT);
}
}
我們定位到 loadAndBindWorkspace 方法 加載workspace界面
        private void loadAndBindWorkspace() {
            mIsLoadingAndBindingWorkspace = true;

            // Load the workspace
            if (DEBUG_LOADERS) {
                Log.d(TAG, "loadAndBindWorkspace mWorkspaceLoaded=" + mWorkspaceLoaded);
            }

            if (!mWorkspaceLoaded) { //第一次加載
                loadWorkspace(); //加載
                synchronized (LoaderTask.this) {
                    if (mStopped) {
                        return;
                    }
                    mWorkspaceLoaded = true;
                }
            }

            // Bind the workspace
            bindWorkspace(-1);//綁定數據到UI
        }
loadWorkspace方法就是加載手機裡面的所有app信息,包括app widget, folder 並且存儲到ArrayList中,後面顯示這些東西到UI上。
數據我們存儲好以後調用bindWorkspace(-1)開始顯示數據到workspace,裡面包含了很多調用方法,主要是數據排序,清除以前綁定的UI數據。
在bindWorkspace方法裡面,調用了一些filter方法,這個地方主要是排序和過濾,分別判斷需要加載到那個屏幕裡面.
            r = new Runnable() {
                public void run() {
                    Callbacks callbacks = tryGetCallbacks(oldCallbacks);
                    if (callbacks != null) {
                        callbacks.startBinding();//綁定之前,清理之前的數據,簡單就這麼理解
                    }
                }
            };
runOnMainThread(r);//UI更新需要在主線程中 bindWorkspaceItems(oldCallbacks, currentWorkspaceItems, currentAppWidgets,
currentFolders, null); private void bindWorkspaceItems(final Callbacks oldCallbacks,
final ArrayList workspaceItems,
final ArrayList appWidgets,
final HashMap folders,
ArrayList deferredBindRunnables) {
final boolean postOnMainThread = (deferredBindRunnables != null);
// Bind the workspace items
int N = workspaceItems.size();
for (int i = 0; i < N; i += ITEMS_CHUNK) {
final int start = i;
final int chunkSize = (i+ITEMS_CHUNK <= N) ? ITEMS_CHUNK : (N-i);
final Runnable r = new Runnable() {
@Override
public void run() {
Callbacks callbacks = tryGetCallbacks(oldCallbacks);
if (callbacks != null) {
callbacks.bindItems(workspaceItems, start, start+chunkSize);//顯示app信息到UI上
}
}
};
if (postOnMainThread) {
deferredBindRunnables.add(r);
} else {
runOnMainThread(r);
}
}
// Bind the folders
if (!folders.isEmpty()) {
final Runnable r = new Runnable() {
public void run() {
Callbacks callbacks = tryGetCallbacks(oldCallbacks);
if (callbacks != null) {
callbacks.bindFolders(folders);//顯示folders
}
}
};
if (postOnMainThread) {
deferredBindRunnables.add(r);
} else {
runOnMainThread(r);
}
}
// Bind the widgets, one at a time
N = appWidgets.size();
for (int i = 0; i < N; i++) {
final LauncherAppWidgetInfo widget = appWidgets.get(i);
final Runnable r = new Runnable() {
public void run() {
Callbacks callbacks = tryGetCallbacks(oldCallbacks);
if (callbacks != null) {
callbacks.bindAppWidget(widget);//綁定AppWidget信息
}
}
};
if (postOnMainThread) {
deferredBindRunnables.add(r);
} else {
runOnMainThread(r);
}
}
}
我們這裡只看第一個綁定shortcut信息代碼,其他2個其實道理差不多.
public void bindItems(ArrayListshortcuts, int start, int end) { setLoadOnResume(); // Get the list of added shortcuts and intersect them with the set of shortcuts here Set newApps = new HashSet (); newApps = mSharedPrefs.getStringSet(InstallShortcutReceiver.NEW_APPS_LIST_KEY, newApps); Workspace workspace = mWorkspace; for (int i = start; i < end; i++) { final ItemInfo item = shortcuts.get(i); // Short circuit if we are loading dock items for a configuration which has no dock if (item.container == LauncherSettings.Favorites.CONTAINER_HOTSEAT && mHotseat == null) { continue; } switch (item.itemType) { case LauncherSettings.Favorites.ITEM_TYPE_APPLICATION: case LauncherSettings.Favorites.ITEM_TYPE_SHORTCUT: ShortcutInfo info = (ShortcutInfo) item; String uri = info.intent.toUri(0).toString(); View shortcut = createShortcut(info); workspace.addInScreen(shortcut, item.container, item.screen, item.cellX, item.cellY, 1, 1, false); boolean animateIconUp = false; synchronized (newApps) { if (newApps.contains(uri)) { animateIconUp = newApps.remove(uri); } } if (animateIconUp) { // Prepare the view to be animated up shortcut.setAlpha(0f); shortcut.setScaleX(0f); shortcut.setScaleY(0f); mNewShortcutAnimatePage = item.screen; if (!mNewShortcutAnimateViews.contains(shortcut)) { mNewShortcutAnimateViews.add(shortcut); } } break; case LauncherSettings.Favorites.ITEM_TYPE_FOLDER: FolderIcon newFolder = FolderIcon.fromXml(R.layout.folder_icon, this, (ViewGroup) workspace.getChildAt(workspace.getCurrentPage()), (FolderInfo) item, mIconCache); workspace.addInScreen(newFolder, item.container, item.screen, item.cellX, item.cellY, 1, 1, false); break; } } workspace.requestLayout(); }
重點就是下面這個,把數據畫到UI上面,坐標信息,APP信息.
                    workspace.addInScreen(shortcut, item.container, item.screen, item.cellX,
                            item.cellY, 1, 1, false);
最後我們調用 finishBindingItems完成調用,這個方法裡面還包括了滑動和顯示APP動畫方法的處理。
        if (mVisible || mWorkspaceLoading) {
            Runnable newAppsRunnable = new Runnable() {
                @Override
                public void run() {
                    runNewAppsAnimation(false);
                }
            };

            boolean willSnapPage = mNewShortcutAnimatePage > -1 &&
                    mNewShortcutAnimatePage != mWorkspace.getCurrentPage();
            if (canRunNewAppsAnimation()) {
                // If the user has not interacted recently, then either snap to the new page to show
                // the new-apps animation or just run them if they are to appear on the current page
                if (willSnapPage) {
                    mWorkspace.snapToPage(mNewShortcutAnimatePage, newAppsRunnable);
                } else {
                    runNewAppsAnimation(false);
                }
            } else {
                // If the user has interacted recently, then just add the items in place if they
                // are on another page (or just normally if they are added to the current page)
                runNewAppsAnimation(willSnapPage);
            }
        }
詳細的我們到後面繼續分析。還包括具體Workspace上面的界面格子cell是怎麼設計和APP添加位置的計算問題。
若有問題,請指出,謝謝~ O(∩_∩)O~
 Andriod下完全自定義控件和在自定義控件中使用自定義屬性
首先,自定義控件分為三類:自定義的組合控件繼承View的自定義控件繼承ViewGroup的自定義控件在這裡,我要寫的是第二種,也就是繼承自View的自定義控件,第一種自定
 Android TextView中文字通過SpannableString設置屬性用法示例
本文實例講述了Android TextView中文字通過SpannableString設置屬性的方法。分享給大家供大家參考,具體如下:在Android中,TextView
 利用adt-bundle輕松搭建Android開發環境與Hello world(Linux)
本文與《利用adt-bundle輕松搭建Android開發環境與Hello world(Windows) 》是姊妹篇,只是這次操作換成了Linux 。拿Ubuntu做例子
 Android-studio原生微信第三方登錄、分享
第一步:注冊開發者賬號,—->微信開放平台https://open.weixin.qq.com/第二步:創建一個應用,並通過審核(其中需要填寫項目中的D