編輯:關於Android編程
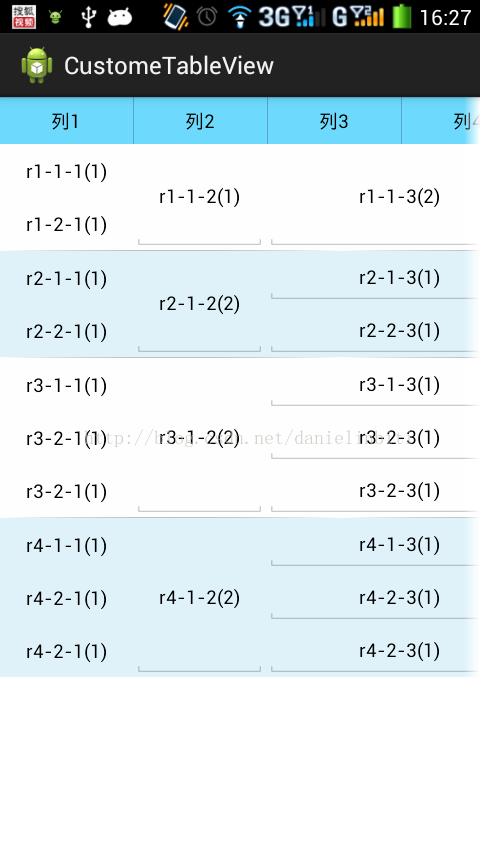
把自定義表格又改進了一下,可以支持行合並。表格分為簡單和復雜兩種模式
1、簡單模式就是《Android中使用ListView繪制自定義表格(2)》描述的方式。不支持行合並
2、復雜模式支持行列合並
1、基於上回上傳的代碼,改動文件如下
package csdn.danielinbiti.custometableview.item;

public class ItemCell {
	private String cellValue = ;//單元格的值
	private int cellSpan = 1; //單元格跨列
	private CellTypeEnum cellType = CellTypeEnum.LABEL; //單元格類型
	private int colNum = 0;  //單元格列號,從0開始
	private int rowNum = 0;//從0開始,每個item都從0開始
	private int rowSpan = 1;//單元格跨行
	//private int rowType = 0; //行類型

	private boolean isChange = false;//是否被編輯
	public ItemCell(String cellValue,CellTypeEnum cellType,int cellSpan){
		this.cellValue = cellValue;
		this.cellType = cellType;
		this.cellSpan = cellSpan;
	}
	public ItemCell(String cellValue, CellTypeEnum cellType){
		this(cellValue,cellType,1);
	}
	public int getColNum(){
		return this.colNum;
	}
//	public void setRowType(int rowType){
//		this.rowType = rowType;
//	}
//	public int getRowType(){
//		return this.rowType;
//	}
	public String getCellValue(){
		return cellValue;
	}
	public void setCellValue(String value){
		this.cellValue = value;
	}
	public CellTypeEnum getCellType(){
		return cellType;
	}
	public int getCellSpan(){
		return cellSpan;
	}
	public void setIsChange(boolean isChange){
		this.isChange = isChange;
	}
	public boolean getIsChange(){
		return this.isChange;
	}
	//設置行列位置,列根據前面列+rowspan數字累加後的值,rownum每行都從0開始
    public void setPos(int rowNum,int colNum,int rowSpan){
    	this.rowNum = rowNum;
    	this.colNum = colNum;
    	this.rowSpan = rowSpan;
    }
	public int getRowNum() {
		return rowNum;
	}
	public int getRowSpan() {
		return rowSpan;
	}
    public int getId(){
    	return this.rowNum * 10000 + this.rowSpan;
    }
}
package csdn.danielinbiti.custometableview.item;

import java.util.ArrayList;
import java.util.HashMap;

import csdn.danielinbiti.custometableview.R;

import android.content.Context;
import android.util.AttributeSet;
import android.view.LayoutInflater;
import android.view.View;
import android.widget.EditText;
import android.widget.LinearLayout;
import android.widget.RelativeLayout;
import android.widget.TextView;
import android.widget.LinearLayout.LayoutParams;

public class CustomeTableItem extends LinearLayout {
	private Context context = null;
	private boolean isRead = false;//是否只讀
	private ArrayList viewList = new ArrayList();//行的表格列表
	private HashMap viewMap = new HashMap();//key為行列組合
	private int[] headWidthArr = null;//表頭的列寬設置
	private String rowType = 0;//行的樣式id
	private int rowHeight = 0;
	private boolean isSimple = true;//是否簡單的行模式(沒有行合並)

	public CustomeTableItem(Context context) {
		super(context);
	}
	public CustomeTableItem(Context context, AttributeSet attrs) {
		super(context, attrs);
	}
	public CustomeTableItem(Context context, AttributeSet attrs, int defStyle) {
		super(context, attrs, defStyle);
	}
	/*
	 * rowType:行的樣式,字符任意,相同樣式的行不需要再創建了
	 * itemCells:單元格信息
	 * headWidthArr:每列寬度
	 * isRead:是否只讀,如果是只讀,則所有的輸入都不生效
	 */
    public void buildItem(Context context,String rowType,ArrayList itemCells
    		,int[] headWidthArr,boolean isRead){
    	if(this.getTag()!=null
    			&& this.getTag() instanceof String
    			&& this.getTag().equals(2)){//設置成2為復雜的行合並
    		this.isSimple = false;
    	}
		this.setOrientation(LinearLayout.VERTICAL);//第一層布局垂直
    	this.context = context;
    	this.headWidthArr =headWidthArr.clone();
        this.rowType = rowType;
        if(rowHeight==0){
        	rowHeight = Dp2Px(context,40);
        }
        if(isSimple){
        	this.addCell(itemCells);
        }else{
        	this.addCellR(itemCells);
        }
    }
    private void addCell(ArrayList itemCells){
    	this.removeAllViews();
    	LinearLayout secondLayout = new LinearLayout(context);
		secondLayout.setOrientation(LinearLayout.HORIZONTAL);
		secondLayout.setLayoutParams(new LinearLayout.LayoutParams(LayoutParams.MATCH_PARENT,LayoutParams.WRAP_CONTENT));
		this.addView(secondLayout);
    	int cellIndex = 0;

    	for(int i=0;i itemCells){
    	this.removeAllViews();
    	RelativeLayout secondLayout = new RelativeLayout(context);
		//secondLayout.setOrientation(LinearLayout.HORIZONTAL);
		secondLayout.setLayoutParams(new RelativeLayout.LayoutParams(LayoutParams.MATCH_PARENT,LayoutParams.WRAP_CONTENT));
		this.addView(secondLayout);
    	//int cellIndex = 0;
    	for(int i=0;i itemCells){
    	if(this.isSimple){
    		this.refreshDataSimple(itemCells);
    	}else{
    		this.refreshDataR(itemCells);
    	}
    }
    private void refreshDataSimple(ArrayList itemCells){
		for(int i=0;i itemCells){
		for(int i=0;i

2、簡單模式和復雜模式可以通過布局文件配置。不進行設置默認是簡單模式


android:tag=2為復雜模式,不進行配置為簡單模式

3、測試數據格式


private void testAddContentRows(HashMap contentMap){
		HashMap rowMap1 = new HashMap();
		lists.add(rowMap1);
		this.testAddRows(rowMap1, 1, r1-1-1(1), CellTypeEnum.LABEL,0,0,1);
		this.testAddRows(rowMap1, 1, r1-2-1(1), CellTypeEnum.LABEL,1,0,1);
		this.testAddRows(rowMap1, 1, r1-1-2(1), CellTypeEnum.STRING,0,1,2);
		this.testAddRows(rowMap1, 2, r1-1-3(2), CellTypeEnum.STRING,0,2,2);
		this.testAddRows(rowMap1, 1, r1-1-4(1), CellTypeEnum.DIGIT,0,4,2);//注意這個列號的標識,必須是前面列號+跨行數
		rowMap1.put(rowtype, css1);//表樣標示放在內容添加後再添加

		HashMap rowMap2 = new HashMap();
		lists.add(rowMap2);
		this.testAddRows(rowMap2, 1, r2-1-1(1), CellTypeEnum.LABEL,0,0,1);
		this.testAddRows(rowMap2, 1, r2-2-1(1), CellTypeEnum.LABEL,1,0,1);
		this.testAddRows(rowMap2, 1, r2-1-2(2), CellTypeEnum.STRING,0,1,2);
		this.testAddRows(rowMap2, 2, r2-1-3(1), CellTypeEnum.STRING,0,2,1);
		this.testAddRows(rowMap2, 2, r2-2-3(1), CellTypeEnum.STRING,1,2,1);
		this.testAddRows(rowMap2, 1, r2-1-4(1), CellTypeEnum.DIGIT,0,4,2);
		rowMap2.put(rowtype, css2);//表樣標示放在內容添加後再添加


		HashMap rowMap3 = new HashMap();
		lists.add(rowMap3);
		this.testAddRows(rowMap3, 1, r3-1-1(1), CellTypeEnum.LABEL,0,0,1);
		this.testAddRows(rowMap3, 1, r3-2-1(1), CellTypeEnum.LABEL,1,0,1);
		this.testAddRows(rowMap3, 1, r3-2-1(1), CellTypeEnum.LABEL,2,0,1);
		this.testAddRows(rowMap3, 1, r3-1-2(2), CellTypeEnum.STRING,0,1,3);
		this.testAddRows(rowMap3, 2, r3-1-3(1), CellTypeEnum.STRING,0,2,1);
		this.testAddRows(rowMap3, 2, r3-2-3(1), CellTypeEnum.STRING,1,2,1);
		this.testAddRows(rowMap3, 2, r3-2-3(1), CellTypeEnum.STRING,2,2,1);
		this.testAddRows(rowMap3, 1, r3-1-4(1), CellTypeEnum.DIGIT,0,4,3);
		rowMap3.put(rowtype, css3);//表樣標示放在內容添加後再添加


		HashMap rowMap4 = new HashMap();
		lists.add(rowMap4);
		this.testAddRows(rowMap4, 1, r4-1-1(1), CellTypeEnum.LABEL,0,0,1);
		this.testAddRows(rowMap4, 1, r4-2-1(1), CellTypeEnum.LABEL,1,0,1);
		this.testAddRows(rowMap4, 1, r4-2-1(1), CellTypeEnum.LABEL,2,0,1);
		this.testAddRows(rowMap4, 1, r4-1-2(2), CellTypeEnum.STRING,0,1,3);
		this.testAddRows(rowMap4, 2, r4-1-3(1), CellTypeEnum.STRING,0,2,1);
		this.testAddRows(rowMap4, 2, r4-2-3(1), CellTypeEnum.STRING,1,2,1);
		this.testAddRows(rowMap4, 2, r4-2-3(1), CellTypeEnum.STRING,2,2,1);
		this.testAddRows(rowMap4, 1, r4-1-4(1), CellTypeEnum.DIGIT,0,4,3);
		rowMap4.put(rowtype, css3);//表樣標示放在內容添加後再添加
	}


private void testAddRows(HashMap rowMap,int colSpan,String cellValue,CellTypeEnum cellType,int rowNum,int colNum,int rowSpan){
	    ItemCell itemCell = new ItemCell(cellValue,cellType,colSpan);
	    itemCell.setPos(rowNum, colNum, rowSpan);
	    rowMap.put(rowMap.size()+, itemCell);
	}

		//this.testAddContent(contentMap);//簡單模式,原來的代碼,改行替換成下面代碼就可以
		this.testAddContentRows(contentMap);//復雜模式


基於listview方式的動態布局已經實現了行列合並模式,基本也就告一段落了,希望能夠給後面的人提供幫助。至於一些樣式的設置,這裡沒有具體提供,包括數字輸入時的數字鍵盤,輸入改變時數據獲取等方式都沒有提供,這些只能使用的人自己根據需要進行加減了。

建議對於最好弄個簡單的html之類的布局設計器,這樣生成能夠使用的數據相對比較好點,要不人工計算數據很容易出錯。
 Android利用HorizontalScrollView仿ViewPager設計簡單相冊
最近學習了一個視頻公開課,講到了利用HorizontalScrollView仿ViewPager設計的一個簡單相冊,其實主要用了ViewPager緩存的思想。此篇文章參考
 android ViewSwitcher的用法介紹
ViewSwitcher 的作用簡單來說就是:在兩個視圖間轉換時顯示動畫它的兩個子類應該很熟悉,ImageSwitcher:轉換圖片時增加動畫效果;TextSwitche
 深入淺出學習Android ListView基礎
ListView 簡介ListView 是安卓裡常用的控件, 本文介紹一下常用用法,以及優化等方法1、改寫activity_main.xml<LinearLayou
 Android中gravity與layout_gravity的使用區別分析
android:gravity:設置的是控件自身上面的內容位置android:layout_gravity:設置控件本身相對於父控件的顯示位置。看下如下代碼段復制代碼 代