編輯:關於Android編程
滑動刪除的部分主要包含兩個部分, 一個是內容區域(用於放置正常顯示的view),另一個是操作區域(用於放置刪除按鈕)。默認情況下,操作區域是不顯示的,內容區域的大小是填充整個容 器,操作區域始終位於內容區域的右面。當開始滑動的時候,整個容器中的所有子view都像左滑動,如果操作區域此時是不可見的,設置為可見。
實現思路就是自定義一個layout SwipeLayout繼承自FrameLayout。SwipeLayout包含兩個子view,第一個子view是內容區域,第二個子view是操作 區域。滑動效果的控制,主要就是通過檢測SwipeLayout的touch事件來實現,Android support庫裡其實已經提供了ViewDragHelper來進行監聽touch事件。
1、首先需要對LinearLayout進行重載
具體分析看注解
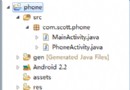
package com.example.mac.agriculturemanagement;
import android.content.Context;
import android.support.annotation.Nullable;
import android.support.v4.view.ViewCompat;
import android.support.v4.widget.ViewDragHelper;
import android.util.AttributeSet;
import android.view.MotionEvent;
import android.view.View;
import android.widget.LinearLayout;
/**
 * Created by mac on 2017/6/15.
 */
//條目滑動效果
public class SlideLayout extends LinearLayout {
  private ViewDragHelper mDragHelper;
  private View contentView;
  private View actionView;
  private int dragDistance;
  private final double AUTO_OPEN_SPEED_LIMIT = 800.0;
  private int draggedX;
  public SlideLayout(Context context) {
    super(context);
    init();
  }
  public SlideLayout(Context context, @Nullable AttributeSet attrs) {
    super(context, attrs);
    init();
  }
  public SlideLayout(Context context, @Nullable AttributeSet attrs, int defStyleAttr) {
    super(context, attrs, defStyleAttr);
    init();
  }
  //初始化
  public void init (){
    mDragHelper = ViewDragHelper.create(this, new DragHelperCallback());
  }
  @Override
  public boolean callOnClick() {
    return super.callOnClick();
  }
  /*當你觸摸屏幕,移動的時候,就會回調這個方法。
  它會返回兩個參數。第一個參數,就是你觸摸的那個控件。
  第二個就是ID。
  返回值又代表什麼呢?返回ture,就是代筆允許拖動這個控件。
  返回false就代表不允許拖動這個控件.。這裡我只允許拖動主控件。*/
   //把容器的事件處理委托給ViewDragHelper對象
  @Override
  public boolean onInterceptTouchEvent(MotionEvent event) {
    if (mDragHelper.shouldInterceptTouchEvent(event)) {
      return true;
    }
    return super.onInterceptTouchEvent(event);
  }
  @Override
  public boolean onTouchEvent(MotionEvent event) {
    mDragHelper.processTouchEvent(event);
    return true;
  }
  @Override
  protected void onFinishInflate() {
    contentView = getChildAt(0);
    actionView = getChildAt(1);
    actionView.setVisibility(GONE);
  }
   //設置拖動的距離為actionView的寬度
   @Override
   protected void onMeasure(int widthMeasureSpec, int heightMeasureSpec) {
    super.onMeasure(widthMeasureSpec, heightMeasureSpec);
    dragDistance = actionView.getMeasuredWidth();
    //System.out.println("rightTop"+actionView.getTop());
   }
  private class DragHelperCallback extends ViewDragHelper.Callback {
    //用來確定contentView和actionView是可以拖動的
    @Override
    public boolean tryCaptureView(View view, int i) {
      return view == contentView || view == actionView;
    }
    //被拖動的view位置改變的時候調用,如果被拖動的view是contentView,
    // 我們需要在這裡更新actionView的位置
    @Override
    public void onViewPositionChanged(View changedView, int left, int top, int dx, int dy) {
      draggedX = left;
      if (changedView == contentView) {
        actionView.offsetLeftAndRight(dx);
      } else {
        contentView.offsetLeftAndRight(dx);
      }
      //actionView 是否可見
      //0  --------  VISIBLE  可見
      //4  --------  INVISIBLE  不可見但是占用布局空間
      //8  --------  GONE  不可見也不占用布局空間
      if (actionView.getVisibility() == View.GONE) {
        actionView.setVisibility(View.VISIBLE);
      }
      if (left==25)
      {
        actionView.setVisibility(View.GONE);
      }
      invalidate(); //刷新View
    }
    //用來限制view在x軸上拖動
    //@Override
    public int clampViewPositionHorizontal(View child, int left, int dx) {
      if (child == contentView) {
        final int leftBound = getPaddingLeft();
        final int minLeftBound = -leftBound - dragDistance;
        final int newLeft = Math.min(Math.max(minLeftBound, left), 25);
        //System.out.println("content "+newLeft);
        return newLeft;
      } else {
        //getMeasuredWidth()獲取全部長度 包括隱藏的
        final int minLeftBound = getPaddingLeft() + contentView.getMeasuredWidth() - dragDistance;
        final int maxLeftBound = getPaddingLeft() + contentView.getMeasuredWidth() + getPaddingRight();
        final int newLeft = Math.min(Math.max(left, minLeftBound), maxLeftBound);
        System.out.println("action "+newLeft);
        return newLeft;
      }
    }
    @Override
    public int clampViewPositionVertical(View child, int top, int dy) {
      //System.out.println("top "+top);
      if(top!=25)
      {
        top=25;
      }
      return top;
    }
    //用來限制view可以拖動的范圍
    //@Override
    public int getViewHorizontalDragRange(View child) {
      return dragDistance;
    }
    @Override
    public int getViewVerticalDragRange(View child) {
      return 0;
    }
    //根據滑動手勢的速度以及滑動的距離來確定是否顯示actionView。
    // smoothSlideViewTo方法用來在滑動手勢之後實現慣性滑動效果
    //@Override
    public void onViewReleased(View releasedChild, float xvel, float yvel) {
      super.onViewReleased(releasedChild, xvel, yvel);
      boolean settleToOpen = false;
      if (xvel > AUTO_OPEN_SPEED_LIMIT) {
        settleToOpen = false;
      } else if (xvel < -AUTO_OPEN_SPEED_LIMIT) {
        settleToOpen = true;
      } else if (draggedX <= -dragDistance / 2) {
        settleToOpen = true;
      } else if (draggedX > -dragDistance / 2) {
        settleToOpen = false;
      }
      final int settleDestX = settleToOpen ? -dragDistance : 0;
      mDragHelper.smoothSlideViewTo(contentView, settleDestX, 0);
      ViewCompat.postInvalidateOnAnimation(SlideLayout.this);
    }
  }
}
因為我給我的LinearLayout設置了外邊距,所以在向左滑動的過程,出現上下的滑動,並且該條目的原始位置也偏移。為了解決該問題,首先需要根據自己設置的margin值來修改一下的數據
將onViewPositionChanged中添加
if (left==25)
      {
        actionView.setVisibility(View.GONE);
      }
修改為適合的數據,來防止右側的滑塊不隱藏
再添加上
public int clampViewPositionVertical(View child, int top, int dy) {
      //System.out.println("top "+top);
      if(top!=25)
      {
        top=25;
      }
      return top;
    }
來限制其上下移動 top的值依舊需要自己琢磨
2、編寫布局文件
<?xml version="1.0" encoding="utf-8"?>
<LinearLayout xmlns:android="http://schemas.android.com/apk/res/android"
  android:orientation="vertical" android:layout_width="match_parent"
  android:layout_height="match_parent">
  <com.example.mac.agriculturemanagement.SlideLayout
    android:layout_width="match_parent"
    android:layout_height="wrap_content"
    android:orientation="horizontal"
    >
    <LinearLayout
      android:layout_width="match_parent"
      android:layout_height="100dp"
      android:layout_margin="10dp"
      android:background="@drawable/text_border"
      android:elevation="3dp"
      android:orientation="vertical">
      <TextView
        android:id="@+id/mark"
        android:layout_width="match_parent"
        android:layout_height="wrap_content"
        android:layout_weight="1"
        android:gravity="center"
        android:text="TextView"
        android:textSize="40dp" />
      <TextView
        android:id="@+id/markSquare"
        android:layout_width="wrap_content"
        android:layout_height="wrap_content"
        android:layout_gravity="center"
        android:layout_weight="1"
        android:text="TextView"
        android:textSize="20dp" />
    </LinearLayout>
    <LinearLayout
      android:layout_width="100dp"
      android:layout_height="100dp"
      android:background="#f0f0f0"
      android:layout_marginTop="10dp"
      >
      <RelativeLayout
        android:layout_width="wrap_content"
        android:layout_height="match_parent"
        android:layout_weight="1"
        android:gravity="center">
        <TextView
          android:id="@+id/showInfo"
          android:layout_width="wrap_content"
          android:layout_height="wrap_content"
          android:layout_alignParentTop="true"
          android:layout_marginLeft="5dp"
          android:layout_toEndOf="@+id/textView6"
          android:layout_toRightOf="@+id/textView6"
          android:text="詳細信息" />
        <TextView
          android:id="@+id/textView6"
          android:layout_width="wrap_content"
          android:layout_height="wrap_content"
          android:layout_alignParentLeft="true"
          android:layout_alignParentStart="true"
          android:layout_alignParentTop="true"
          android:text="刪除" />
      </RelativeLayout>
    </LinearLayout>
  </com.example.mac.agriculturemanagement.SlideLayout>
</LinearLayout>
具體效果
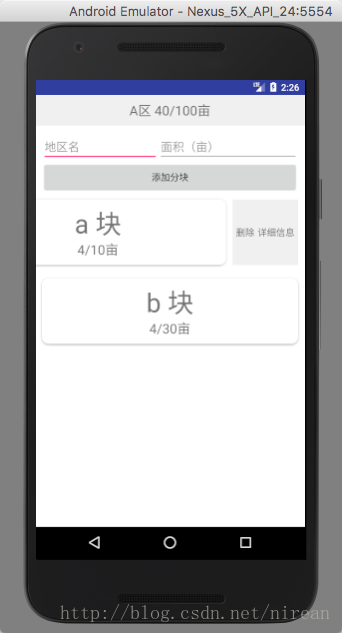
但目前還存在一個問題
ListView每一個條目的點擊事件和滑動事件不能共存。網上說是因為事件的觸發是逐層向下傳遞到進行處理該事件的部件,再逐層向上返 回處理結果。
以上所述是小編給大家介紹的Android 實現左滑出現刪除選項,希望對大家有所幫助,如果大家有任何疑問請給我留言,小編會及時回復大家的。在此也非常感謝大家對本站網站的支持!
 Android入門之Style與Theme用法實例解析
就目前的互聯網發展來看,已經有越來越多互聯網企業都在Android平台上部署其客戶端,並且為了提升用戶體驗,這些客戶端都做得布局合理而且美觀。本文所要介紹的Android
 解析Android聲明和使用權限
Android定義了一種權限方案來保護設備上的資源和功能。例如,在默認情況下,應用程序無法訪問聯系人列表、撥打電話等。下面就以撥打電話為例介紹一下系統對權限的要求。一般在
 Android初級教程:Android中解析方式之pull解析
在安卓中有很多種解析方式。按照大方向有xml解析和json解析。而,細致的分,xml和json解析各有自己的很多解析方式。今天這一篇主要介紹xml解析中的pull解析。對
 學會編寫Android Studio插件
一、概述相信大家在使用Android Studio的時候,或多或少的會使用一些插件,適當的配合插件可以幫助我們提升一定的開發效率,更加快樂。例如:https://gith