編輯:Android開發教程
Android API Demos中有很多非常Nice的例子,這些例子的代碼都寫的很出色,如果大家把API Demos中的 每個例子研究透了,那麼恭喜你已經成為一個真正的Android高手了。這也算是給一些比較迷茫的Android開 發者一個指出了一個提升自我能力的方向吧。API Demos中的例子眾多,今天我們就來模仿其中一個3D變換的 特效,來實現一種別樣的圖片浏覽器。
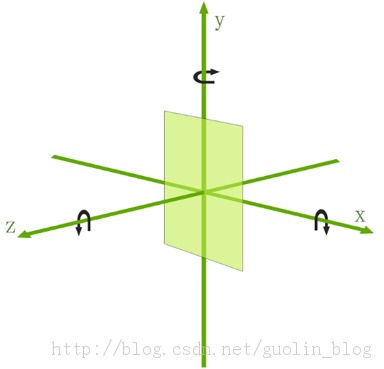
既然是做中軸旋轉的特效,那麼肯定就要用到3D變換的功能。 在Android中如果想要實現3D效果一般有兩種選擇,一是使用Open GL ES,二是使用Camera。Open GL ES使用 起來太過復雜,一般是用於比較高級的3D特效或游戲,像比較簡單的一些3D效果,使用Camera就足夠了。
Camera中提供了三種旋轉方法,分別是rotateX()、rotateY()和rotateZ,調用這三個方法,並傳入相應 的角度,就可以讓視圖圍繞這三個軸進行旋轉,而今天我們要做的中軸旋轉效果其實就是讓視圖圍繞Y軸進行 旋轉。使用Camera讓視圖進行旋轉的示意圖,如下所示:
那我們就開始動手吧,首先創 建一個Android項目,起名叫做RotatePicBrowserDemo,然後我們准備了幾張圖片,用於稍後在圖片浏覽器中 進行浏覽。
而API Demos中已經給我們提供了一個非常好用的3D旋轉動畫的工具類Rotate3dAnimation ,這個工具類就是使用Camera來實現的,我們先將這個這個類復制到項目中來,代碼如下所示:
/**
 * An animation that rotates the view on the Y axis between two specified angles.
 * This animation also adds a translation on the Z axis (depth) to improve the effect.
 */
public class Rotate3dAnimation extends Animation {
    private final float mFromDegrees;
    private final float mToDegrees;
    private final float mCenterX;
    private final float mCenterY;
    private final float mDepthZ;
    private final boolean mReverse;
    private Camera mCamera;

    /**
     * Creates a new 3D rotation on the Y axis. The rotation is defined by its
     * start angle and its end angle. Both angles are in degrees. The rotation
     * is performed around a center point on the 2D space, definied by a pair
     * of X and Y coordinates, called centerX and centerY. When the animation
     * starts, a translation on the Z axis (depth) is performed. The length
     * of the translation can be specified, as well as whether the translation
     * should be reversed in time.
     *
     * @param fromDegrees the start angle of the 3D rotation
     * @param toDegrees the end angle of the 3D rotation
     * @param centerX the X center of the 3D rotation
     * @param centerY the Y center of the 3D rotation
     * @param reverse true if the translation should be reversed, false otherwise
     */
    public Rotate3dAnimation(float fromDegrees, float toDegrees,
            float centerX, float centerY, float depthZ, boolean reverse) {
        mFromDegrees = fromDegrees;
        mToDegrees = toDegrees;
        mCenterX = centerX;
        mCenterY = centerY;
        mDepthZ = depthZ;
        mReverse = reverse;
    }

    @Override
    public void initialize(int width, int height, int parentWidth, int parentHeight) {
        super.initialize(width, height, parentWidth, parentHeight);
        mCamera = new Camera();
    }

    @Override
    protected void applyTransformation(float interpolatedTime, Transformation t) {
        final float fromDegrees = mFromDegrees;
        float degrees = fromDegrees + ((mToDegrees - fromDegrees) * interpolatedTime);

        final float centerX = mCenterX;
        final float centerY = mCenterY;
        final Camera camera = mCamera;

        final Matrix matrix = t.getMatrix();

        camera.save();
        if (mReverse) {
            camera.translate(0.0f, 0.0f, mDepthZ * interpolatedTime);
        } else {
            camera.translate(0.0f, 0.0f, mDepthZ * (1.0f - interpolatedTime));
        }
        camera.rotateY(degrees);
        camera.getMatrix(matrix);
        camera.restore();

        matrix.preTranslate(-centerX, -centerY);
        matrix.postTranslate(centerX, centerY);
    }
}
 android如何使用BroadcastReceiver後台實現來電通話記錄的監聽
android如何使用BroadcastReceiver後台實現來電通話記錄的監聽並存取到sqllite數據庫通過Contentprovilder實現接口Broadcas
 Android實現ListView過濾功能,繼承於BaseAdapter,非ArrayAdapter
其實實現ListView過濾功能最方便的便是使用ArrayAdapter,裡面自帶的 getFilter()方法能很方便的實現此功能,但是在實際的開發中,一般都是繼承於
 Android多線程研究(2)定時器
先來看一段代碼:public static void main(String[] args) { new Timer().schedule(new TimerT
 Android GUI系統之SurfaceFlinger(13) VSync信號的處理
1.1.1 VSync信號的處理經過上一小節的分析,現在我們已經明白了系統是如何通過硬件設備或者軟件模擬來產生VSync信號的,也明白了它的流轉過程。VSync最終會被E