編輯:Android技術基礎
說到GPS這個名詞,相信大家都不陌生,GPS全球定位技術嘛,嗯,Android中定位的方式 一般有這四種:GPS定位,WIFI定准,基站定位,AGPS定位(基站+GPS);
本系列教程只講解GPS定位的基本使用!GPS是通過與衛星交互來獲取設備當前的經緯度,准確 度較高,但也有一些缺點,最大的缺點就是:室內幾乎無法使用...需要收到4顆衛星或以上 信號才能保證GPS的准確定位!但是假如你是在室外,無網絡的情況,GPS還是可以用的!
本節我們就來探討下Android中的GPS的基本用法~
官方API文檔:LocationManager
這玩意是系統服務來的,不能直接new,需要:
LocationManager lm = (LocationManager)getSystemService(Context.LOCATION_SERVICE);
另外用GPS定位別忘了加權限:
<uses-permission android:name="android.permission.ACCESS_FINE_LOCATION"/>
好的,獲得了LocationManager對象後,我們可以調用下面這些常用的方法:
官方API文檔:LocationProvider
這比是GPS定位組件的抽象表示,調用下述方法可以獲取該定位組件的相關信息!
常用的方法如下:
官方API文檔:Location
位置信息的抽象類,我們可以調用下述方法獲取相關的定位信息!
常用方法如下:
官方API文檔:Criteria
獲取LocationProvider時,可以設置過濾條件,就是通過這個類來設置相關條件的~
常用方法如下:
運行效果圖:
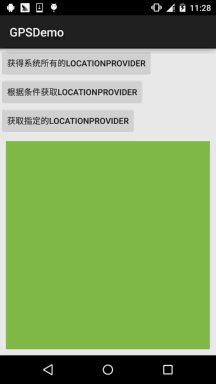
由圖可以看到,當前可用的LocationProvider有三個,分別是:
實現代碼:
布局文件:activity_main.xml:
<LinearLayout xmlns:android="http://schemas.android.com/apk/res/android"
    android:layout_width="match_parent"
    android:layout_height="match_parent"
    android:orientation="vertical">

    <Button
        android:id="@+id/btn_one"
        android:layout_width="wrap_content"
        android:layout_height="wrap_content"
        android:text="獲得系統所有的LocationProvider" />

    <Button
        android:id="@+id/btn_two"
        android:layout_width="wrap_content"
        android:layout_height="wrap_content"
        android:text="根據條件獲取LocationProvider" />

    <Button
        android:id="@+id/btn_three"
        android:layout_width="wrap_content"
        android:layout_height="wrap_content"
        android:text="獲取指定的LocationProvider" />

    <TextView
        android:id="@+id/tv_result"
        android:layout_width="match_parent"
        android:layout_height="match_parent"
        android:layout_margin="10dp"
        android:background="#81BB4D"
        android:padding="5dp"
        android:textColor="#FFFFFF"
        android:textSize="20sp"
        android:text />

</LinearLayout>
MainActivity.java:
public class MainActivity extends AppCompatActivity implements View.OnClickListener {

    private Button btn_one;
    private Button btn_two;
    private Button btn_three;
    private TextView tv_result;
    private LocationManager lm;
    private List<String> pNames = new ArrayList<String>(); // 存放LocationProvider名稱的集合

    @Override
    protected void onCreate(Bundle savedInstanceState) {
        super.onCreate(savedInstanceState);
        setContentView(R.layout.activity_main);
        lm = (LocationManager) getSystemService(Context.LOCATION_SERVICE);
        bindViews();
    }

    private void bindViews() {
        btn_one = (Button) findViewById(R.id.btn_one);
        btn_two = (Button) findViewById(R.id.btn_two);
        btn_three = (Button) findViewById(R.id.btn_three);
        tv_result = (TextView) findViewById(R.id.tv_result);

        btn_one.setOnClickListener(this);
        btn_two.setOnClickListener(this);
        btn_three.setOnClickListener(this);
    }


    @Override
    public void onClick(View v) {
        switch (v.getId()) {
            case R.id.btn_one:
                pNames.clear();
                pNames = lm.getAllProviders();
                tv_result.setText(getProvider());
                break;
            case R.id.btn_two:
                pNames.clear();
                Criteria criteria = new Criteria();
                criteria.setCostAllowed(false);   //免費
                criteria.setAltitudeRequired(true);  //能夠提供高度信息
                criteria.setBearingRequired(true);   //能夠提供方向信息
                pNames = lm.getProviders(criteria, true);
                tv_result.setText(getProvider());
                break;
            case R.id.btn_three:
                pNames.clear();
                pNames.add(lm.getProvider(LocationManager.GPS_PROVIDER).getName()); //指定名稱
                tv_result.setText(getProvider());
                break;
        }
    }

    //遍歷數組返回字符串的方法
    private String getProvider(){
        StringBuilder sb = new StringBuilder();
        for (String s : pNames) {
            sb.append(s + "\n");
        }
        return sb.toString();
    }
}
在我們使用GPS定位前的第一件事應該是去判斷GPS是否已經打開或可用,沒打開的話我們需要去 打開GPS才能完成定位!這裡不考慮AGPS的情況~
private boolean isGpsAble(LocationManager lm){
    return lm.isProviderEnabled(android.location.LocationManager.GPS_PROVIDER)?true:false;
}
方法一:強制打開GPS,Android 5.0後無用....
//強制幫用戶打開GPS 5.0以前可用
private void openGPS(Context context){
    Intent gpsIntent = new Intent();
    gpsIntent.setClassName("com.android.settings", "com.android.settings.widget.SettingsAppWidgetProvider");
    gpsIntent.addCategory("android.intent.category.ALTERNATIVE");
    gpsIntent.setData(Uri.parse("custom:3"));
    try {
        PendingIntent.getBroadcast(LocationActivity.this, 0, gpsIntent, 0).send();
    } catch (PendingIntent.CanceledException e) {
        e.printStackTrace();
    }
}
方法二:打開GPS位置信息設置頁面,讓用戶自行打開
//打開位置信息設置頁面讓用戶自己設置
private void openGPS2(){
    Intent intent = new Intent(Settings.ACTION_LOCATION_SOURCE_SETTINGS);
    startActivityForResult(intent,0);
}
這個非常簡單,調用requestLocationUpdates方法設置一個LocationListener定時檢測位置而已!
示例代碼如下:
布局:activity_location.xml:
<?xml version="1.0" encoding="utf-8"?>
<LinearLayout xmlns:android="http://schemas.android.com/apk/res/android"
    android:layout_width="match_parent"
    android:layout_height="match_parent"
    android:orientation="vertical">

    <TextView
        android:id="@+id/tv_show"
        android:layout_width="match_parent"
        android:layout_height="match_parent"
        android:padding="5dp"
        android:textSize="20sp"
        android:text />

</LinearLayout>
LocationActivity.java:
/**
* Created by Jay on 2015/11/20 0020.
*/
public class LocationActivity extends AppCompatActivity {
private LocationManager lm;
private TextView tv_show;
@Override
public void onCreate(Bundle savedInstanceState) {
super.onCreate(savedInstanceState);
setContentView(R.layout.activity_location);
tv_show = (TextView) findViewById(R.id.tv_show);
lm = (LocationManager) getSystemService(Context.LOCATION_SERVICE);
if (!isGpsAble(lm)) {
Toast.makeText(LocationActivity.this, "請打開GPS~", Toast.LENGTH_SHORT).show();
openGPS2();
}
//從GPS獲取最近的定位信息
Location lc = lm.getLastKnownLocation(LocationManager.GPS_PROVIDER);
updateShow(lc);
//設置間隔兩秒獲得一次GPS定位信息
lm.requestLocationUpdates(LocationManager.GPS_PROVIDER, 2000, 8, new LocationListener() {
@Override
public void onLocationChanged(Location location) {
// 當GPS定位信息發生改變時,更新定位
updateShow(location);
}
@Override
public void onStatusChanged(String provider, int status, Bundle extras) {
}
@Override
public void onProviderEnabled(String provider) {
// 當GPS LocationProvider可用時,更新定位
updateShow(lm.getLastKnownLocation(provider));
}
@Override
public void onProviderDisabled(String provider) {
updateShow(null);
}
});
}
//定義一個更新顯示的方法
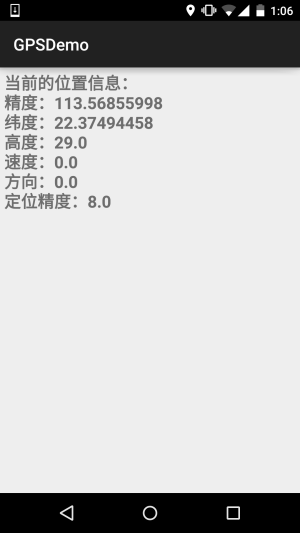
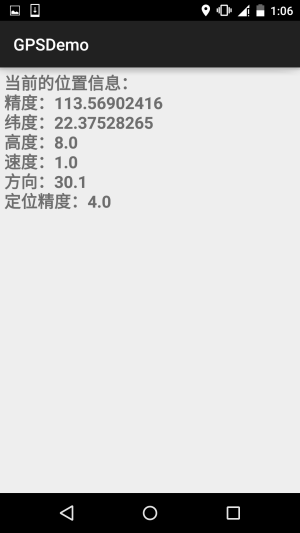
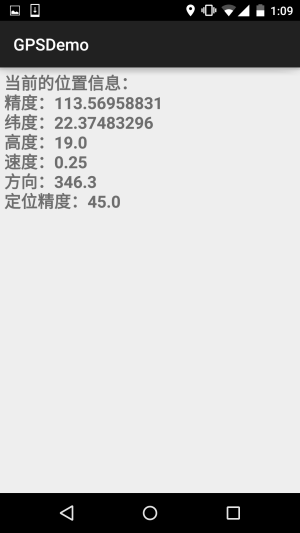
private void updateShow(Location location) {
if (location != null) {
StringBuilder sb = new StringBuilder();
sb.append("當前的位置信息:\n");
sb.append("精度:" + location.getLongitude() + "\n");
sb.append("緯度:" + location.getLatitude() + "\n");
sb.append("高度:" + location.getAltitude() + "\n");
sb.append("速度:" + location.getSpeed() + "\n");
sb.append("方向:" + location.getBearing() + "\n");
sb.append("定位精度:" + location.getAccuracy() + "\n");
tv_show.setText(sb.toString());
} else tv_show.setText("");
}
private boolean isGpsAble(LocationManager lm) {
return lm.isProviderEnabled(android.location.LocationManager.GPS_PROVIDER) ? true : false;
}
//打開設置頁面讓用戶自己設置
private void openGPS2() {
Intent intent = new Intent(Settings.ACTION_LOCATION_SOURCE_SETTINGS);
startActivityForResult(intent, 0);
}
}
好的,非常簡單,因為gps需要在室外才能用,於是趁著這個機會小跑出去便利店買了杯奶茶, 順道截下圖~
requestLocationUpdates (String provider, long minTime, float minDistance, LocationListener listener)
當時間超過minTime(單位:毫秒),或者位置移動超過minDistance(單位:米),就會調用listener中的方法更新GPS信息,建議這個minTime不小於60000,即1分鐘,這樣會更加高效而且省電,加入你需要盡可能 實時地更新GPS,可以將minTime和minDistance設置為0
對了,別忘了,你還需要一枚權限:
<uses-permission android:name="android.permission.ACCESS_FINE_LOCATION" />
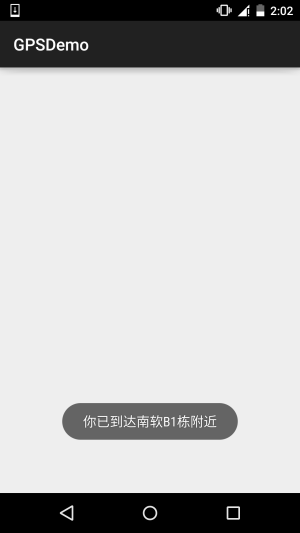
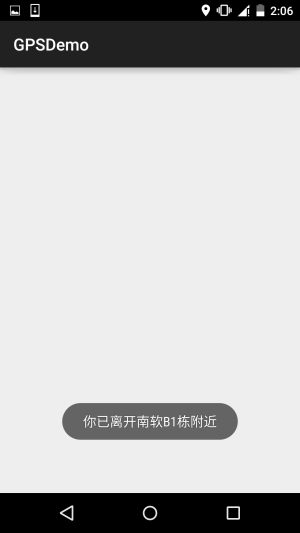
嗯,就是固定一個點,當手機與該點的距離少於指定范圍時,可以觸發對應的處理! 有點像地理圍欄...我們可以調用LocationManager的addProximityAlert方法添加臨近警告! 完整方法如下:
addProximityAlert(double latitude,double longitude,float radius,long expiration,PendingIntent intent)
屬性說明:
示例代碼如下:
ProximityActivity.java:
/**
 * Created by Jay on 2015/11/21 0021.
 */
public class ProximityActivity extends AppCompatActivity {
    private LocationManager lm;
    @Override
    public void onCreate(Bundle savedInstanceState) {
        super.onCreate(savedInstanceState);
        setContentView(R.layout.activity_proximity);
        lm = (LocationManager) getSystemService(Context.LOCATION_SERVICE);
        //定義固定點的經緯度
        double longitude = 113.56843;
        double latitude = 22.374937;
        float radius = 10;     //定義半徑,米
        Intent intent = new Intent(this, ProximityReceiver.class);
        PendingIntent pi = PendingIntent.getBroadcast(this, -1, intent, 0);
        lm.addProximityAlert(latitude, longitude, radius, -1, pi);
    }
}
還需要注冊一個廣播接收者:ProximityReceiver.java:
/**
 * Created by Jay on 2015/11/21 0021.
 */
public class ProximityReceiver extends BroadcastReceiver{
    @Override
    public void onReceive(Context context, Intent intent) {
        boolean isEnter = intent.getBooleanExtra( LocationManager.KEY_PROXIMITY_ENTERING, false);
        if(isEnter) Toast.makeText(context, "你已到達南軟B1棟附近", Toast.LENGTH_LONG).show();
        else Toast.makeText(context, "你已離開南軟B1棟附近", Toast.LENGTH_LONG).show();
    }
}
別忘了注冊:
<receiver android:name=".ProximityReceiver"/>
運行效果圖:
PS:好吧,設置了10m,結果我從B1走到D1那邊,不止10m了吧...還剛好下雨
GPSDemo.zip
好的,本節給大家介紹了Android中GPS定位的一些基本用法,非常簡單,內容部分參考的 李剛老師的《Android瘋狂講義》,只是對例子進行了一些修改以及進行了可用性的測試! 本節就到這裡,謝謝~
 10.3 AudioManager(音頻管理器)
本節引言:在多媒體的第一節,我們用SoundPool寫了個Duang的示例,小豬點擊一個按鈕後,突然發出Duang的一聲,而且當時的聲音很大,嚇死寶
 第94章、圖形變換Matrix(從零開始學Android)
Matrix ,翻譯過來是矩陣,大學課程是線性代數有專門介紹,相信大多數人都很頭疼,在圖像處理方面,主要是用於平面的縮放、平移、旋轉等操作。在這裡就體現了學編程為什麼說數
 5.2.5 Fragment實例精講——新聞(購物)類App列表Fragment的簡單實現
本節引言:相信大家對點擊列表,然後進入詳情這種App並不陌生吧,在購物類App和新聞類App中最為常見:下面我們簡單來講一下流程邏輯!1.邏輯流程講
 5.2.4 Fragment實例精講——底部導航欄+ViewPager滑動切換頁面
前三節我們分別用不同的方式實現了普通底部導航欄的效果,而本節我們將會在第二個實例的基礎上加上ViewPager來實現滑動切換頁面的效果!大部分朋友都