編輯:關於android開發
最近博主想做一個app,中間有一個是錄音的功能。於是博主想把UI做的好看一些,想仿照微信或者QQ語音輸入時,能夠隨著聲音的大小顯示聲波振幅。於是查找了一些資料,現在把這個功能的Demo分享給大家,以後也會把更多的項目學習到的知識分享給大家。
其實這個功能主要是依靠MediaRecorder的getMaxAmplitude()方法來獲得聲音的振幅,然後依據計算公式分貝的計算公式K=20lg(Vo/Vi) Vo當前的振幅值,Vi基准值為600來獲得分貝數然後在根據分貝來顯示ImageView上的不同圖片。這樣就實現了聲波振幅顯示了。
下面列出主要的函數,後面會給出錄音顯示聲波振幅的Demo下載鏈接:
	public RecordDialog(Context context){
		this.context=context;
		dialog_view=LayoutInflater.from(context).inflate(R.layout.dialog_sound, null);

		//初始化振幅圖片
		progressImg[0]=context.getResources().getDrawable(R.drawable.mic_1);
		progressImg[1]=context.getResources().getDrawable(R.drawable.mic_2);
		progressImg[2]=context.getResources().getDrawable(R.drawable.mic_3);
		progressImg[3]=context.getResources().getDrawable(R.drawable.mic_4);
		progressImg[4]=context.getResources().getDrawable(R.drawable.mic_5);
		progressImg[5]=context.getResources().getDrawable(R.drawable.mic_6);
		progressImg[6]=context.getResources().getDrawable(R.drawable.mic_7);

		dialog=new AlertDialog.Builder(context).setView(dialog_view).show();
//		dialog.cancel();

		progress=(ImageView) dialog_view.findViewById(R.id.sound_progress);
		btn_cancel=(ImageView) dialog_view.findViewById(R.id.cancel);
		btn_submit=(TextView) dialog_view.findViewById(R.id.submit);
		mic_icon=(ImageView) dialog.findViewById(R.id.mic);
		dialog_title=(TextView) dialog.findViewById(R.id.title);
		txt_msg=(TextView) dialog.findViewById(R.id.msg);

		btn_cancel.setOnClickListener(onCancel);
		btn_submit.setOnClickListener(onSubmit);
		}
然後我們實現一個自定義的接口SoundAmplitudeListen用來處理獲取分貝值之後顯示不同的波動圖片:
private SoundAmplitudeListen onSoundAmplitudeListen=new SoundAmplitudeListen() {

		@SuppressWarnings("deprecation")
		@Override
		public void amplitude(int amplitude, int db, int value) {
			// TODO Auto-generated method stub
			if(value>=6){
				value=6;
			}
			progress.setBackgroundDrawable(progressImg[value]);
		}
	};
最後就是錄音時處理分貝的RecodeManager類了:
package com.example.voiceviewdemo;

import java.io.File;
import java.io.IOException;
import java.util.Calendar;
import java.util.Locale;

import android.R.integer;
import android.media.MediaRecorder;
import android.os.Environment;
import android.os.Handler;
import android.text.format.DateFormat;

public class RecodeManager {

	private File file;//錄音文件
	private MediaRecorder mediaRecorder;//android 媒體錄音類
	private SoundAmplitudeListen soundAmplitudeListen;//聲波振幅監聽器
	private final Handler mHandler=new Handler();
	private Runnable mUpdateMicStatusTimer=new Runnable() {
		/**
		 * 分貝的計算公式K=20lg(Vo/Vi) Vo當前的振幅值,Vi基准值為600
		 */
		private int BASE=500;
		private int RATIO=5;
		private int postDelayed=200;
		@Override
		public void run() {
			int ratio=mediaRecorder.getMaxAmplitude()/BASE;
			int db=(int)(20*Math.log10(Math.abs(ratio)));
			int value=db/RATIO;
			if(value<0) value=0;
			if(soundAmplitudeListen!=null){
				soundAmplitudeListen.amplitude(ratio, db, value);
				mHandler.postDelayed(mUpdateMicStatusTimer,postDelayed);
			}
		}
	};

	public void startRecordCreateFile() throws IOException{
		if(!Environment.getExternalStorageState().equals(
				Environment.MEDIA_MOUNTED)){
			return ;
		}
		file=new File(Environment.getExternalStorageDirectory()+File.separator+"1"+File.separator+
				new DateFormat().format("yyyyMMdd_HHmmss", Calendar.getInstance(Locale.CHINA))+".amr");
		mediaRecorder=new MediaRecorder();//創建錄音對象
		mediaRecorder.setAudioSource(MediaRecorder.AudioSource.DEFAULT);//從麥克風源進行錄音
		mediaRecorder.setOutputFormat(MediaRecorder.OutputFormat.MPEG_4);//設置輸出格式
		mediaRecorder.setAudioEncoder(MediaRecorder.AudioEncoder.DEFAULT);//設置編碼格式
		mediaRecorder.setOutputFile(file.getAbsolutePath());

		//創建文件
		if(!file.getParentFile().exists()){
			file.getParentFile().mkdirs();
		}
		file.createNewFile();
		mediaRecorder.prepare();
		mediaRecorder.start();
		mHandler.post(mUpdateMicStatusTimer);
	}

	public File stopRecord(){
		if(mediaRecorder!=null){
			mediaRecorder.stop();
			mediaRecorder.release();
			mediaRecorder=null;
			mHandler.removeCallbacks(mUpdateMicStatusTimer);
		}
		return file;
	}
	public void setSoundAmplitudeListen(SoundAmplitudeListen soundAmplitudeListen){
		this.soundAmplitudeListen=soundAmplitudeListen;
	}
	public interface SoundAmplitudeListen{
		public void amplitude(int amplitude,int db,int value);
	}
}
效果如下: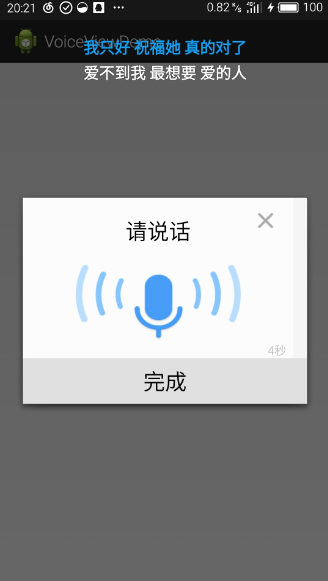
Demo 資源: http://download.csdn.net/detail/u014132820/9369346
下面給出博主自己開發的一些小App,分享給大家:
二維碼生成器:http://shouji.baidu.com/software/item?docid=8395189&from=as 古老讀心術:http://shouji.baidu.com/game/item?docid=8425923&from=as 打地鼠:http://shouji.baidu.com/game/item?docid=8409245&from=as 2048軍銜版:http://shouji.baidu.com/game/item?docid=8372779&from=as 瘋狂的手指:http://shouji.baidu.com/game/item?docid=8269676&from=as
 自定義控件三部曲之繪圖篇(八)——Paint之ColorMatrix與濾鏡效果
自定義控件三部曲之繪圖篇(八)——Paint之ColorMatrix與濾鏡效果 這篇主要講解ColorMatrix的相關知識,這裡將涉及到矩陣乘法的相關知識。所以這篇
 ListView下拉刷新,listview下拉
ListView下拉刷新,listview下拉下拉刷新------- 1.addHeaderView必須在setAdapter之前調用
 Android事件分發
Android事件分發 Android 中與 Touch 事件相關的方法包括:dispatchTouchEvent(MotionEvent ev)、onInterce
 谷歌電子市場9--詳情界面,谷歌電子市場9--
谷歌電子市場9--詳情界面,谷歌電子市場9-- 1.詳情頁(HomeDetailActivity) @Override protected void onCreate(