編輯:關於android開發
之前關於如何實現屏幕頁面切換,寫過一篇博文《Android中使用ViewFlipper實現屏幕切換》,相比ViewFlipper,ViewPager更適用復雜的視圖切換,而且Viewpager有自己的adapter,這也讓其適應復雜對象,實現數據的動態加載。
ViewPager是谷歌官方給我們提供的一個兼容低版本安卓設備的軟件包,裡面包囊了只有在安卓3.0以上可以使用的api。而viewpager就是其中之一,利用它,我們可以做很多事情,從最簡單的導航,到頁面菜單等等。
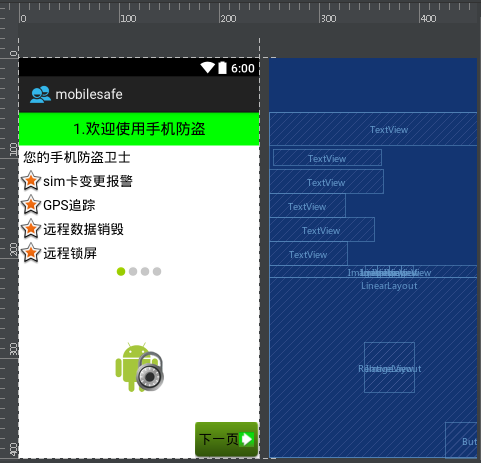
下面我們就展示下ViewPager可以實現的兩種簡單效果:
實現效果如下(4張視圖(layout)):

 1 <?xml version="1.0" encoding="utf-8"?>
 2 <LinearLayout xmlns:android="http://schemas.android.com/apk/res/android"
 3     android:orientation="vertical" android:layout_width="match_parent"
 4     android:layout_height="match_parent">
 5     <android.support.v4.view.ViewPager
 6         android:layout_width="match_parent"
 7         android:layout_height="match_parent"
 8         android:layout_gravity="center"
 9         android:gravity="center"
10         android:id="@+id/vp">
11         <android.support.v4.view.PagerTabStrip
12             android:layout_width="match_parent"
13             android:layout_height="wrap_content"
14             android:id="@+id/tap">
15         </android.support.v4.view.PagerTabStrip>
16     </android.support.v4.view.ViewPager>
17 </LinearLayout>
注意事項:
<1、這裡ViewPager和PagerTabStrip都要把包名寫全了,不然會ClassNotFound
<2、API中說:在布局xml把PagerTabStrip當做ViewPager的一個子標簽來用,不能拿出來,不然還是會報錯
<3、在PagerTabStrip標簽中可以用屬性android:layout_gravity=TOP|BOTTOM來指定title的位置
<4、如果要顯示出PagerTabStrip某一頁的title,需要在ViewPager的adapter中實現getPageTitle(int)
 1 <?xml version="1.0" encoding="utf-8"?>
 2 <LinearLayout xmlns:android="http://schemas.android.com/apk/res/android"
 3     xmlns:app="http://schemas.android.com/apk/res-auto"
 4     android:orientation="vertical" android:layout_width="match_parent"
 5     android:layout_height="match_parent">
 6     <ImageView
 7         android:layout_width="match_parent"
 8         android:layout_height="match_parent"
 9         android:src="@mipmap/a1"
10         android:scaleType="centerCrop"
11         android:id="@+id/iv1" />
12 </LinearLayout>
在Activity裡實例化ViewPager組件,並設置它的Adapter(就是PagerAdapter,方法與ListView一樣的)
實現一個PagerAdapter,覆蓋以下方法:
instantiateItem(ViewGroup, int)//用來實例化頁卡
destroyItem(ViewGroup, int, Object)//刪除頁卡
getCount() //返回頁卡的數量
isViewFromObject(View, Object)//判斷兩個對象是否相等
getPageTitle(int position)//設置標簽顯示的標題
設置指示標簽的屬性
pagerTabStrip.setTabIndicatorColor();//指示器的顏色
pagerTabStrip.setBackgroundColor();//背影色
pagerTabStrip.setTextColor(Color.WHITE);//字體顏色
 1 import android.os.Bundle;
 2 import android.support.annotation.Nullable;
 3 import android.support.v4.view.PagerAdapter;
 4 import android.support.v4.view.ViewPager;
 5 import android.support.v7.app.AppCompatActivity;
 6 import android.view.View;
 7 import android.view.ViewGroup;
 8 import java.util.ArrayList;
 9 /**
10  * Created by panchengjia on 2016/12/1.
11  */
12 public class ViewPagerDemo extends AppCompatActivity {
13     private ViewPager vp;
14     //聲明存儲ViewPager下子視圖的集合
15     ArrayList<View> views = new ArrayList<>();
16     //顯示效果中每個視圖的標題
17     String[] titles={"一號美女","二號美女","三號美女","四號美女"};
18     @Override
19     protected void onCreate(@Nullable Bundle savedInstanceState) {
20         super.onCreate(savedInstanceState);
21         setContentView(R.layout.viewpager_layout);
22         vp= (ViewPager) findViewById(R.id.vp);
23         initView();//調用初始化視圖方法
24         vp.setAdapter(new MyAdapter());//設置適配器
25 }
26 //初始化視圖的方法(通過布局填充器獲取用於滑動的視圖並存入對應的的集合)
27     private void initView() {
28         View v1 = getLayoutInflater().inflate(R.layout.layout1,null);
29         View v2 = getLayoutInflater().inflate(R.layout.layout2,null);
30         View v3 = getLayoutInflater().inflate(R.layout.layout3,null);
31         View v4 = getLayoutInflater().inflate(R.layout.layout4,null);
32         views.add(v1);
33         views.add(v2);
34         views.add(v3);
35         views.add(v4);
36     }
37     class MyAdapter extends PagerAdapter{
38         @Override
39         public int getCount() {
40             return views.size();
41         }
42         @Override
43         public boolean isViewFromObject(View view, Object object) {
44             return view==object;
45         }
46         //重寫銷毀滑動視圖布局(將子視圖移出視圖存儲集合(ViewGroup))
47         @Override
48         public void destroyItem(ViewGroup container, int position, Object object) {
49             container.removeView(views.get(position));
50         }
51         //重寫初始化滑動視圖布局(從視圖集合中取出對應視圖,添加到ViewGroup)
52         @Override
53         public Object instantiateItem(ViewGroup container, int position) {
54             View v =views.get(position);
55             container.addView(v);
56             return v;
57         }
58         @Override
59         public CharSequence getPageTitle(int position) {
60             return titles[position];
61         }
62     }
63 }
實現效果如下(3張視圖滑動引導):

開始代碼前注釋:1、本次未實現循環輪播效果;2、導航原點資源圖片注解:default_holo為未選中狀態,touched_holo為選中後實心狀態。(也可自己用Shape繪制)
主布局為FrameLayout,在ViewPager(這裡因為存在導航原點,不設置PagerTabStrip)上嵌套包含3個導航原點(由滑動視圖數量決定)的linearLayout布局(本次設置該布局位於底部):
 1 <?xml version="1.0" encoding="utf-8"?>
 2 <FrameLayout
 3     xmlns:android="http://schemas.android.com/apk/res/android"
 4     xmlns:tools="http://schemas.android.com/tools"
 5     android:id="@+id/activity_main"
 6     android:layout_width="match_parent"
 7     android:layout_height="match_parent"
 8     tools:context="com.example.administrator.myapplication11.MainActivity">
 9     <android.support.v4.view.ViewPager
10         android:layout_width="match_parent"
11         android:layout_height="match_parent"
12         android:id="@+id/vp">
13     </android.support.v4.view.ViewPager>
14     <LinearLayout
15         android:id="@+id/point_layout"
16         android:layout_width="match_parent"
17         android:layout_height="wrap_content"
18         android:layout_gravity="bottom"
19         android:orientation="horizontal">
20         <ImageView
21             android:layout_width="0dp"
22             android:layout_height="wrap_content"
23             android:layout_weight="1"
24             android:src="@mipmap/default_holo"/>
25         <ImageView
26             android:layout_width="0dp"
27             android:layout_height="wrap_content"
28             android:layout_weight="1"
29             android:src="@mipmap/default_holo" />
30         <ImageView
31             android:layout_width="0dp"
32             android:layout_height="wrap_content"
33             android:layout_weight="1"
34             android:src="@mipmap/default_holo"
35             android:id="@+id/imageView" />
36     </LinearLayout>
37 </FrameLayout>
 1 <?xml version="1.0" encoding="utf-8"?>
 2 <LinearLayout xmlns:android="http://schemas.android.com/apk/res/android"
 3     android:orientation="vertical" android:layout_width="match_parent"
 4     android:layout_height="match_parent">
 5     <ImageView
 6         android:layout_width="match_parent"
 7         android:layout_height="match_parent"
 8         android:scaleType="centerCrop"
 9         android:src="@mipmap/genie"/>
10 </LinearLayout>
通過實現OnPageChangeListener接口實現在視圖切換時導航原點狀態的變化),其中關於OnPageChangeListener中方法的詳細解釋,請參考博文
《ViewPager的setOnPageChangeListener方法詳解》這裡不做贅述:
 1 import android.support.v4.view.PagerAdapter;
 2 import android.support.v4.view.ViewPager;
 3 import android.support.v7.app.AppCompatActivity;
 4 import android.os.Bundle;
 5 import android.view.View;
 6 import android.view.ViewGroup;
 7 import android.widget.ImageView;
 8 import android.widget.LinearLayout;
 9 import java.util.ArrayList;
10 /**
11  * Created by panchengjia on 2016/11/30.
12  */
13 public class MainActivity extends AppCompatActivity implements ViewPager.OnPageChangeListener{
14     private ViewPager vp;
15     private LinearLayout point_layout;
16     ArrayList<View> views =new ArrayList<>();
17     //實例化存儲imageView(導航原點)的集合
18     ArrayList<ImageView> imageViews = new ArrayList<>();
19     int currImage;//記錄當前頁(導航原點)
20     @Override
21     protected void onCreate(Bundle savedInstanceState) {
22         super.onCreate(savedInstanceState);
23         setContentView(R.layout.activity_main);
24         vp= (ViewPager) findViewById(R.id.vp);
25         initView();//調用初始化視圖方法
26         initPoint();//調用初始化導航原點的方法
27         vp.addOnPageChangeListener(this);
28         vp.setAdapter(new MyAdapter());
29     }
30     /*將point_layout中包含的imageView(導航原點)添加到imageViewS集合中
31      *並設置layout1(第一視圖)的導航原點(對應集合0下標)的圖片
32      * 為touched_holo(觸摸狀態的圖片)
33      */
34     private void initPoint() {
35         point_layout= (LinearLayout) findViewById(R.id.point_layout);
36         int counnt = point_layout.getChildCount();//獲取point數量
37         for (int i=0;i<counnt;i++){
38             imageViews.add((ImageView) point_layout.getChildAt(i));
39         }
40         imageViews.get(0).setImageResource(R.mipmap.touched_holo);
41     }
42     private void initView() {
43         View v1=getLayoutInflater().inflate(R.layout.layout1,null);
44         View v2=getLayoutInflater().inflate(R.layout.layout2,null);
45         View v3=getLayoutInflater().inflate(R.layout.layout3,null);
46         views.add(v1);
47         views.add(v2);
48         views.add(v3);
49     }
50     //OnPageChangeListener的方法,這裡不做具體實現
51     @Override
52     public void onPageScrolled(int position, float positionOffset, int positionOffsetPixels) {
53
54     }
55     //設置滑動到對應位置的視圖後,導航原點的不同狀態(圖片)
56     @Override
57 public void onPageSelected(int position) {
58         ImageView preView = imageViews.get(currImage);
59         preView.setImageResource(R.mipmap.default_holo);
60         ImageView currView = imageViews.get(position);
61         currView.setImageResource(R.mipmap.touched_holo);
62         currImage = position;
63     }
64     //OnPageChangeListener的方法,這裡不做具體實現
65     @Override
66     public void onPageScrollStateChanged(int state) {
67
68     }
69     class MyAdapter extends PagerAdapter {
70         @Override
71         public int getCount() {
72             return views.size();
73         }
74         @Override
75         public boolean isViewFromObject(View view, Object object) {
76             return view==object;
77         }
78         @Override
79         public void destroyItem(ViewGroup container, int position, Object object) {
80             container.removeView(views.get(position));
81         }
82         @Override
83         public Object instantiateItem(ViewGroup container, int position) {
84             View v = views.get(position);
85             container.addView(v);
86             return v;
87         }
88     }
89 }
至此,本次的ViewPager實現示例所需代碼已完成,當然這只是ViewPager最簡單的功能,後續還會更新一些ViewPager的高級用法,歡迎小伙伴們繼續支持。
當然篇幅所限,這只是ViewPager最最簡單的功能,
 EditText 顯示明文和密碼,edittext明文密碼
EditText 顯示明文和密碼,edittext明文密碼1、效果圖 2、布局文件 <?xml version=1.0 encoding=utf-
 Android Activity各啟動模式的差異,androidactivity
Android Activity各啟動模式的差異,androidactivityActivity共有四種啟動模式:standard,singleTop,singleTas
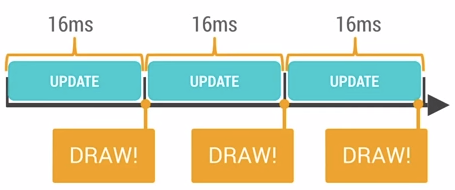 Android性能優化的淺談,android性能優化
Android性能優化的淺談,android性能優化一、概要: 本文主要以Android的渲染機制、UI優化、多線程的處理、緩存處理、電量優化以及代碼規范等幾方面
 AndroidStudio項目提交(更新)到github最詳細步驟
AndroidStudio項目提交(更新)到github最詳細步驟 在使用studio開發的項目過程中有時候我們想將項目發布到github上,以前都是用一種比較麻煩的方式