編輯:關於android開發
ListView
就是用來顯示一行一行的條目的
MVC結構
* M:model模型層,要顯示的數據 ————people集合
* V:view視圖層,用戶看到的界面 ————ListView
* c:control控制層,操作數據如何顯示 ————adapter對象
每一個條目都是一個View對象
BaseAdapter
* 必須實現的兩個方法
* 第一個
//系統調用此方法,用來獲知模型層有多少條數據
@Override
public int getCount() {
return people.size();
}
* 第二個
//系統調用此方法,獲取要顯示至ListView的View對象
//position:是return的View對象所對應的數據在集合中的位置
@Override
public View getView(int position, View convertView, ViewGroup parent) {
System.out.println("getView方法調用" + position);
TextView tv = new TextView(MainActivity.this);
//拿到集合中的元素
Person p = people.get(position);
tv.setText(p.toString());
//把TextView的對象返回出去,它會變成ListView的條目
return tv;
}
屏幕上能顯示多少個條目,getView方法就會被調用多少次,屏幕向下滑動時,getView會繼續被調用,創建更多的View對象顯示至屏幕
條目的緩存
當條目劃出屏幕時,系統會把該條目緩存至內存,當該條目再次進入屏幕,系統在重新調用getView時會把緩存的條目作為convertView參數傳入,但是傳入的條目不一定是之前被緩存的該條目,即系統有可能在調用getView方法獲取第一個條目時,傳入任意一個條目的緩存
代碼如下:
activity_main.xml:
<LinearLayout xmlns:android="http://schemas.android.com/apk/res/android"
    xmlns:tools="http://schemas.android.com/tools"
    android:layout_width="match_parent"
    android:layout_height="match_parent"

    tools:context="com.example.list.MainActivity" >

    <ListView
       android:id="@+id/lv"
       android:layout_width="fill_parent"
       android:layout_height="fill_parent"
       ></ListView>


</LinearLayout>
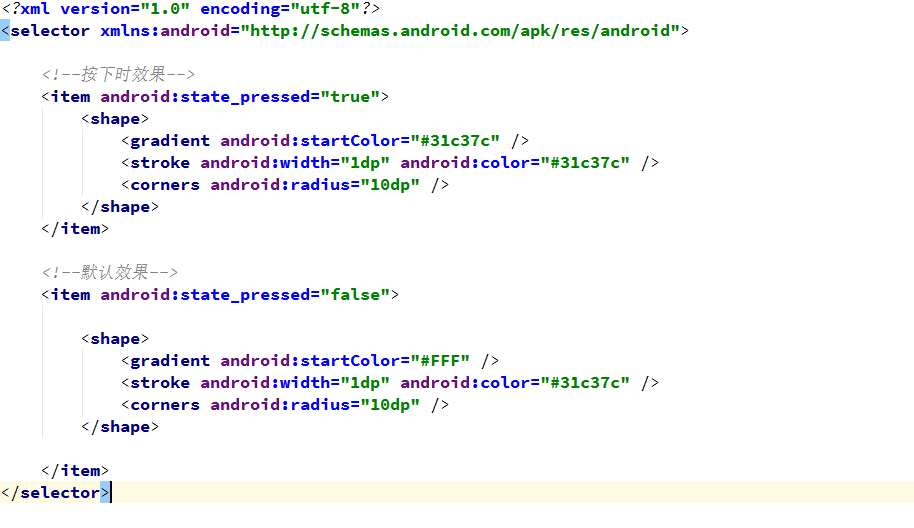
item.xml
<?xml version="1.0" encoding="utf-8"?>
<LinearLayout xmlns:android="http://schemas.android.com/apk/res/android"
    android:layout_width="match_parent"
    android:layout_height="match_parent"
    android:orientation="vertical" >
    <ImageView
        android:id="@+id/iv"
        android:src="@drawable/xing"
        android:layout_width="80dp"
        android:layout_height="80dp"

        />
    <TextView
        android:id="@+id/t1"
        android:layout_width="match_parent"
        android:layout_height="wrap_content"

        />
    <TextView
        android:id="@+id/t2"
        android:layout_width="match_parent"
        android:layout_height="wrap_content"

        />


</LinearLayout>
MainActivity.java
public class MainActivity extends Activity {
    List<shopInfo> l;
    ListView lv;
    @Override
    protected void onCreate(Bundle savedInstanceState) {
        super.onCreate(savedInstanceState);
        setContentView(R.layout.activity_main);
        lv = (ListView) findViewById(R.id.lv);
        //准備集合數據
        l = new ArrayList<shopInfo>();
        l.add(new shopInfo(R.drawable.xing, "name-1", "content-1"));
        l.add(new shopInfo(R.drawable.xing, "name-2", "content-2"));
        l.add(new shopInfo(R.drawable.xing, "name-3", "content-3"));
        l.add(new shopInfo(R.drawable.xing, "name-4", "content-4"));
        l.add(new shopInfo(R.drawable.xing, "name-5", "content-5"));
        l.add(new shopInfo(R.drawable.xing, "name-6", "content-6"));
        l.add(new shopInfo(R.drawable.xing, "name-7", "content-7"));
        l.add(new shopInfo(R.drawable.xing, "name-8", "content-8"));
   //准備BaseAdapter對象
        MyAdapter a = new MyAdapter();
        //設置Adapter顯示數據
        lv.setAdapter(a);

    }
//這個類可以寫在裡面,也可以寫在外面
    public class MyAdapter extends BaseAdapter {

        @Override
        public int getCount() {
            // TODO Auto-generated method stub
            return l.size();
        }

        @Override
        public Object getItem(int arg0) {
            // TODO Auto-generated method stub
            return null;
        }

        @Override
        public long getItemId(int arg0) {
            // TODO Auto-generated method stub
            return 0;
        }


//第一種:沒有任何處理,不建議這樣寫。如果數據量少看將就,但是如果列表項數據量很大的時候,會每次都重新創建View,設置資源,嚴重影響性能,所以從一開始就不要用這種方式
        @Override
        public View getView(int position, View convertView, ViewGroup parent) {
            // TODO Auto-generated method stub
            // 加載item的布局
            View view = View.inflate(MainActivity.this, R.layout.item, null);

            shopInfo s = l.get(position);
            ImageView i = (ImageView) view.findViewById(R.id.iv);
            TextView t1 = (TextView) view.findViewById(R.id.t1);
            TextView t2 = (TextView) view.findViewById(R.id.t2);

            i.setImageResource(s.getIcon());
            t1.setText(s.getName());
            t2.setText(s.getContent());
            convertView  = view ;
            return convertView;
        }

    }
}
shopInfo.java
//每行item的數據信息封裝類
public class shopInfo {
    private int icon;
    private String name;
    private String content;


    public int getIcon() {
        return icon;
    }
    public void setIcon(int icon) {
        this.icon = icon;
    }
    public String getName() {
        return name;
    }
    public void setName(String name) {
        this.name = name;
    }
    public String getContent() {
        return content;
    }
    public void setContent(String content) {
        this.content = content;
    }
    public shopInfo(int icon, String name, String content) {
        super();
        this.icon = icon;
        this.name = name;
        this.content = content;
    }
    @Override
    public String toString() {
        return "shopInfo [icon=" + icon + ", name=" + name + ", content="
                + content + "]";
    }
    public shopInfo() {
        super();
        // TODO Auto-generated constructor stub
    }


}
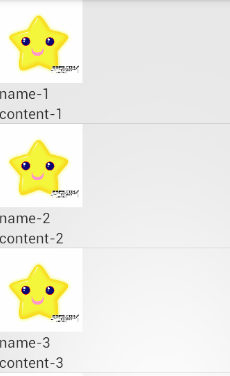
運行結果如下:
接下來實現getView()的方法和上邊的實現一樣的功能。
第二種ListView優化:通過緩存convertView,這種利用緩存contentView的方式可以判斷如果緩存中不存在View才創建View,如果已經存在可以利用緩存中的View,提升了性能
public View getView(int position, View convertView, ViewGroup parent) {
            if(convertView == null)
            {
                convertView = mInflater.inflate(R.layout.list_item, null);
            }

            ImageView img = (ImageView)convertView.findViewById(R.id.iv) ;
            TextView title = (TextView)convertView.findViewById(R.id.t1);
            TextView info = (TextView)ConvertView.findViewById(R.id.t2);
            img.setImageResource(R.drawable.xing);
            title.setText("Hello");
            info.setText("world");

            return convertView;
        }
第三種ListView優化:通過convertView+ViewHolder來實現,ViewHolder就是一個靜態類,使用 ViewHolder 的關鍵好處是緩存了顯示數據的視圖(View),加快了 UI 的響應速度。
當我們判斷 convertView == null 的時候,如果為空,就會根據設計好的List的Item布局(XML),來為convertView賦值,並生成一個viewHolder來綁定converView裡面的各個View控件(XML布局裡面的那些控件)。再用convertView的setTag將viewHolder設置到Tag中,以便系統第二次繪制ListView時從Tag中取出。(看下面代碼中)
如果convertView不為空的時候,就會直接用convertView的getTag(),來獲得一個ViewHolder。
public View getView(int position, View convertView, ViewGroup parent) {
            // LayoutInflater mInflater = null;
            ViewHolder holder = null;
            shopInfo s = l.get(position);
            if (convertView == null) {
                holder = new ViewHolder();
//                 convertView = LinearLayout.inflate(MainActivity.this,
//                 R.layout.item, null);
                convertView = LayoutInflater.from(MainActivity.this).inflate(R.layout.item, null);
                /* 得到各個控件的對象 */
                holder.iv = (ImageView) convertView.findViewById(R.id.iv);
                holder.t1 = (TextView) convertView.findViewById(R.id.t1);
                holder.t2 = (TextView) convertView.findViewById(R.id.t2); // to
                                                                            // ItemButton

                convertView.setTag(holder); // 綁定ViewHolder對象
            } else {
                holder = (ViewHolder) convertView.getTag(); // 取出ViewHolder對象
            }

            /* 設置TextView顯示的內容,即我們存放在動態數組中的數據 */

            holder.iv.setImageResource(s.getIcon());
            holder.t1.setText(s.getName());
            holder.t2.setText(s.getContent());

            return convertView;

        }

        /* 存放控件 的ViewHolder */
        public final class ViewHolder {
            public ImageView iv;
            public TextView t1;
            public TextView t2;
        }
在上述的代碼中方法getView(int position, View convertView, ViewGroup parent)的方法體中,holder這個變量其實就是一個每一個item的View的結構。
這個holder結構存儲了item對應布局裡面的一些組件,而convertView.setTag(holder),就是把convertView中的Tag關聯到holder這個結構中。
而convertView.getTag(),就是把convertView中的Tag取出來。
最後的holder.textView.setText(mData.get(position));就是把holder中的對應的組件初始化或者重定義(改變一些值),然後就可以顯示出不同的內容了。
如果要實現單雙行顏色交替
MainActivity.java:
加下邊三個語句就可以了。
public class MainActivity extends Activity {
    List<shopInfo> l;
    ListView lv;
    private int[] colors = new int[] { 0xff3cb371, 0xffa0a0a0 };
    @Override
    protected void onCreate(Bundle savedInstanceState) {
        super.onCreate(savedInstanceState);
        setContentView(R.layout.activity_main);
        lv = (ListView) findViewById(R.id.lv);
        // 准備集合數據
        l = new ArrayList<shopInfo>();
        l.add(new shopInfo(R.drawable.xing, "name-1", "content-1"));
        l.add(new shopInfo(R.drawable.xing, "name-2", "content-2"));
        l.add(new shopInfo(R.drawable.xing, "name-3", "content-3"));
        l.add(new shopInfo(R.drawable.xing, "name-4", "content-4"));
        l.add(new shopInfo(R.drawable.xing, "name-5", "content-5"));
        l.add(new shopInfo(R.drawable.xing, "name-6", "content-6"));
        l.add(new shopInfo(R.drawable.xing, "name-7", "content-7"));
        l.add(new shopInfo(R.drawable.xing, "name-8", "content-8"));
        // 准備BaseAdapter對象
        MyAdapter a = new MyAdapter();
        // 設置Adapter顯示數據
        lv.setAdapter(a);

    }

    // 這個類可以寫在裡面,也可以寫在外面
    public class MyAdapter extends BaseAdapter {

        @Override
        public int getCount() {
            // TODO Auto-generated method stub
            return l.size();
        }

        @Override
        public Object getItem(int arg0) {
            // TODO Auto-generated method stub
            return null;
        }

        @Override
        public long getItemId(int arg0) {
            // TODO Auto-generated method stub
            return arg0;
        }

        @Override
        public View getView(int position, View convertView, ViewGroup parent) {
            // TODO Auto-generated method stub
            // 加載item的布局
            // View view = View.inflate(MainActivity.this, R.layout.item, null);
            //
            // shopInfo s = l.get(position);
            // ImageView i = (ImageView) view.findViewById(R.id.iv);
            // TextView t1 = (TextView) view.findViewById(R.id.t1);
            // TextView t2 = (TextView) view.findViewById(R.id.t2);
            //
            // i.setImageResource(s.getIcon());
            // t1.setText(s.getName());
            // t2.setText(s.getContent());
            // convertView = view ;
            // return convertView;

            // LayoutInflater mInflater = null;

//            if(position%2==0){
//                lv.setBackgroundColor(Color.argb(250 ,  255 ,  255 ,  255 ));
//            }else{
//                lv.setBackgroundColor(Color.argb(250 ,  224 ,  243 ,  250 ));
//            }


            ViewHolder holder = null;
            shopInfo s = l.get(position);
            if (convertView == null) {
                holder = new ViewHolder();
//                 convertView = LinearLayout.inflate(MainActivity.this,
//                 R.layout.item, null);
                convertView = LayoutInflater.from(MainActivity.this).inflate(R.layout.item, null);
                /* 得到各個控件的對象 */
                holder.iv = (ImageView) convertView.findViewById(R.id.iv);
                holder.t1 = (TextView) convertView.findViewById(R.id.t1);
                holder.t2 = (TextView) convertView.findViewById(R.id.t2); // to
                                                                            // ItemButton

                convertView.setTag(holder); // 綁定ViewHolder對象
            } else {
                holder = (ViewHolder) convertView.getTag(); // 取出ViewHolder對象
            }

            /* 設置TextView顯示的內容,即我們存放在動態數組中的數據 */

            holder.iv.setImageResource(s.getIcon());
            holder.t1.setText(s.getName());
            holder.t2.setText(s.getContent());

            int colorPos = position % colors.length;
            convertView.setBackgroundColor(colors[colorPos]);


            return convertView;

        }

        /* 存放控件 的ViewHolder */
        public final class ViewHolder {
            public ImageView iv;
            public TextView t1;
            public TextView t2;
        }

    }
}
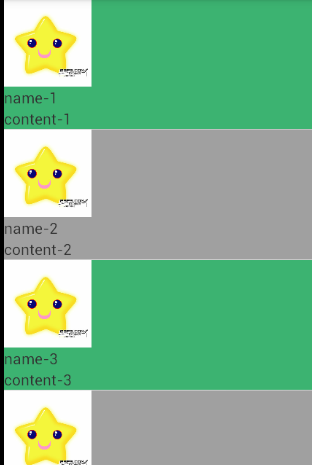
效果如圖:
 javascript基礎【一】
javascript基礎【一】2015/11/13 16:10:04javascript自誕生之初就處於爭論之中,但是這依舊不影響其成為今天WEB編程的主流語言。最初的j
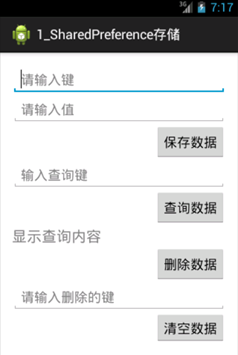 Android SharedPreferences存儲,sharedpreferences
Android SharedPreferences存儲,sharedpreferences一 概念 SharedPreferences存儲方式是Android中存儲輕
 安卓開源項目周報1214,安卓開源項目1214
安卓開源項目周報1214,安卓開源項目1214由OpenDigg 出品的安卓開源項目周報第一期來啦。我們的安卓開源周報集合了OpenDigg一周來新收錄的優質的
 Pulltorefresh使用中碰到的問題,pulltorefresh碰到
Pulltorefresh使用中碰到的問題,pulltorefresh碰到第一 在使用XScrollView布局是,無法在該布局.xml文件,放置內容布局控件,假如放置了