編輯:關於android開發
Android啟動Service有兩種方法,一種是startService,一種是bindService。生命周期如下:
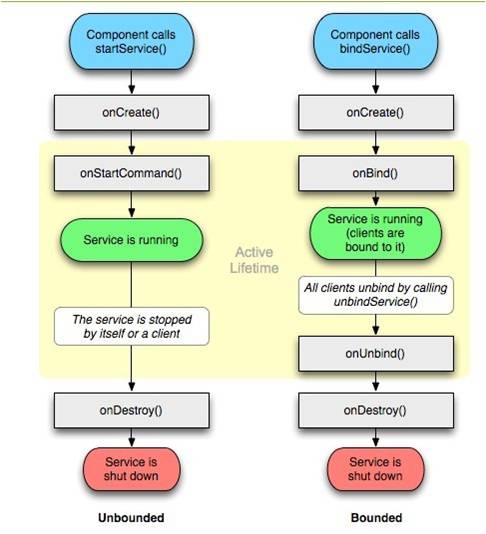
執行startService時,調用者如果沒有stopService,Service會一直在後台運行。多次調用startService,該Service只能被創建一次,即該Service的onCreate方法只會被調用一次。但是每次調用startService,onStartCommand方法都會被調用。
執行bindService時,調用者調用unbindService方法或者調用者Context不存在了(如Activity被finish了)。第一次執行bindService時,onCreate和onBind方法會被調用,但是多次執行bindService時,onCreate和onBind方法並不會被多次調用,即並不會多次創建服務和綁定服務。
既使用startService又使用bindService的情況,需要unbindService和stopService同時調用才會終止Service。
Activity與Service交互有兩種方法:一種是使用broadcast,另一種是使用bindService。本文只介紹bindService方法。
 1 public class MsgService extends Service {
 2     public MsgService() {
 3     }
 4
 5     /**
 6      * 進度條的最大值
 7      */
 8     public static final int MAX_PROGRESS = 100;
 9     /**
10      * 進度條的進度值
11      */
12     private int progress = 0;
13
14     /**
15      * 增加get()方法,供Activity調用
16      *
17      * @return 下載進度
18      */
19     public int getProgress() {
20         return progress;
21     }
22
23     /**
24      * 模擬下載任務,每秒鐘更新一次
25      */
26     public void startDownLoad(){
27         new Thread(new Runnable() {
28
29             @Override
30             public void run() {
31                 while(progress < MAX_PROGRESS){
32                     progress += 5;
33
34                     //進度發生變化通知調用方
35                     if(onProgressListener != null){
36                         onProgressListener.onProgress(progress);
37                     }
38
39                     try {
40                         Thread.sleep(1000);
41                     } catch (InterruptedException e) {
42                         e.printStackTrace();
43                     }
44
45                 }
46             }
47         }).start();
48     }
49
50     @Override
51     public IBinder onBind(Intent intent) {
52         return new MyBinder();
53     }
54
55     public class MyBinder extends Binder {
56         public MsgService getService() {
57             return MsgService.this;
58         }
59     }
60
61     public interface OnProgressListener {
62         void onProgress(int progress);
63     }
64
65     /**
66      * 更新進度的回調接口
67      */
68     private OnProgressListener onProgressListener;
69
70
71     /**
72      * 注冊回調接口的方法,供外部調用
73      *
74      * @param onProgressListener
75      */
76     public void setOnProgressListener(OnProgressListener onProgressListener) {
77         this.onProgressListener = onProgressListener;
78     }
79
80 }
public class MainActivity extends Activity {

    private Button button19;

    private MsgService msgService;
    private int progress = 0;
    private ProgressBar mProgressBar;


    @Override
    protected void onCreate(Bundle savedInstanceState) {
        super.onCreate(savedInstanceState);
        setContentView(R.layout.activity_main);


        btnExec = (Button) findViewById(R.id.btnExec);
        button19 = (Button) findViewById(R.id.button19);
        mProgressBar = (ProgressBar) findViewById(R.id.progressBar);


        button19.setOnClickListener(new View.OnClickListener() {
            @Override
            public void onClick(View view) {
                msgService.startDownLoad();
            }
        });

        Intent intent = new Intent(this, MsgService.class);
        bindService(intent, mServiceConnection, Context.BIND_AUTO_CREATE);


    }


    ServiceConnection mServiceConnection = new ServiceConnection() {
        @Override
        public void onServiceConnected(ComponentName componentName, IBinder iBinder) {
            msgService = ((MsgService.MyBinder) iBinder).getService();

            msgService.setOnProgressListener(new MsgService.OnProgressListener() {
                @Override
                public void onProgress(int progress) {
                    mProgressBar.setProgress(progress);
                }
            });
        }

        @Override
        public void onServiceDisconnected(ComponentName componentName) {

        }
    };


    @Override
    protected void onDestroy() {

        unbindService(mServiceConnection);
        super.onDestroy();
    }
}
例子中,MsgService模擬耗時的下載任務,MainActivity 綁定服務,通過注冊OnProgressListener回調獲取下載進度,更新進度條。
本例子Activity和Service是在同一個進程中,對於跨進程調用Service需要使用到AIDL技術。
 genymotion的安裝和使用,genymotion安裝
genymotion的安裝和使用,genymotion安裝 一、簡介 相信大家用eclipse上的模擬器會覺得很慢很卡,這裡給大家介紹個好東西安卓模擬器gen
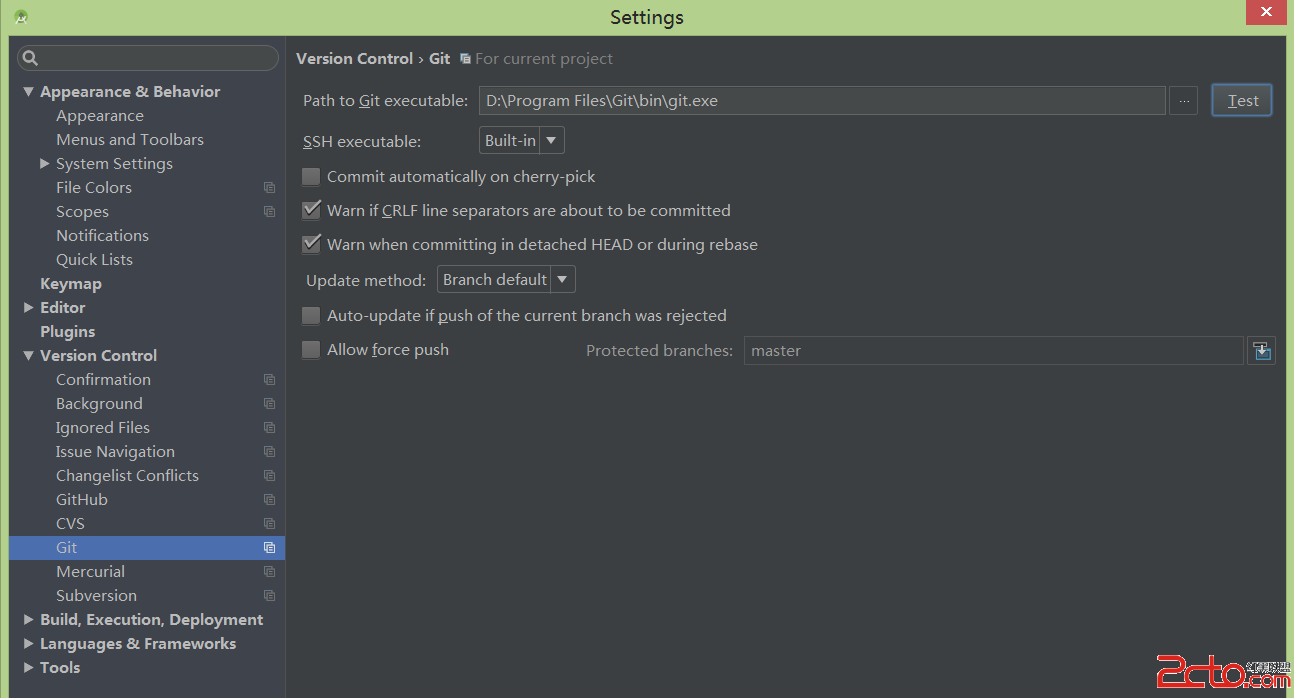 AndroidStudio項目提交(更新)到github最詳細步驟
AndroidStudio項目提交(更新)到github最詳細步驟 在使用studio開發的項目過程中有時候我們想將項目發布到github上,以前都是用一種比較麻煩的方式
 Android學習指南之三十二:Android主題(Theme)和風格(Style)
上一節講解的是Android中使用SAX和pull方式解析XML,本節的主要內容是Andr
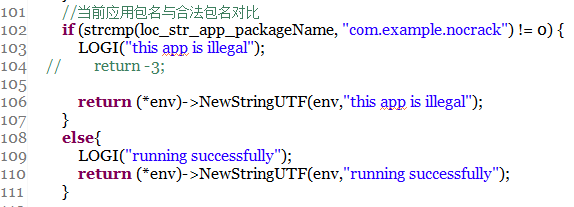 android加固系列—3.加固前先學會破解,靜態修改so,android加固
android加固系列—3.加固前先學會破解,靜態修改so,android加固【版權所有,轉載請注明出處。】 項目jni的關鍵代碼(項目地址見文章底部),獲取當前程序的包