編輯:關於android開發
前言:
最近接觸藍牙開發,主要是通過藍牙連接獲取傳感器硬件設備的數據,並進行處理。
網上學習一番,現整理出一套比較標准的 操作流程代碼。
如果大家看得懂,將來只需要改下 硬件設備的MAC碼 和 改下對接收數據的處理 即可。 一切都是套路~~~
現在以一個小型項目需求來學習Android藍牙編程
需求: 通過藍牙獲取硬件數據,並顯示在一個隨數據即時變化的動態折線圖中。
實現思路:
(1) 配對藍牙設備
(2) 連接藍牙設備 ,根據MAC地址,代碼中修改
(3) 接收數據
(4) 處理數據 ,根據硬件廠商提供給你的數據轉換公式,在BluetoothService類中 修改
(5) 傳數據給折線圖,展現實時變化
-----------------------------------------------------------------------
藍牙知識了解:
(1)、MAC地址:每個設備都有全球唯一的,根據此MAC地址判斷藍牙設備
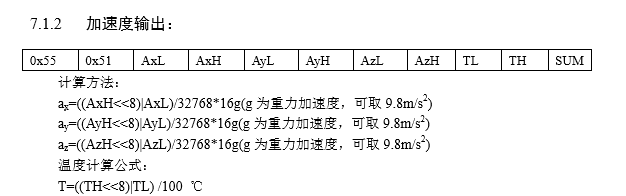
(2)、藍牙傳輸數據,通常一秒鐘會傳輸很多個包,每個包的數據情況如下:
此時,這個包有11個字節,0x55 是首碼,通常通過他來判斷一個包的開始
SUM是驗證碼,會有一套公式來計算,判斷當前包是不是一個有效的完整的包
中間的即是數據,然後硬件方面會給我們一套計算公式,可以以此獲取我們要的數據。
當然每個硬件的包的數據大小都是不同的,有的可能有21個字節,每個硬件的數據的計算方式也不想同
代碼實現:
一共就三部分,因為代碼篇幅可能較大,不適合一段段代碼講解,直接貼出整個代碼。所有的解釋都在注釋當中。
其中:
(1)、紅色部分是需要大家根據個人硬件情況進行修改的
(2)、紫色部分是根據個人數據情況添加刪除修改的。
一:MainActivity
public class MainActivity extends Activity {

    private BluetoothService mBluetoothService; //自定義藍牙服務類
    private BluetoothAdapter mBluetoothAdapter;
    private String mConnectedDeviceName = null; //連接設備的名稱

    //默認是1,因為程序啟動時首先會連接一個藍牙
    private int current_pos = 1;

    //hanlder消息標識 message.what
    public static final int MESSAGE_STATE_CHANGE = 1; // 狀態改變
    public static final int MESSAGE_READ = 2;          // 讀取數據
    public static final int MESSAGE_WRITE = 3;         // 給硬件傳數據,暫不需要,看具體需求
    public static final int MESSAGE_DEVICE_NAME = 4;  // 設備名字
    public static final int MESSAGE_TOAST = 5;         // Toast

    //傳感器 ,這裡默認同時需要和三個硬件連接,分別設置id 1,2,3進行區分,demo中實際只用到 MAGIKARE_SENSOR_DOWN = 1
    //可以根據情況自行添加刪除
    public static final int MAGIKARE_SENSOR_UP = 2;
    public static final int MAGIKARE_SENSOR_DOWN = 1;
    public static final int MAGIKARE_SENSOR_CENTER = 3;

    public static float[] m_receive_data_up;                    //傳感器的數據
    public static float[] m_receive_data_down;                  //傳感器的數據 ,demo中我們只需要這一個,因為只有一個硬件設備,
    public static float[] m_receive_data_center;                //傳感器的數據


    @Override
    protected void onCreate(Bundle savedInstanceState) {
        super.onCreate(savedInstanceState);
        setContentView(R.layout.activity_main);

        //獲取藍牙適配器
        mBluetoothAdapter = BluetoothAdapter.getDefaultAdapter();

        // 1、判斷設備是否支持藍牙功能
        if (mBluetoothAdapter == null) {
            //設備不支持藍牙功能
            Toast.makeText(this, "當前設備不支持藍牙功能!", Toast.LENGTH_SHORT).show();
            return;
        }

        // 2、打開設備的藍牙功能
        if (!mBluetoothAdapter.isEnabled()) {
            boolean enable = mBluetoothAdapter.enable(); //返回值表示 是否成功打開了藍牙設備
            if (enable) {
                Toast.makeText(this, "打開藍牙功能成功!", Toast.LENGTH_SHORT).show();
            } else {
                Toast.makeText(this, "打開藍牙功能失敗,請到'系統設置'中手動開啟藍牙功能!", Toast.LENGTH_SHORT).show();
                return;
            }
        }


        // 3、創建自定義藍牙服務對象
        if (mBluetoothService == null) {
            mBluetoothService = new BluetoothService(MainActivity.this, mHandler);
        }
        if (mBluetoothService != null) {
            //根據MAC地址遠程獲取一個藍牙設備,這裡固定了,實際開發中,需要動態設置參數(MAC地址)
            BluetoothDevice sensor_down = mBluetoothAdapter.getRemoteDevice("20:16:06:15:78:76");
            if (sensor_down != null) {
                //成功獲取到遠程藍牙設備(傳感器),這裡默認只連接MAGIKARE_SENSOR_DOWN = 1這個設備
                mBluetoothService.connect(sensor_down, MAGIKARE_SENSOR_DOWN);
            }
        }


    }
    private Handler mHandler = new Handler(new Handler.Callback() {
        @Override
        public boolean handleMessage(Message msg) {
            switch (msg.what){
                case MESSAGE_READ:
                    try {
                        String str=msg.getData().getString("index");
                        int index=Integer.valueOf(str);
                        switch (index)
                        {
                            //獲取到藍牙傳輸過來的數據
                            case MAGIKARE_SENSOR_UP:
                                m_receive_data_up=msg.getData().getFloatArray("Data");
                                break;
                            //實際只用到這個case ,因為demo只連接了一個硬件設備
                            case MAGIKARE_SENSOR_DOWN:
                                m_receive_data_down=msg.getData().getFloatArray("Data");
                                break;
                            case MAGIKARE_SENSOR_CENTER:
                                m_receive_data_center=msg.getData().getFloatArray("Data");
                                break;

                        }
                    } catch (Exception e) {
                        // TODO: handle exception
                    }
                    break;
                case MESSAGE_STATE_CHANGE:
//                    連接狀態
                    switch (msg.arg1) {
                        case BluetoothService.STATE_CONNECTED:
                            break;
                        case BluetoothService.STATE_CONNECTING:
                            break;
                        case BluetoothService.STATE_LISTEN:
                            break;
                        case BluetoothService.STATE_NONE:
                            break;
                    }
                    break;
                case MESSAGE_DEVICE_NAME:
                    mConnectedDeviceName = msg.getData().getString("device_name");
                    Log.i("bluetooth","成功連接到:"+mConnectedDeviceName);
                    Toast.makeText(getApplicationContext(),"成功連接到設備" + mConnectedDeviceName,Toast.LENGTH_SHORT).show();

                    break;
                case MESSAGE_TOAST:
                    int index=msg.getData().getInt("device_id");
                    Toast.makeText(getApplicationContext(),msg.getData().getString("toast"), Toast.LENGTH_SHORT).show();
                    //當失去設備或者不能連接設備時,重新連接
                    Log.d("Magikare","當失去設備或者不能連接設備時,重新連接");

            //重新連接硬件設備
                    if(mBluetoothService!=null)
                    {
                        switch (index) {
                            case MAGIKARE_SENSOR_DOWN:
                    //根據你的硬件的MAC地址寫參數,每一個硬件設備都有一個MAC地址,此方法是根據MAC地址得到藍牙設備
                                BluetoothDevice sensor_down = mBluetoothAdapter.getRemoteDevice("20:16:06:15:78:76");
                                if (sensor_down != null)
                                    mBluetoothService.connect(sensor_down, MAGIKARE_SENSOR_DOWN);
                                break;
                            case MAGIKARE_SENSOR_UP:
                                BluetoothDevice sensor_up = mBluetoothAdapter.getRemoteDevice("");  //參數寫你這個設備的MAC碼
                                if (sensor_up != null)
                                    mBluetoothService.connect(sensor_up, MAGIKARE_SENSOR_UP);
                                break;
                            case MAGIKARE_SENSOR_CENTER:
                                BluetoothDevice center = mBluetoothAdapter.getRemoteDevice("");    //參數寫你這個設備的MAC碼
                                if (center != null)
                                    mBluetoothService.connect(center, MAGIKARE_SENSOR_CENTER);
                                break;
                        }
                    }

                    break;
            }
            return false;
        }
    });


    public synchronized void onResume() {
        super.onResume();

        if (mBluetoothService != null) {
            if (mBluetoothService.getState() == BluetoothService.STATE_NONE) {
                mBluetoothService.start();
            }
        }
    }

    @Override
    public void onDestroy() {
        super.onDestroy();
        if (mBluetoothService != null) mBluetoothService.stop();
    }


  // 硬件通過藍牙傳輸的byte類型已經轉換為float類型,並且通過handler傳輸到 m_receive_data_down[]數組中,一下操作是獲取這個數據,根據個人情況使用
    //獲取角度
    public float[] GetAngle(int index)
    {
        float[] angles=new float[3];
        if(m_receive_data_up==null
                ||m_receive_data_down==null
                )
        {
            return angles;
        }
        switch (index)
        {
            case  MAGIKARE_SENSOR_DOWN:
                angles[0]=m_receive_data_down[6];
                angles[1]=m_receive_data_down[7];
                angles[2]=m_receive_data_down[8];
                break;
            case MAGIKARE_SENSOR_UP:
                angles[0]=m_receive_data_up[6];
                angles[1]=m_receive_data_up[7];
                angles[2]=m_receive_data_up[8];
                Log.d("安卓 Up 角度",angles[0]+","+angles[1]+","+angles[2]);
                break;
        }
        return angles;
    }
    //獲取角速度
    public static float[] GetAngleSpeed(int index)
    {

        float [] anglespeed=new float[3];

        if(m_receive_data_down==null)
        {

            return anglespeed;
        }
        switch (index)
        {
            case MAGIKARE_SENSOR_DOWN:

                anglespeed[0]=m_receive_data_down[3];
                anglespeed[1]=m_receive_data_down[4];
                anglespeed[2]=m_receive_data_down[5];
                break;
            case MAGIKARE_SENSOR_UP:
                anglespeed[0]=m_receive_data_up[3];
                anglespeed[1]=m_receive_data_up[4];
                anglespeed[2]=m_receive_data_up[5];
                break;
        }
        return  anglespeed;
    }

    public float[] GetQuaternion(int index)
    {
        float[] quaternion=new float[4];

        if(m_receive_data_down==null)
        {
            return quaternion;
        }
        switch (index)
        {
            case  MAGIKARE_SENSOR_DOWN:
                quaternion[0]=m_receive_data_down[23];
                quaternion[1]=m_receive_data_down[24];
                quaternion[2]=m_receive_data_down[25];
                quaternion[3]=m_receive_data_down[26];
                Log.i("saveinfo","m_receive_data_down23"+m_receive_data_down[23]);
                Log.i("saveinfo","m_receive_data_down24"+m_receive_data_down[24]);
                Log.i("saveinfo","m_receive_data_down25"+m_receive_data_down[25]);
                Log.i("saveinfo","m_receive_data_down26"+m_receive_data_down[26]);
                break;
            case MAGIKARE_SENSOR_UP:
                quaternion[0]=m_receive_data_up[23];
                quaternion[1]=m_receive_data_up[24];
                quaternion[2]=m_receive_data_up[25];
                quaternion[3]=m_receive_data_up[26];
                break;
            case MAGIKARE_SENSOR_CENTER:
                quaternion[0]=m_receive_data_center[23];
                quaternion[1]=m_receive_data_center[24];
                quaternion[2]=m_receive_data_center[25];
                quaternion[3]=m_receive_data_center[26];
        }
        return  quaternion;
    }


}
二、BluetoothService
public class BluetoothService {
  private static final UUID MY_UUID = UUID.fromString("00001101-0000-1000-8000-00805F9B34FB");
    private Context context;
    //藍牙適配器
    private BluetoothAdapter mAdapter;
    private Handler mHandler;

    //當前傳感器設備的個數,即要開啟的線程個數,用於設置線程數組的大小
    //這裡默認為1,因為我們目前只需要和一個傳感器連接, 比如:你要連接兩個硬件設備,那就設置值為2,這樣就會開啟兩個線程,分別去執行想要操作
    public static final int  SENSEOR_NUM=1;

    private AcceptThread mAcceptThread;// 請求連接的監聽進程
    private ConnectThread mConnectThread;// 連接一個設備的進程
    public ConnectedThread[] mConnectedThread=new ConnectedThread[SENSEOR_NUM];// 已經連接之後的管理進程

    private int mState;// 當前狀態

    // 指明連接狀態的常量
    public static final int STATE_NONE = 0;         //沒有連接
    public static final int STATE_LISTEN = 1;       //等待連接
    public static final int STATE_CONNECTING = 2;  //正在連接
    public static final int STATE_CONNECTED = 3;   //已經連接

    public BluetoothService(Context context, Handler mHandler) {
        this.context = context;
        this.mHandler = mHandler;
        mAdapter = BluetoothAdapter.getDefaultAdapter();//獲取藍牙適配器
        mState = STATE_NONE ; //當前連接狀態:未連接
    }

    // 參數 index 是 硬件設備的id ,隨便設的,目的在於當 同時連接多個硬件設備的時候,根據此id進行區分
    public synchronized void connect(BluetoothDevice device, int index) {

        //連接一個藍牙時,將該設備 的藍牙連接線程關閉,如果有的話
        //demo  就只有一個硬件設備,默認該設備id 取值index=1;
        if (mConnectedThread[index-1] != null) {
            mConnectedThread[index-1].cancel();
            mConnectedThread[index-1]=null;
        }
        mConnectThread=new ConnectThread(device,index);
        mConnectThread.start();
        setState(STATE_CONNECTING);
    }

    private class ConnectThread extends Thread{
        private final BluetoothSocket mmSocket;
        private final BluetoothDevice mmDevice;
        private int index;
        public ConnectThread(BluetoothDevice device,int index) {
            mmDevice = device;
            this.index=index;
            BluetoothSocket tmp = null;
            try {
                tmp = device.createRfcommSocketToServiceRecord(MY_UUID);// Get a BluetoothSocket for a connection with the given BluetoothDevice
            }
            catch (IOException e) {}
            mmSocket = tmp;
        }

        public void run() {

            setName("ConnectThread");
            //當連接成功,取消藍牙適配器搜索藍牙設備的操作,因為搜索操作非常耗時
            mAdapter.cancelDiscovery();// Always cancel discovery because it will slow down a connection

            try {
                mmSocket.connect();// This is a blocking call and will only return on a successful connection or an exception
            }
            catch (IOException e) {
                connectionFailed(this.index);
                try {
                    mmSocket.close();
                } catch (IOException e2) {}

                BluetoothService.this.start();// 引用來說明要調用的是外部類的方法 run
                return;
            }

            synchronized (BluetoothService.this) {// Reset the ConnectThread because we're done
                mConnectThread = null;
            }
            connected(mmSocket, mmDevice,index);// Start the connected thread
        }

        public void cancel() {
            try {
                mmSocket.close();
            } catch (IOException e) {
            }
        }
    }

    class ConnectedThread extends Thread{
        private BluetoothSocket mmSocket;
        private InputStream mmInStream;
        private OutputStream mmOutStream;
        private int index;
        private Queue<Byte> queueBuffer = new LinkedList<Byte>();
        private byte[] packBuffer = new byte[11];


        //構造方法
        public ConnectedThread(BluetoothSocket socket,int index) {
            mmSocket = socket;
            InputStream tmpIn = null;
            OutputStream tmpOut = null;
            this.index=index;
            // Get the BluetoothSocket input and output streams
            try {
                tmpIn = socket.getInputStream();
                tmpOut = socket.getOutputStream();
            } catch (IOException e) {}

            mmInStream = tmpIn;
            mmOutStream = tmpOut;
        }

        // 數組大小看你的數據需求,這裡存的是你處理藍牙傳輸來的字節數據之後實際要用到的數據
        private float [] fData=new float[31];

        @Override
        public void run() {
            byte[] tempInputBuffer = new byte[1024];
            int acceptedLen = 0; //記錄每次讀取數據的數據長度
            byte sHead;
            long lLastTime = System.currentTimeMillis(); //獲取開始時間
            while(true){
                try {
                    acceptedLen = mmInStream.read(tempInputBuffer);//返回接收的長度
                    //從緩沖區中讀取數據
                    for (int i = 0; i < acceptedLen; i++) {
                        queueBuffer.add(tempInputBuffer[i]);
                    }
                    // 這裡需要按個人硬件數據的情況自行修改了
                    // 如果你的硬件藍牙傳輸 一個包有11個字節,那queueBuffer.size()>=11
                    // 如果你的硬件藍牙傳輸 一個包有21個字節,那queueBuffer.size()>=21
                    while (queueBuffer.size()>=11){
                        //返回隊首並刪除,判斷隊首是不是0x55,如果不是,說明不是一個包的數據,跳過,
                        //注意這裡的0x55是你的包的首字節
                        if (queueBuffer.poll()!=0x55)
                            continue;
                        // 進入到這裡,說明得到一個包的數據了,然後就要根據個人硬件的數據情況,將byte類型的數據轉換為float類型的數據

                        sHead = queueBuffer.poll(); //返回隊首並刪除

              // 現在得到的就是你數據部分了,如果有9位字節代表數據,j<9 ,如果有19位字節代表數據,j<19

              //將字節數組存到packBuffer[]數據中,用於byte-->float數據的轉換
                        for (int j = 0; j < 9; j++) {
                            packBuffer[j] = queueBuffer.poll();
                        }
                        switch (sHead) {//
                            case 0x52://角速度
                                fData[3] = ((((short) packBuffer[1]) << 8) | ((short) packBuffer[0] & 0xff)) / 32768.0f * 2000;
                                fData[4] = ((((short) packBuffer[3]) << 8) | ((short) packBuffer[2] & 0xff)) / 32768.0f * 2000;
                                fData[5] = ((((short) packBuffer[5]) << 8) | ((short) packBuffer[4] & 0xff)) / 32768.0f * 2000;
                                fData[17] = ((((short) packBuffer[7]) << 8) | ((short) packBuffer[6] & 0xff)) / 100.0f;
                                break;
                            case 0x53://角度
                                fData[6] = ((((short) packBuffer[1]) << 8) | ((short) packBuffer[0] & 0xff)) / 32768.0f * 180;
                                fData[7] = ((((short) packBuffer[3]) << 8) | ((short) packBuffer[2] & 0xff)) / 32768.0f * 180;
                                fData[8] = ((((short) packBuffer[5]) << 8) | ((short) packBuffer[4] & 0xff)) / 32768.0f * 180;
                                fData[17] = ((((short) packBuffer[7]) << 8) | ((short) packBuffer[6] & 0xff)) / 100.0f;
                                break;
                            case 0x59://四元數
                                fData[23] = ((((short) packBuffer[1]) << 8) | ((short) packBuffer[0] & 0xff)) / 32768.0f;
                                fData[24] = ((((short) packBuffer[3]) << 8) | ((short) packBuffer[2] & 0xff))/32768.0f;
                                fData[25] = ((((short) packBuffer[5]) << 8) | ((short) packBuffer[4] & 0xff))/32768.0f;
                                fData[26] = ((((short) packBuffer[7]) << 8) | ((short) packBuffer[6] & 0xff))/32768.0f;
                                break;
                        }
                    }
                    long lTimeNow = System.currentTimeMillis(); // 獲取收據轉換之後的時間
                    // 如果數據處理後的時間  與 接收到數據的時間 的時間差>80 則發送消息傳輸數據,
                    // 這個時間需要看你硬件一秒鐘發送的包的個數
                    if (lTimeNow - lLastTime > 80) {
                        lLastTime = lTimeNow;
                        Message msg = mHandler.obtainMessage(MainActivity.MESSAGE_READ);
                        Bundle bundle = new Bundle();
                        bundle.putString("index",String.valueOf(this.index));
                        bundle.putFloatArray("Data", fData);
                        msg.setData(bundle);
                        mHandler.sendMessage(msg);
                    }
                } catch (IOException e) {
                    connectionLost(this.index);
                    e.printStackTrace();
                }
            }
        }
        public void cancel() {
            try {
                mmSocket.close();
            } catch (IOException e) {}
        }
    }
    //連接失敗
    private void connectionFailed(int index) {
        setState(STATE_LISTEN);
        // Send a failure message back to the Activity
        Message msg = mHandler.obtainMessage(MainActivity.MESSAGE_TOAST);
        Bundle bundle = new Bundle();
        bundle.putString("toast", "未能連接設備"+index);
        bundle.putInt("device_id",index);
        msg.setData(bundle);
        mHandler.sendMessage(msg);
    }
    // 連接丟失
    private void connectionLost(int index) {
        setState(STATE_LISTEN);
        Message msg = mHandler.obtainMessage(MainActivity.MESSAGE_TOAST);
        Bundle bundle = new Bundle();
        bundle.putString("toast", "設備丟失"+index);
        bundle.putInt("device_id",index);
        msg.setData(bundle);
        mHandler.sendMessage(msg);
    }


    //用於 藍牙連接的Activity onResume()方法
    public synchronized void start() {
        // Cancel any thread attempting to make a connection
        if (mConnectThread != null) {
            mConnectThread.cancel();
            mConnectThread = null;
        }

        if (mAcceptThread == null) {
            mAcceptThread = new AcceptThread();
            mAcceptThread.start();
        }
        setState(STATE_LISTEN);
    }

    public synchronized void connected(BluetoothSocket socket,BluetoothDevice device,int index) {
        Log.d("MAGIKARE","連接到線程"+index);
        // Cancel the thread that completed the connection
        if (mConnectThread != null) {
            mConnectThread.cancel();
            mConnectThread = null;
        }
        // Cancel the accept thread because we only want to connect to one device
        if (mAcceptThread != null) {
            mAcceptThread.cancel();
            mAcceptThread = null;
        }

        // Start the thread to manage the connection and perform transmissions
        mConnectedThread[index-1] = new ConnectedThread(socket,index);

        mConnectedThread[index-1].start();

        // Send the name of the connected device back to the UI Activity
        Message msg = mHandler.obtainMessage(MainActivity.MESSAGE_DEVICE_NAME);
        Bundle bundle = new Bundle();
        bundle.putString("device_name", device.getName()+" "+index);

        msg.setData(bundle);
        mHandler.sendMessage(msg);

        setState(STATE_CONNECTED);
    }

    private synchronized void setState(int state) {
        mState = state;
        // Give the new state to the Handler so the UI Activity can update
        mHandler.obtainMessage(MainActivity.MESSAGE_STATE_CHANGE, state, -1).sendToTarget();
    }

    private class AcceptThread extends Thread {
        // The local server socket
        private final BluetoothServerSocket mmServerSocket;
        //private int index;
        public AcceptThread() {
            BluetoothServerSocket tmp = null;
            // this.index=index;
            // Create a new listening server socket
            try {
                tmp = mAdapter.listenUsingRfcommWithServiceRecord("BluetoothData", MY_UUID);
            }
            catch (IOException e) {}
            mmServerSocket = tmp;
        }

        public void run() {
            new Thread(new Runnable() {
                @Override
                public void run() {

                }
            }).start();

        }

        public void cancel() {

            try {
                if(mmServerSocket!=null) {
                    mmServerSocket.close();
                }
            }
            catch (IOException e) {}
        }
    }
    public synchronized int getState() {
        return mState;
    }


    public synchronized void stop() {
        if (mConnectedThread != null) {
            for(int i=0;i<mConnectedThread.length;i++)
            {
                    mConnectedThread[i].cancel();
            }
            mConnectedThread = null;
        }
        if (mAcceptThread != null) {
            mAcceptThread.cancel();
            mAcceptThread = null;
        }
        setState(STATE_NONE);
    }
}
三、自定義即時變化的折線圖:
public class MyView extends View {
    /*http://www.cnblogs.com/aibuli/p/950c34f2bc0d02cbd290dd6a8339d42a.html*/
    //坐標軸原點的位置
    private int xPoint=60;
    private int yPoint=260;
    //刻度長度
    private int xScale=8;  //8個單位構成一個刻度
    private int yScale=40;
    //x與y坐標軸的長度
    private int xLength=580;
    private int yLength=480;

    private int MaxDataSize=xLength/xScale;   //橫坐標  最多可繪制的點

    private List<Float> data=new ArrayList<Float>();   //存放 縱坐標 所描繪的點

    private String[] yLabel=new String[yLength/yScale];  //Y軸的刻度上顯示字的集合


    private Handler mh=new Handler(){
        public void handleMessage(android.os.Message msg) {
            if(msg.what==0){                //判斷接受消息類型
                MyView.this.invalidate();  //刷新View
            }
        };
    };
    public MyView(Context context, AttributeSet attrs) {
        super(context, attrs);
        for (int i = 0; i <yLabel.length; i++) {
            yLabel[i]=(i+1)+"M/s";
        }
        new Thread(new Runnable() {
            @Override
            public void run() {
                while(true){     //在線程中不斷往集合中增加數據
                    try {
                        Thread.sleep(300);
                    } catch (InterruptedException e) {
                        e.printStackTrace();
                    }
                    if(data.size()>MaxDataSize){  //判斷集合的長度是否大於最大繪制長度
                        data.remove(0);  //刪除頭數據
                    }
                    // 這裡得到藍牙設備得到的數據
                    float[] floats = MainActivity.GetAngleSpeed(1);
                    data.add(floats[0]);
                    mh.sendEmptyMessage(0);   //發送空消息通知刷新
                }
            }
        }).start();
    }

    @Override
    protected void onDraw(Canvas canvas) {
        super.onDraw(canvas);
        Paint paint=new Paint();
        paint.setStyle(Paint.Style.STROKE);
        paint.setAntiAlias(true);
        paint.setColor(Color.RED);
        //繪制Y軸
        canvas.drawLine(xPoint, yPoint-yLength, xPoint, yPoint, paint);
        //繪制Y軸左右兩邊的箭頭
        canvas.drawLine(xPoint, yPoint-yLength, xPoint-3,yPoint-yLength+6, paint);
        canvas.drawLine(xPoint, yPoint-yLength, xPoint+3,yPoint-yLength+6, paint);
        //Y軸上的刻度與文字
        for (int i = 0; i * yScale< yLength; i++) {
            canvas.drawLine(xPoint, yPoint-i*yScale, xPoint+5, yPoint-i*yScale, paint);  //刻度
            canvas.drawText(yLabel[i], xPoint-50, yPoint-i*yScale, paint);//文字
        }
        //X軸
        canvas.drawLine(xPoint, yPoint, xPoint+xLength, yPoint, paint);
        //如果集合中有數據
        if(data.size()>1){
            for (int i = 1; i < data.size(); i++) {  //依次取出數據進行繪制
                canvas.drawLine(xPoint+(i-1)*xScale, yPoint-data.get(i-1)*yScale, xPoint+i*xScale, yPoint-data.get(i)*yScale, paint);
            }
        }

    }
}
相關知識:淺談Bluetooth藍牙開發
有問題歡迎留言交流!
 MultiTouch————多點觸控,伸縮圖片,變換圖片位置,
MultiTouch————多點觸控,伸縮圖片,變換圖片位置,前言:當今的手機都支持多點觸控功能(可以進行圖片伸縮,變換位置),但是我們程序員要怎樣結合硬件去實現這個功能
 Android 塗鴉最佳實踐
Android 塗鴉最佳實踐 Android中實現手勢畫圖一般都兩種方式,一是直接在View上繪制,而是使用SurfaceView。 兩者還是有一些差別的。簡介下。
 Android應用開發教程之六:ListView詳解
ListView是Android軟件開發中非常重要組件之一,基本上是個軟件基本都會使用ListView ,今天我通過一個demo來教大家怎麼樣使用L
 Linux內核系列—操作系統開發之HelloWorld,linuxhelloworld
Linux內核系列—操作系統開發之HelloWorld,linuxhelloworld org 07c00h ;偽指令,告訴編譯器程序會被加載到7c00處