編輯:關於android開發
在本文中實現的是比較普遍的一個對EditText的重繪以及對於按鈕或窗口添加漸變色。
因為EditText是繼承於TextView的,所以可以實現對EditText的重繪,在重繪的時候只需要繼承EditText並且重寫它的onDraw()方法就可以了。
在給按鈕或者窗口添加漸變色的時候需要借用GradientDrawable方法設置漸變的方向,以及漸變的顏色,將漸變的顏色放在一個數組中然後對其進行訪問。並且使用setBackgroundDrawable()方法將其顯示在界面上。
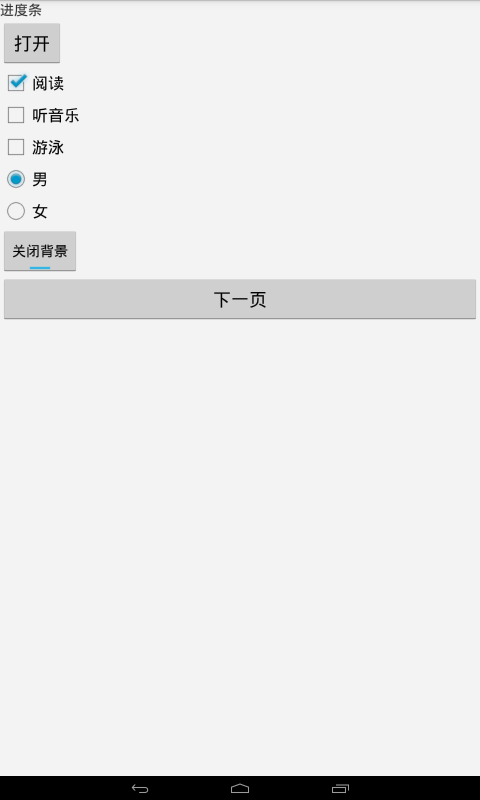
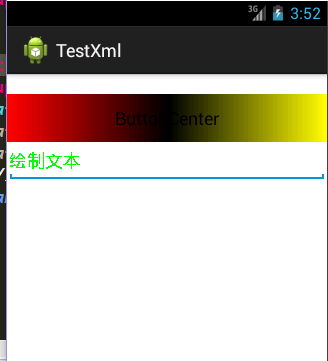
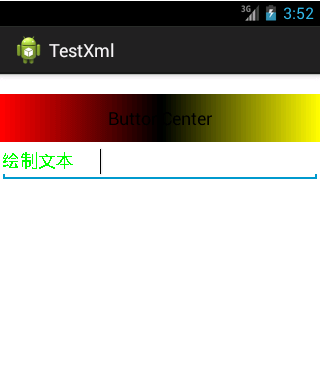
本例的運行截圖:
具體的實現代碼如下:
MainActivity
package com.example.testxml;

import android.annotation.SuppressLint;
import android.app.Activity;
import android.content.Context;
import android.graphics.Canvas;
import android.graphics.Color;
import android.graphics.drawable.GradientDrawable;
import android.graphics.drawable.GradientDrawable.Orientation;
import android.os.Bundle;
import android.widget.Button;
import android.widget.EditText;

public class MainActivity extends Activity {

    private Button btn;
    private EditText edtxt;
//    private DrawEdit drawedtxt;

    @SuppressLint("WrongCall")
    @Override
    protected void onCreate(Bundle savedInstanceState) {
        super.onCreate(savedInstanceState);
        setContentView(R.layout.activity_main);

        btn = (Button)this.findViewById(R.id.btncenter);

        //對按鈕設置至上而下的漸變色
        GradientDrawable gradientdrawable = new GradientDrawable(Orientation.LEFT_RIGHT,new int[]
                {Color.RED,Color.BLACK,Color.YELLOW});
        //設置當前窗口的漸變背景色
//        getWindow().setBackgroundDrawable(gradientdrawable);
        btn.setBackgroundDrawable(gradientdrawable);
    }

}
對EditText進行重繪 DrawEdit代碼如下
 1 package com.example.testxml;
 2
 3 import android.content.Context;
 4 import android.graphics.Canvas;
 5 import android.graphics.Color;
 6 import android.graphics.Paint;
 7 import android.util.AttributeSet;
 8 import android.widget.EditText;
 9
10 public class DrawEdit extends EditText{
11
12     //實現DrawEdit的構造函數
13     public DrawEdit(Context context) {
14         super(context);
15     }
16
17     public DrawEdit(Context context, AttributeSet attrs) {
18         super(context, attrs);
19     }
20
21     protected void onDraw(Canvas canvas) {
22         super.onDraw(canvas);
23         Paint paint = new Paint();
24         paint.setTextSize(18);
25         paint.setColor(Color.GREEN);
26         //繪制文本
27         canvas.drawText("繪制文本", 2, getHeight() / 2 + 5, paint);
28
29     }
30
31
32 }
xml布局文件:
 1 <LinearLayout xmlns:android="http://schemas.android.com/apk/res/android"
 2     xmlns:tools="http://schemas.android.com/tools"
 3     android:id="@+id/LinearLayout1"
 4     android:layout_width="match_parent"
 5     android:layout_height="match_parent"
 6     android:orientation="vertical"
 7     tools:context=".MainActivity" >
 8
 9     <Button
10         android:id="@+id/btncenter"
11         android:layout_width="fill_parent"
12         android:layout_height="wrap_content"
13         android:layout_marginTop="20dp"
14         android:text="@string/btncenter" />
15
16     <!-- 將EditText進行重繪時要對其進行自定義,這樣在MainActivity中無需進行調用,他會自己調用 -->
17
18         <com.example.testxml.DrawEdit
19             android:layout_width="match_parent"
20             android:layout_height="wrap_content"
21             android:paddingLeft="100dp"
22              />
23
24
25 </LinearLayout>
上面就實現了對於EditText的重繪以及對於按鈕的設置的漸變色的過程。
 Android中實現圖片平移、縮放、旋轉同步進行
Android中實現圖片平移、縮放、旋轉同步進行 前言 之前因為項目需求,其中使用到了圖片的單擊顯示取消,圖片平移縮放功能,昨天突然想再加上圖片的旋轉功能,
 編譯android源碼4---ubuntu下載Android源代碼
編譯android源碼4---ubuntu下載Android源代碼 1.下載repo信息 mkdir ~/bin PATH=~/bin:$PATH //放到環境變量中
 Android插件實例——360 DroidPlugin詳解
Android插件實例——360 DroidPlugin詳解 在中國找到錢不難,但你的一個點子不意味著是一個創業。你談一個再好的想法,比如我今天談一個創意說,新浪為什麼
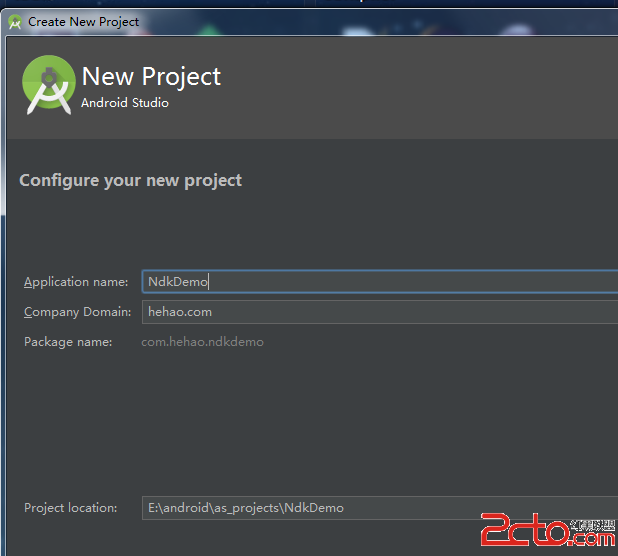 Android Studio下NDK的使用
Android Studio下NDK的使用 當我們在開發android程序的過程中,有時候需要應用程序對底層硬件的調用。android官方給我們提供NDK以便於我們