編輯:關於android開發
Android Studio是google專門為開發Android提供的開發工具,在它內部可以直接的添加一些非常好用的開發小工具,這裡就講解怎樣添加這些小工具,並且向大家推薦一個非常有用的對象傳遞時,必須要把對象序列化的接口Parcelable小工具;
這裡先介紹下 Android中實現序列化的兩個選擇:一是實現Serializable接口(是JavaSE本身就支持的),一是實現Parcelable接口(是Android特有功能,效率比實現Serializable接口高效,可用於Intent數據傳遞,也可以用於進程間通信(IPC))。實現Serializable接口非常簡單,聲明一下就可以了,而實現Parcelable接口稍微復雜一些,但效率更高,推薦用這種方法提高性能。
並且值得注意的是 Android中Intent傳遞對象也對應有兩種方法:一是Bundle.putSerializable(Key,Object),另一種是Bundle.putParcelable(Key,Object)。當然這些Object是有一定的條件的,前者是實現了Serializable接口,而後者是實現了Parcelable接口。
好了介紹了對象序列化之後,就來看看怎樣添加這樣的小工具了:
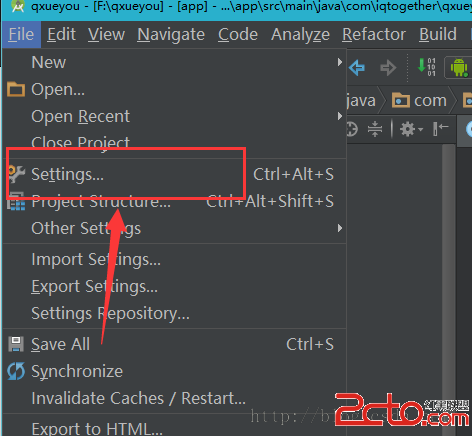
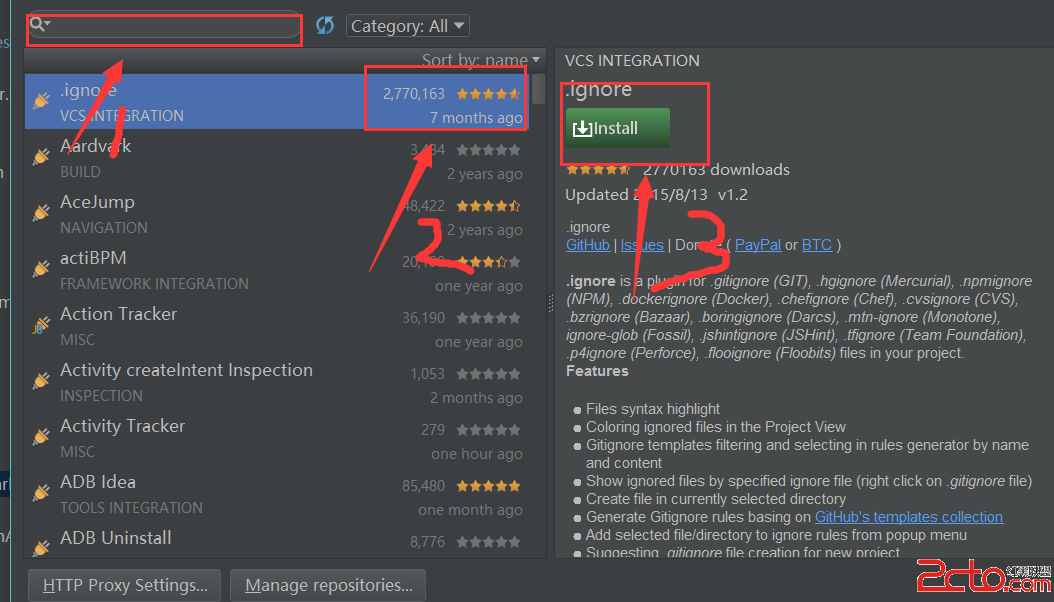
第一步:點擊設置(Setting)
第二步:點擊Plugins,然後點擊2所指的Browse repositories (浏覽存儲庫)

第三步: 然後在1所指的輸入框中收索你想要下載的插件小工具,然後2所指的就是下載數量和用戶評分,3所指的就是安裝,點擊3所指的安裝按鈕,就能下載安裝這個插件了。 這裡要給大家講的是,這裡的插件都是全球Android開發人員都能下載的,所以大家看到很多4顆星和5顆星的評分,都是非常值得去研究,沒事的時候大家就可以百度看看是干什麼的,覺得有意思的話就可以下來研究一下,這裡有很多有趣的小插件,可以幫助我們減少很多不必要的代碼,下面給大家推薦的Parcelable小插件就是方便大家對象序列化的。
好了上面介紹了怎樣安裝小插件的方法,我們接下來就為大家介紹怎樣安裝Parcelable小插件。
在上圖 1處中輸入Parcelable,在下面的收索結果 中就有一個 Android Parcelable code generator,沒錯就是它,它評分還是非常高的,接近5顆星,說明性能啊什麼的還是非常值得肯定的,而且有8萬多人下載。那麼我們就點擊下載安裝後,就可以使用了;如下圖
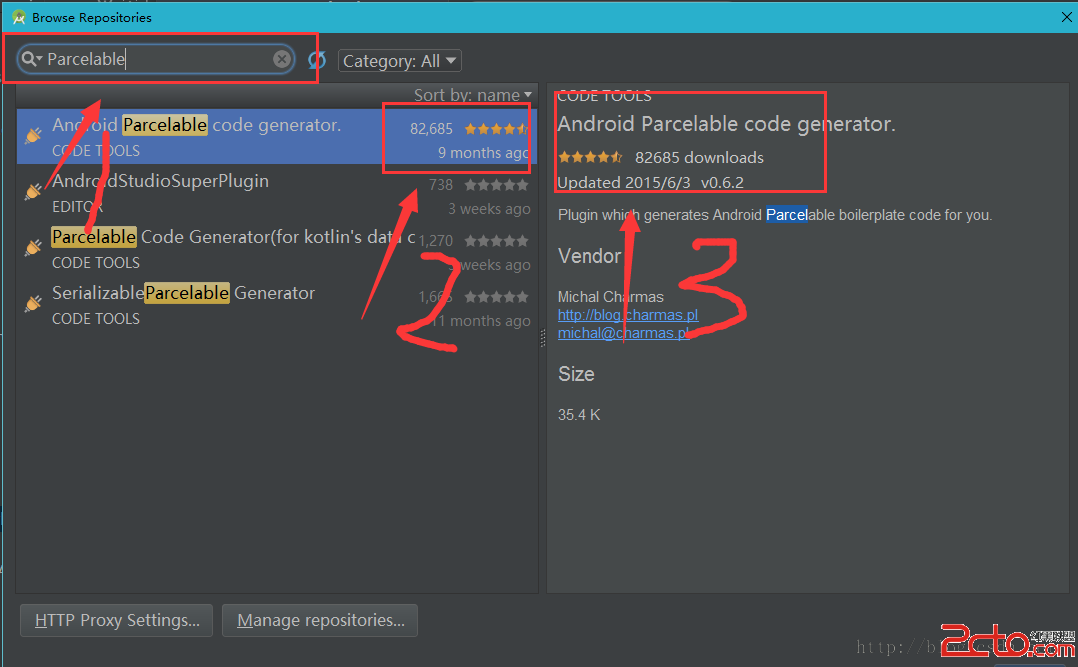
注意,下載安裝後,必須要重啟Android Studio 剛才安裝的小插件才能使用;
接下就教大家怎麼使用;
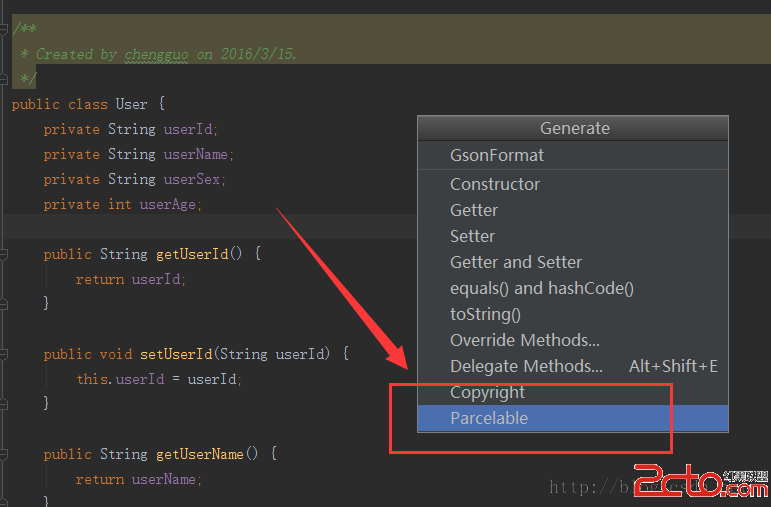
第一步:要在你傳遞的實體類 中鼠標右鍵,如下圖 ,點擊 Generate... (或者直接快捷鍵 Alt+Insert)

點擊了Generate...之後,就出現了如下菜單界面,點擊Parcelable,就能直接快速的使對象是想Parcelable了。
然後就會彈出一個窗口,讓我們選擇要序列化的屬性,這裡就全選如下圖:
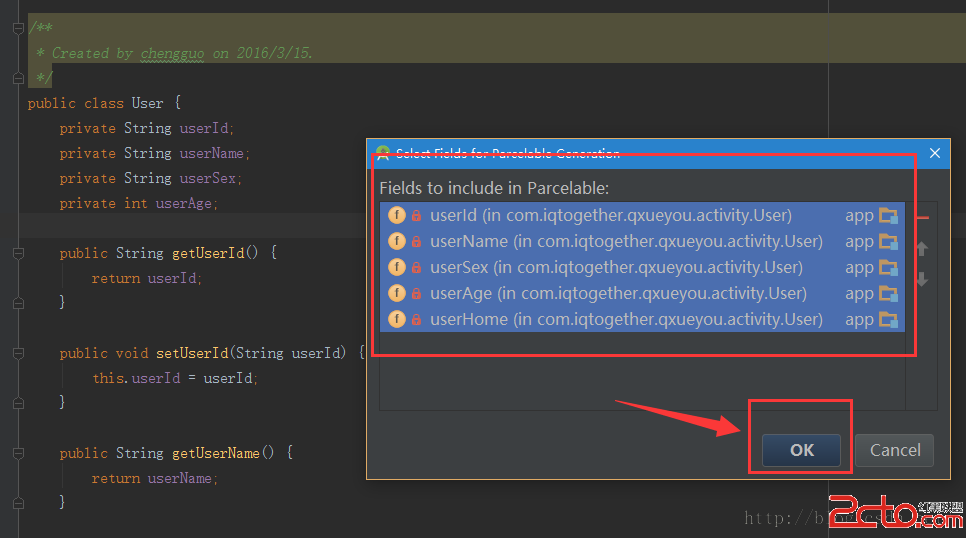
點擊Ok之後,這個對象就實現了Parcelable,並且在後面會自動的生成一些代碼,這是非常方便的。
下面就是點擊了Parcelable,對象就成功序列化了,這樣就省去了我們很多時間,而且對象使用Parcelable接口實現序列化,在activity之間傳遞是非常快速的。
package com.iqtogether.qxueyou.activity;

import android.os.Parcel;
import android.os.Parcelable;

/**
 * Created by chengguo on 2016/3/15.
 */
public class User implements Parcelable {
    private String userId;
    private String userName;
    private String userSex;
    private int userAge;

    public String getUserId() {
        return userId;
    }

    public void setUserId(String userId) {
        this.userId = userId;
    }

    public String getUserName() {
        return userName;
    }

    public void setUserName(String userName) {
        this.userName = userName;
    }

    public String getUserSex() {
        return userSex;
    }

    public void setUserSex(String userSex) {
        this.userSex = userSex;
    }

    public int getUserAge() {
        return userAge;
    }

    public void setUserAge(int userAge) {
        this.userAge = userAge;
    }

    public String getUserHome() {
        return userHome;
    }

    public void setUserHome(String userHome) {
        this.userHome = userHome;
    }

    private String userHome;

    @Override
    public int describeContents() {
        return 0;
    }

    @Override
    public void writeToParcel(Parcel dest, int flags) {
        dest.writeString(this.userId);
        dest.writeString(this.userName);
        dest.writeString(this.userSex);
        dest.writeInt(this.userAge);
        dest.writeString(this.userHome);
    }

    public User() {
    }

    protected User(Parcel in) {
        this.userId = in.readString();
        this.userName = in.readString();
        this.userSex = in.readString();
        this.userAge = in.readInt();
        this.userHome = in.readString();
    }

    public static final Parcelable.Creator CREATOR = new Parcelable.Creator() {
        public User createFromParcel(Parcel source) {
            return new User(source);
        }

        public User[] newArray(int size) {
            return new User[size];
        }
    };
}
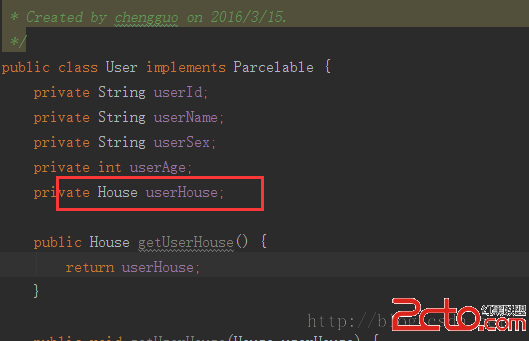
注意:如果User對象中包含有對象屬性,這個對象屬性它自身也必須要實現Parcelable接口,如下圖,User對象的一個對象屬性,沒有實現Parcelable接口就會出現序列化失敗的提示;
這裡給User設置一個House對象屬性,這裡做個范例
然後錯誤提示如下:
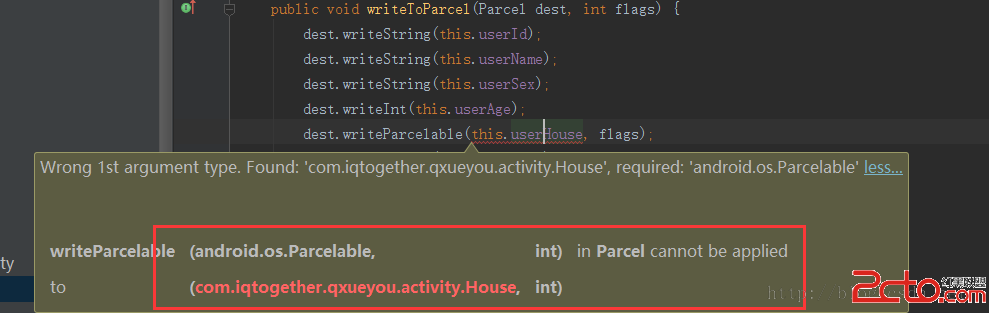
提示: 要求傳遞一個實現了Parcelable接口的對象。這時候我們去給House對象實現Parcelable接口就Ok了。
如下House對象:
package com.iqtogether.qxueyou.activity;

import android.os.Parcel;
import android.os.Parcelable;

/**
 * Created by chengguo on 2016/3/15.
 */
public class House implements Parcelable {
    private String price;

    public String getPrice() {
        return price;
    }

    public void setPrice(String price) {
        this.price = price;
    }

    @Override
    public int describeContents() {
        return 0;
    }

    @Override
    public void writeToParcel(Parcel dest, int flags) {
        dest.writeString(this.price);
    }

    public House() {
    }

    protected House(Parcel in) {
        this.price = in.readString();
    }

    public static final Parcelable.Creator CREATOR = new Parcelable.Creator() {
        public House createFromParcel(Parcel source) {
            return new House(source);
        }

        public House[] newArray(int size) {
            return new House[size];
        }
    };
}
接下來就是整個User對象的代碼 如下:
package com.iqtogether.qxueyou.activity;

import android.os.Parcel;
import android.os.Parcelable;

/**
 * Created by chengguo on 2016/3/15.
 */
public class User implements Parcelable {
    private String userId;
    private String userName;
    private String userSex;
    private int userAge;
    private House userHouse;

    public House getUserHouse() {
        return userHouse;
    }

    public void setUserHouse(House userHouse) {
        this.userHouse = userHouse;
    }

    public String getUserId() {
        return userId;
    }

    public void setUserId(String userId) {
        this.userId = userId;
    }

    public String getUserName() {
        return userName;
    }

    public void setUserName(String userName) {
        this.userName = userName;
    }

    public String getUserSex() {
        return userSex;
    }

    public void setUserSex(String userSex) {
        this.userSex = userSex;
    }

    public int getUserAge() {
        return userAge;
    }

    public void setUserAge(int userAge) {
        this.userAge = userAge;
    }

    public String getUserHome() {
        return userHome;
    }

    public void setUserHome(String userHome) {
        this.userHome = userHome;
    }

    private String userHome;

    public User() {
    }

    @Override
    public int describeContents() {
        return 0;
    }

    @Override
    public void writeToParcel(Parcel dest, int flags) {
        dest.writeString(this.userId);
        dest.writeString(this.userName);
        dest.writeString(this.userSex);
        dest.writeInt(this.userAge);
        dest.writeParcelable(this.userHouse, flags);
        dest.writeString(this.userHome);
    }

    protected User(Parcel in) {
        this.userId = in.readString();
        this.userName = in.readString();
        this.userSex = in.readString();
        this.userAge = in.readInt();
        this.userHouse = in.readParcelable(House.class.getClassLoader());
        this.userHome = in.readString();
    }

    public static final Creator CREATOR = new Creator() {
        public User createFromParcel(Parcel source) {
            return new User(source);
        }

        public User[] newArray(int size) {
            return new User[size];
        }
    };
}
好了這樣就完成了Pacelable序列化小工具的添加和使用,是不是非常方便快捷呢!最後不要忘了,intent在 傳遞對象是使用的是Bundle.putParcelable(Key,Object),而不是Bundle.putSerializable(Key,Object)。在接收對象時使用的是getIntent( ).getParcelableExter( Key),而不是getIntent( ).getSerializableExtera( Key);
祝大家工作愉快。
 Android SDK目錄及版本號區別
Android SDK目錄及版本號區別 今天又有人問Tools,Build-Tools,Platform-tools有什麼區別,是干嘛的? 現在對SDK目錄做一下總結闡述
 添加頁面切換動畫, 避免冷啟動
添加頁面切換動畫, 避免冷啟動 在啟動Android應用時, 直接顯示頁面, 就稱之為冷啟動(Cold Start). 為了增強用戶體驗, 可以添加控件動畫, 讓啟動
 Android項目從Eclipse增加支持Android Studio
Android項目從Eclipse增加支持Android Studio 使用Eclipse開發Android已經有些年頭了,然而Android Studio(後面簡稱
 Android學習筆記①——安卓工具的基本安裝,android安卓
Android學習筆記①——安卓工具的基本安裝,android安卓 安卓已經出來很長時間了,網上的教程也有很多,怕以後忘記,就把網上大牛們的分享的知識自己在學習一下
 Android Studio創建/打開項目時一直處於Building“project name”Gradle project info的解決辦法,androidgradle
Android Studio創建/打開項目時一直處於Building“p