編輯:關於android開發
ZXing的二維碼功能的提取lib下載地址:https://github.com/xuyisheng/ZXingLib
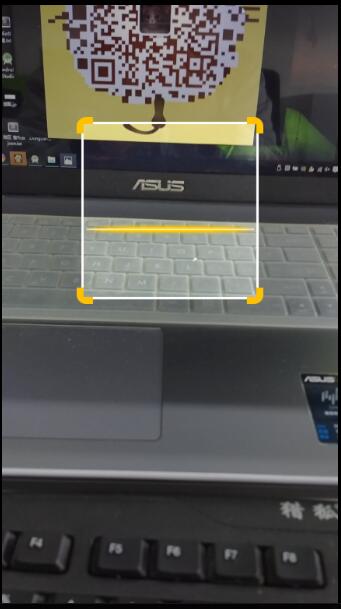
1.掃描二維碼:
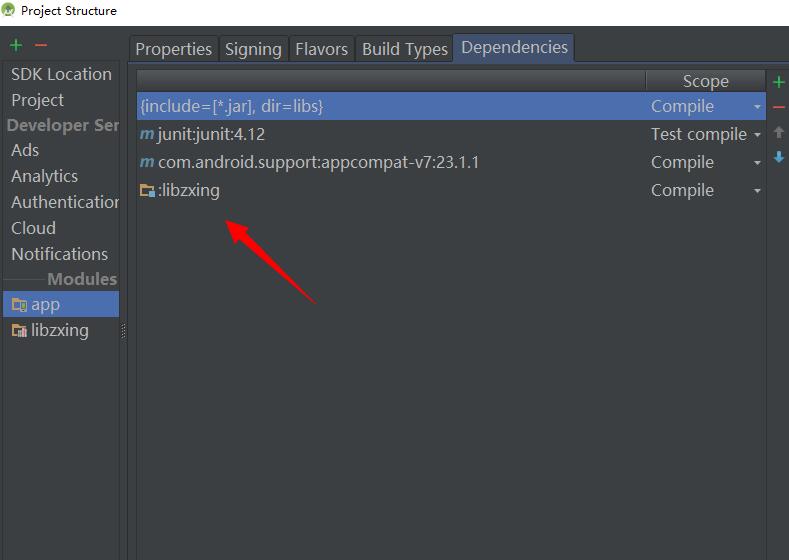
我們掃描就是要用到這個CaptureActivity類,直接把上面下載地址裡面下載了裡面的libzxing作為Module,如下圖:

首先加上權限:
 <!-- 相機 -->
    <uses-permission android:name="android.permission.CAMERA" />
    <!-- 振動 -->
    <uses-permission android:name="android.permission.VIBRATE" />
我們既然把它作為Module了,那麼我們也是可以拿來直接用,這裡我們可以直接把依賴裡面的關於CaptureActivity類的AndroidManifest.xml的注冊信息拷貝過來放在我們這個項目中:
<activity
            android:name="com.xys.libzxing.zxing.activity.CaptureActivity"
            android:configChanges="orientation|keyboardHidden"
            android:screenOrientation="portrait"
            android:theme="@android:style/Theme.NoTitleBar.Fullscreen"
            android:windowSoftInputMode="stateAlwaysHidden">

        </activity>
我們在activity_main.xml中聲明一個Button:
<Button
        android:id="@+id/btnSan"
        android:layout_width="match_parent"
        android:layout_height="wrap_content"
        android:text="掃描二維碼" />
在JAVA代碼中,初始化後添加點擊事件:
 findViewById(R.id.btnSan).setOnClickListener(new View.OnClickListener() {
            @Override
            public void onClick(View v) {
                startActivityForResult(new Intent(MainActivity.this, CaptureActivity.class), 0);
            }
        });
查看返回的結果就在activity_main.xml中添加一個TextView查看:
<TextView
        android:id="@+id/tv_content"
        android:layout_width="wrap_content"
        android:layout_height="wrap_content" />
初始化後再JAVA代碼中添加返回的代碼:
 @Override
    protected void onActivityResult(int requestCode, int resultCode, Intent data) {
        // TODO Auto-generated method stub
        super.onActivityResult(requestCode, resultCode, data);
        if (resultCode == RESULT_OK) {
            String result = data.getExtras().getString("result");
            tv_content.setText(result);
        }
    }
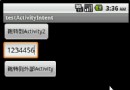
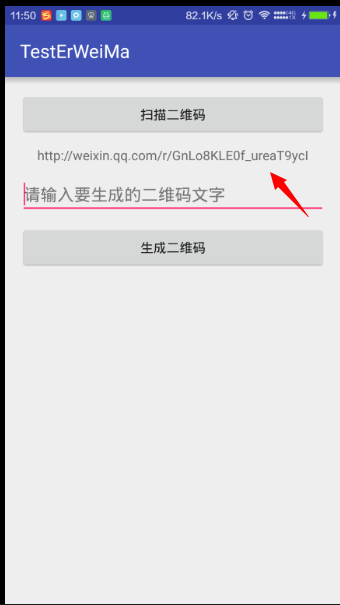
這樣我們就可以看到返回的東西了,下面以微信為例子得到的結果:
2.生成二維碼:
二維碼生成起來,我們需要三個元素,要生成的內容,生成的按鈕,生成內容的存放,所以我們layou_main.xml裡面要添加這樣的
 <EditText
        android:id="@+id/et_input"
        android:layout_width="match_parent"
        android:layout_height="wrap_content"
        android:layout_below="@+id/tv_content"
        android:layout_marginTop="10dp"
        android:hint="請輸入要生成的二維碼文字" />

    <Button
        android:id="@+id/btn_generate"
        android:layout_width="match_parent"
        android:layout_height="wrap_content"
        android:layout_below="@+id/et_input"
        android:layout_marginTop="10dp"
        android:text="生成二維碼" />

    <ImageView
        android:id="@+id/img"
        android:layout_width="wrap_content"
        android:layout_height="wrap_content"
        android:layout_below="@+id/btn_generate"
        android:layout_centerHorizontal="true"
        android:layout_marginTop="10dp" />
我們把這幾個控件都初始化一下,然後在Button的點擊事件中寫:
findViewById(R.id.btn_generate).setOnClickListener(new View.OnClickListener() {
            @Override
            public void onClick(View v) {
                String str = et_input.getText().toString();
                if (str.equals("")) {
                    Toast.makeText(MainActivity.this, "不能為空", Toast.LENGTH_SHORT).show();
                } else {
                    // 位圖
                    try {
                        /**
                         * 參數:1.文本 2 3.二維碼的寬高 4.二維碼中間的那個logo
                         */
                        Bitmap bitmap = EncodingUtils.createQRCode(str, 500, 500, null);
                        // 設置圖片
                        img.setImageBitmap(bitmap);
                    } catch (Exception e) {
                        // TODO Auto-generated catch block
                        e.printStackTrace();
                    }
                }
            }
        });
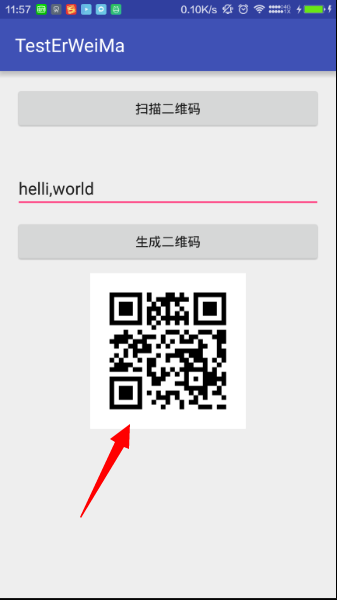
我們來運行一下,二維碼就簡單的生成了:
當然這個是沒有logo的,如果需要添加logo的話,只需要把
Bitmap bitmap = EncodingUtils.createQRCode(str, 500, 500, null);
後面的null改為自己需要的logo就可以了

下面是完整的代碼:
<?xml version="1.0" encoding="utf-8"?>
<RelativeLayout xmlns:android="http://schemas.android.com/apk/res/android"
    xmlns:tools="http://schemas.android.com/tools"
    android:layout_width="match_parent"
    android:layout_height="match_parent"
    android:paddingBottom="@dimen/activity_vertical_margin"
    android:paddingLeft="@dimen/activity_horizontal_margin"
    android:paddingRight="@dimen/activity_horizontal_margin"
    android:paddingTop="@dimen/activity_vertical_margin"
    tools:context="com.zzw.testerweima.MainActivity">

    <Button
        android:id="@+id/btnSan"
        android:layout_width="match_parent"
        android:layout_height="wrap_content"
        android:text="掃描二維碼" />

    <TextView
        android:id="@+id/tv_content"
        android:layout_width="wrap_content"
        android:layout_height="wrap_content"
        android:layout_below="@+id/btnSan"
        android:layout_centerHorizontal="true"
        android:layout_marginTop="10dp" />

    <EditText
        android:id="@+id/et_input"
        android:layout_width="match_parent"
        android:layout_height="wrap_content"
        android:layout_below="@+id/tv_content"
        android:layout_marginTop="10dp"
        android:hint="請輸入要生成的二維碼文字" />

    <Button
        android:id="@+id/btn_generate"
        android:layout_width="match_parent"
        android:layout_height="wrap_content"
        android:layout_below="@+id/et_input"
        android:layout_marginTop="10dp"
        android:text="生成二維碼" />

    <ImageView
        android:id="@+id/img"
        android:layout_width="wrap_content"
        android:layout_height="wrap_content"
        android:layout_below="@+id/btn_generate"
        android:layout_centerHorizontal="true"
        android:layout_marginTop="10dp" />
</RelativeLayout>
package com.zzw.testerweima;

import android.content.Intent;
import android.graphics.Bitmap;
import android.support.v7.app.AppCompatActivity;
import android.os.Bundle;
import android.util.Log;
import android.view.View;
import android.widget.EditText;
import android.widget.ImageView;
import android.widget.TextView;
import android.widget.Toast;

import com.xys.libzxing.zxing.activity.CaptureActivity;
import com.xys.libzxing.zxing.encoding.EncodingUtils;

public class MainActivity extends AppCompatActivity {

    private TextView tv_content;
    private EditText et_input;
    private ImageView img;

    @Override
    protected void onCreate(Bundle savedInstanceState) {
        super.onCreate(savedInstanceState);
        setContentView(R.layout.activity_main);
        tv_content = (TextView) findViewById(R.id.tv_content);
        et_input = (EditText) findViewById(R.id.et_input);
        img = (ImageView) findViewById(R.id.img);

        findViewById(R.id.btnSan).setOnClickListener(new View.OnClickListener() {
            @Override
            public void onClick(View v) {
                startActivityForResult(new Intent(MainActivity.this, CaptureActivity.class), 0);
            }
        });

        findViewById(R.id.btn_generate).setOnClickListener(new View.OnClickListener() {
            @Override
            public void onClick(View v) {
                String str = et_input.getText().toString();
                if (str.equals("")) {
                    Toast.makeText(MainActivity.this, "不能為空", Toast.LENGTH_SHORT).show();
                } else {
                    // 位圖
                    try {
                        /**
                         * 參數:1.文本 2 3.二維碼的寬高 4.二維碼中間的那個logo
                         */
                        Bitmap bitmap = EncodingUtils.createQRCode(str, 500, 500, null);
                        // 設置圖片
                        img.setImageBitmap(bitmap);
                    } catch (Exception e) {
                        // TODO Auto-generated catch block
                        e.printStackTrace();
                    }
                }
            }
        });
    }

    @Override
    protected void onActivityResult(int requestCode, int resultCode, Intent data) {
        // TODO Auto-generated method stub
        super.onActivityResult(requestCode, resultCode, data);
        if (resultCode == RESULT_OK) {
            String result = data.getExtras().getString("result");
            Log.d("Main", result);
            tv_content.setText(result);
        }
    }
}
 Android 主頁面頂部欄的通知Notification ,可以自定義通知消息欄的風格,並且點擊通知欄進人本程序。,android自定義消息欄
Android 主頁面頂部欄的通知Notification ,可以自定義通知消息欄的風格,並且點擊通知欄進人本程序。,android自定義消息欄常用的程序通知,顯示到主頁
 Android學習指南之二十七:如何使用Handler
當用戶點擊一個按鈕時如果執行的是一個常耗時操作的話,處理不好會導致系統假死,用
 android:Activity數據傳遞之基本數據類型
android:Activity數據傳遞之基本數據類型 既然是activity之間的數據傳遞 肯定有兩個activity 我們先創建兩個activity,在MainA
 從源碼的角度理解四大組件的工作過程——Android開發藝術探索筆記
從源碼的角度理解四大組件的工作過程——Android開發藝術探索筆記 系統對四大組件的過程進行了很大程度的封裝,日常開發中並不需要了解底層的工作原理,那麼研究這些原理