編輯:開發入門
創建內容提供器和 Google Maps 應用程序
您已經看到了一個完整的應用程序示例,現在簡要討論一下更加復雜的應用程序。
內容提供器和 Google Maps
本教程中討論的第二個應用程序適用於提供上門服務的專業人員,比如設備維修技術人員,這些人必須找到去客戶地址的路線。這個應用程序使用 android 內置的聯系人數據庫作為記錄存儲庫。本節將講解如何訪問內容提供器中的數據,還將看看 intent 的效果。我們將用聯系人數據庫中的地址數據執行 Google Maps 搜索。為了讓這個應用程序在 android 模擬器上正確運行,必須記錄一些聯系人,而且必須填寫家庭地址字段。圖 12 顯示模擬器中與聯系人應用程序相關的條目。
圖 12. 模擬器中與聯系人應用程序相關的條目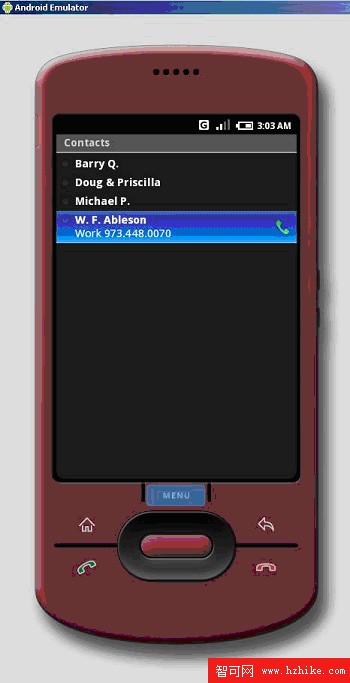
下面是這個應用程序的一個代碼片段。注意,這個應用程序的主Activity 類擴展 ListActivity。這是因為我們需要在列表中顯示信息。
清單 8. 第一個代碼片段
public class MobileServiceCallContacts extends ListActivity
{
     final String tag = "MSCC";
    /** Called when the activity is first created. */
    @Override
    public void onCreate(Bundle icicle)
    {
        super.onCreate(icicle);
        setContentVIEw(R.layout.main);

        // Get a cursor with all people
        Cursor c = getContentResolver().query(People.CONTENT_URI, null, null,
                                                               null, null);
        startManagingCursor(c);

        ListAdapter adapter = new SimpleCursorAdapter(this,android.R.
        layout.simple_list_item_1,c,new String[] {People.NAME} ,new int[]
        {android.R.id.text1});
        setListAdapter(adapter);

    }
...
}
注意,這裡使用游標類查詢聯系人數據庫。這個 “結果集” 游標通過 ListAdapter 類鏈接到 UI。圖 13 顯示當設備上記錄了聯系人時應用程序的效果。注意,這個屏幕上的記錄沒有排序。
圖 13. 應用程序的運行效果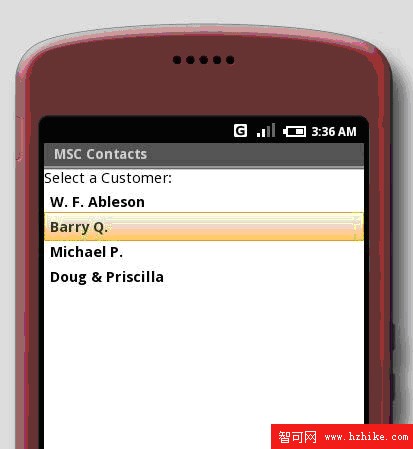
可以通過鼠標單擊、按模擬器的中間按鈕或按鍵盤上的 Enter 鍵選擇一個聯系人。選擇聯系人之後,代碼必須查詢所選聯系人的地址。這要使用覆蓋的 onListItemClick() 方法。這個方法的實現有四個重要參數,其中最重要的是 dbidentifIEr。因為游標綁定到 UI,所以在調用這個方法時,它實際上會獲得底層數據源的標識符。可以使用 dbidentifIEr 字段在聯系人數據庫中查詢所需的信息。還可以使用它啟動聯系人應用程序,所用的 intent 見清單 9 中被注釋掉的代碼。
清單 9. 覆蓋的 onListItemClick() 方法
    @Override
    protected void onListItemClick(ListView list,View view,int position,long
                                                              dbidentifier)
    {
         super.onListItemClick(list,view,position,dbidentifier);

         try
         {
              // this commented out code below will launch the Contacts application
        // and "view" the contact Intent myIntent = \
new Intent(android.content.
    // Intent.VIEW_ACTION,new ContentURI("content://contacts/people/"
        // + dbidentifier)); startSubActivity(myIntent,position);


              // let's lookup specifics on this record
              ContentURI theContact = \
new ContentURI(android.provider.Contacts.ContactMethods.CONTENT_URI.toURI());


              // IMPORTANT
              // in order to use this sample application, you need to have at least
        // one Contact record on your Android emulator\
              // and be sure to have populated the 'Home Address field'
              //

              // this "where clause" is for HOME address and for the person record
        // selected in the GUI (id, dbidentifier)
              Cursor c = managedQuery(theContact,null," type = 1 and person = " +
                                             dbidentifIEr,null);

              if (!c.first())
              {
                   showAlert("MSCC","No Contact Methods Available!","",true);
                   return;
              }


              String address = c.getString(c.getColumnIndex("data"));

              address = address.replace("\n","");
              address = address.replace(",","");
              address = address.replace(" ","+");

              Intent geoIntent = new Intent("android.intent.action.VIEW",
                                        new ContentURI\
("geo:0,0?q=" + address));
              startActivity(geoIntent);
         }
         catch (Exception ee)
         {
              Log.i(tag,ee.getMessage());
         }
    }
找到地址之後,需要通過一些簡單的字符串操作清理數據,准備查詢 Google Maps。geoIntent 是一個用來執行地理搜索的新的 intent,它通過調用 Google Maps 提供默認的 android 模擬器圖像。
第一個應用程序的所有主要元素仍然適用於這個應用程序。它有一個從主應用程序屏幕啟動的活動。當然,還有 androidManifest.XML 文件。在 下載 一節中可以找到完整的源代碼。
關於第二個應用程序,還有最後一點需要注意。androidManifest.XML 文件中包含一個條目,它使應用程序能夠讀取聯系人數據庫:<uses-permission id="android.permission.READ_CONTACTS" />。如果不這樣做,Linux 內核就會禁止應用程序訪問聯系人數據庫。
結束語
本教程介紹了 Android 平台、Android Developer Tools 以及在 Eclipse 中開發 Android 應用程序時涉及的關鍵概念。通過使用 Android Developer Tools,可以在強大的 Eclipse 開發環境中構建和測試 Android 應用程序。您現在可以開始創建自己的 android 應用程序了。
 在MyEclipse 8.6上搭建Android開發環境
1,基本環境准備:安裝JDK1.5以上,Eclipse3.3以上版本.(MyEclipse也可以),筆者安裝了JDK1.6和MyEclipse 8.6。JDK1.6My
 Android Activity的生命周期結構
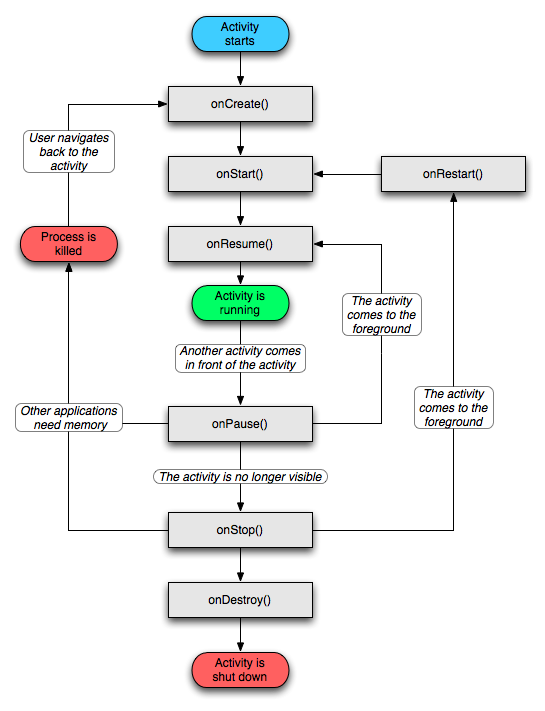
本文將從Android官方網站的Activity生命周期結構圖講起,教我們弄清所有的生命周期函數的原理,用實例表現android Activity的生命周期結構。AD:
 使用 Eclipse 和 Android 小部件進行 Android 開發的簡介(三)
使用小部件的樣例應用程序現在我們要修改現有應用程序,使其像圖 8 中所示的那樣。本例的目的在於讓讀者熟悉在真實應用程序中對 textVIEw、editText
 只需一個U盤 在電腦上也能體驗安卓系統
現在采用安卓系統的手機和平板電腦那是越來越多了,總是聽別人說安卓系統如何如何好,相信大家也想體驗一下安卓系統的獨特魅力吧!不過對於大多數手頭並不寬裕的朋友來說,僅僅為嘗