編輯:Android編程入門
Android消息機制好多人都講過,但是自己去翻源碼的時候才能明白。
今天試著講一下,因為目標是講清楚整體邏輯,所以不追究細節。
Message是消息機制的核心,所以從Message講起。
1.Message是什麼?
看一個從消息池中取出一個msg的方法:
public static Message obtain(Handler h, int what,
        int arg1, int arg2, Object obj) {
    Message m = obtain();
    m.target = h;
    m.what = what;
    m.arg1 = arg1;
    m.arg2 = arg2;
    m.obj = obj;
    return m;
}
一個Message由下面幾個部分構成:
arg1,arg2:用於傳遞簡單整數類型數據時使用
obj:傳遞的數據對象,也就是內容
what:用戶自定義的消息代碼,接受者可以了解這個消息的信息,作為這個消息在MessageQueue中的唯一標示。
target:一個handler,顧名思義,這個message是誰的,是handler的,感覺handler很難理解的,可以把handler理解成一個輔助類。
注:也可以使用一個message初始化另外一個message,參數裡可以加入message自定義的callback
2.Messsage在哪兒待著?
在MessageQueue中,顧名思義,這是一個Message的隊列。我們通過next遍歷這個隊列來獲得msg,next方法如下所示:


Message next() {
    // Return here if the message loop has already quit and been disposed.
    // This can happen if the application tries to restart a looper after quit
    // which is not supported.
    final long ptr = mPtr;
    if (ptr == 0) {
        return null;
    }
    int pendingIdleHandlerCount = -1; // -1 only during first iteration
    int nextPollTimeoutMillis = 0;
    for (;;) {
        if (nextPollTimeoutMillis != 0) {
            Binder.flushPendingCommands();
        }
        nativePollOnce(ptr, nextPollTimeoutMillis);
        synchronized (this) {
            // Try to retrieve the next message.  Return if found.
            final long now = SystemClock.uptimeMillis();
            Message prevMsg = null;
            Message msg = mMessages;
            if (msg != null && msg.target == null) {
                // Stalled by a barrier.  Find the next asynchronous message in the queue.
                do {
                    prevMsg = msg;
                    msg = msg.next;
                } while (msg != null && !msg.isAsynchronous());
            }
            if (msg != null) {
                if (now < msg.when) {
                    // Next message is not ready.  Set a timeout to wake up when it is ready.
                    nextPollTimeoutMillis = (int) Math.min(msg.when - now, Integer.MAX_VALUE);
                } else {
                    // Got a message.
                    mBlocked = false;
                    if (prevMsg != null) {
                        prevMsg.next = msg.next;
                    } else {
                        mMessages = msg.next;
                    }
                    msg.next = null;
                    if (DEBUG) Log.v(TAG, "Returning message: " + msg);
                    msg.markInUse();
                    return msg;
                }
            } else {
                // No more messages.
                nextPollTimeoutMillis = -1;
            }
            // Process the quit message now that all pending messages have been handled.
            if (mQuitting) {
                dispose();
                return null;
            }
            // If first time idle, then get the number of idlers to run.
            // Idle handles only run if the queue is empty or if the first message
            // in the queue (possibly a barrier) is due to be handled in the future.
            if (pendingIdleHandlerCount < 0
                    && (mMessages == null || now < mMessages.when)) {
                pendingIdleHandlerCount = mIdleHandlers.size();
            }
            if (pendingIdleHandlerCount <= 0) {
                // No idle handlers to run.  Loop and wait some more.
                mBlocked = true;
                continue;
            }
            if (mPendingIdleHandlers == null) {
                mPendingIdleHandlers = new IdleHandler[Math.max(pendingIdleHandlerCount, 4)];
            }
            mPendingIdleHandlers = mIdleHandlers.toArray(mPendingIdleHandlers);
        }
        // Run the idle handlers.
        // We only ever reach this code block during the first iteration.
        for (int i = 0; i < pendingIdleHandlerCount; i++) {
            final IdleHandler idler = mPendingIdleHandlers[i];
            mPendingIdleHandlers[i] = null; // release the reference to the handler
            boolean keep = false;
            try {
                keep = idler.queueIdle();
            } catch (Throwable t) {
                Log.wtf(TAG, "IdleHandler threw exception", t);
            }
            if (!keep) {
                synchronized (this) {
                    mIdleHandlers.remove(idler);
                }
            }
        }
        // Reset the idle handler count to 0 so we do not run them again.
        pendingIdleHandlerCount = 0;
        // While calling an idle handler, a new message could have been delivered
        // so go back and look again for a pending message without waiting.
        nextPollTimeoutMillis = 0;
    }
}
View Code
3.Message從何而來?
當我們定義了一個Message後,怎麼把它放在MessageQueue裡的?
這個時候我們需要一個第三方的幫手,於是handler登場了。
此處,我們需要先了解一下Hanlder的成員:
final MessageQueue mQueue;
final Looper mLooper;
final Callback mCallback;
可以看出,handler與一個MessageQueue和一個Looper相關聯,定義一個回調用的的類。
在Message.java中有這樣一個函數:
public void sendToTarget() {
    target.sendMessage(this);
}
可見,一個Message是由它的target,也就是一個handler調用sendMessage方法發送到MessageQueue中的,看Handler.java的源碼是,會發現有好幾種sendMessage方法,但最後都是調用了sendMessageAtTime方法
public boolean sendMessageAtTime(Message msg, long uptimeMillis) {
    MessageQueue queue = mQueue;
    if (queue == null) {
        RuntimeException e = new RuntimeException(
                this + " sendMessageAtTime() called with no mQueue");
        Log.w("Looper", e.getMessage(), e);
        return false;
    }
    return enqueueMessage(queue, msg, uptimeMillis);
}
可以看出,handler與一個MessageQueue相關聯,如果handler關聯的MessageQueue不為空的話,則入隊。
private boolean enqueueMessage(MessageQueue queue, Message msg, long uptimeMillis) {
    msg.target = this;
    if (mAsynchronous) {
        msg.setAsynchronous(true);
    }
    return queue.enqueueMessage(msg, uptimeMillis);
}
在將消息入隊的時候,通過msg.target = this將msg與handler關聯起來。
4.Message去往何處?
這個問題很明顯:Message怎麼從MessageQueue裡出來呀,由Looper從MessageQueue中取出來:
先看看Looper的構成:
public final class Looper {
    static final ThreadLocal<Looper> sThreadLocal = new ThreadLocal<Looper>();
    private static Looper sMainLooper;  // guarded by Looper.class
    final MessageQueue mQueue;
    final Thread mThread;
    //......
}
可以看到Looper對應一個Thread和一個MessageQueue。
每一個Thread都對應有一個Looper麼?是的,但不是默認的,如果不在主線程中,你想使用Looper的話,必須要調用一個函數:
private static void prepare(boolean quitAllowed) {
    if (sThreadLocal.get() != null) {
        throw new RuntimeException("Only one Looper may be created per thread");
    }
    sThreadLocal.set(new Looper(quitAllowed));
}
這個函數就是維護一個ThreadLocal變量:sThreadLocl,設置屬於當前線程的Looper。
這裡,prepare方法巧妙地使用了ThreadLocal變量將Thread與一個Looper關聯起來。
另外,注意looper中的兩個方法:
public static @Nullable Looper myLooper() {
    return sThreadLocal.get();
}

public static Looper getMainLooper() {
    synchronized (Looper.class) {
        return sMainLooper;
    }
}
myLooper獲得當前線程綁定的looper,沒有則返回null。
getMainLooper獲得主線程的looper,方便與主線程通信。
此時已經獲得了一個Looper,准備開始取消息,調用Looper.loop()方法
public static void loop() {
    final Looper me = myLooper();
    if (me == null) {
        throw new RuntimeException("No Looper; Looper.prepare() wasn't called on this thread.");
    }
    final MessageQueue queue = me.mQueue;
    // Make sure the identity of this thread is that of the local process,
    // and keep track of what that identity token actually is.
    Binder.clearCallingIdentity();
    final long ident = Binder.clearCallingIdentity();
    for (;;) {
        Message msg = queue.next(); // might block
        if (msg == null) {
            // No message indicates that the message queue is quitting.
            return;
        }
        // This must be in a local variable, in case a UI event sets the logger
        Printer logging = me.mLogging;
        if (logging != null) {
            logging.println(">>>>> Dispatching to " + msg.target + " " +
                    msg.callback + ": " + msg.what);
        }
        msg.target.dispatchMessage(msg);
        if (logging != null) {
            logging.println("<<<<< Finished to " + msg.target + " " + msg.callback);
        }
        // Make sure that during the course of dispatching the
        // identity of the thread wasn't corrupted.
        final long newIdent = Binder.clearCallingIdentity();
        if (ident != newIdent) {
            Log.wtf(TAG, "Thread identity changed from 0x"
                    + Long.toHexString(ident) + " to 0x"
                    + Long.toHexString(newIdent) + " while dispatching to "
                    + msg.target.getClass().getName() + " "
                    + msg.callback + " what=" + msg.what);
        }
        msg.recycleUnchecked();
    }
}
我們暫時不關注細節,之關心裡面的兩個函數的調用
第一個:Message msg = queue.next(),這裡表示從MessageQueue中取到一條信息。
第二個:msg.tartget.dispatchMessage(msg)
就是將Messag交給了handler去使用dispatchMessage()去處理,那麼我們就看一下這個方法:
public void dispatchMessage(Message msg) {
    if (msg.callback != null) {
        handleCallback(msg);
    } else {
        if (mCallback != null) {
            if (mCallback.handleMessage(msg)) {
                return;
            }
        }
        handleMessage(msg);
    }
}
當msg被從MessageQueue中分發出去後,被送給了handler,這時候handler會調用一個回調方法來處理這個message
(1).如果msg本身有默認的回調方法,則使用該方法處理。
(2).如果handler定義時頂一個默認的回調方法,
(3).如果上面兩者都沒有,則使用我們在定義Handler時重寫的handleMessage方法。
大多數情況下,我們都使用第三種方式來處理信息。
5.兩個簡單的例子:
import android.os.Bundle;
import android.os.Handler;
import android.os.Message;
import android.support.v7.app.AppCompatActivity;
import android.view.View;
import android.widget.TextView;

public class UIActivity extends AppCompatActivity {
    private TextView tv;
    private Handler handler = new Handler(){
        @Override
        public void handleMessage(Message msg) {
            //因為Message Queue和Looper關系,後台其實是循環的調用handleMessage方法,所以加入swith case判斷
            switch (msg.what){
                case 0:
                    tv = (TextView) findViewById(R.id.tv);
                    tv.setText((CharSequence) msg.obj);
            }
        }
    };
    @Override
    protected void onCreate(Bundle savedInstanceState) {
        super.onCreate(savedInstanceState);
        setContentView(R.layout.activity_ui);
        findViewById(R.id.send_text).setOnClickListener(new View.OnClickListener() {
            @Override
            public void onClick(View v) {
                //創建一個新的線程
                new Thread(
                        new Runnable() {
                            @Override
                            public void run() {
                                Message msg = new Message();
                                msg.what = 0 ;
                                msg.obj = "來自另外一個線程的內容";
                                handler.sendMessage(msg);
                            }
                        }
                ).start();
            }
        });
    }
}
第二個:
//MainActivity.java
public class MainActivity extends Activity {
    public static final String TAG = "Main Acticity";
    Button btn = null;
    Button btn2 = null;
    Handler handler = null;
    MyHandlerThread mHandlerThread = null;

    @Override
    protected void onCreate(Bundle savedInstanceState) {
        super.onCreate(savedInstanceState);
        setContentView(R.layout.activity_main);
        btn = (Button)findViewById(R.id.button);
        btn2 = (Button)findViewById(R.id.button2);
        Log.d("MainActivity.myLooper()", Looper.myLooper().toString());
        Log.d("MainActivity.MainLooper", Looper.getMainLooper().toString());
        btn.setOnClickListener(new View.OnClickListener() {
            @Override
            public void onClick(View view) {
                mHandlerThread = new MyHandlerThread("onStartHandlerThread");
                Log.d(TAG, "創建myHandlerThread對象");
                mHandlerThread.start();
                Log.d(TAG, "start一個Thread");
            }
        });
        btn2.setOnClickListener(new View.OnClickListener() {
            @Override
            public void onClick(View view) {
                if(mHandlerThread.mHandler != null){
                    Message msg = new Message();
                    msg.what = 1;
                    mHandlerThread.mHandler.sendMessage(msg);
                }

            }
        });
    }
}
//MyHandlerThread.java
public class MyHandlerThread extends Thread {
    public static final String TAG = "MyHT";
    public Handler mHandler = null;
    @Override
    public void run() {
        Log.d(TAG, "進入Thread的run");
        Looper.prepare();
        Looper.prepare();
        mHandler = new Handler(Looper.myLooper()){
            @Override
            public void handleMessage(Message msg){
                Log.d(TAG, "獲得了message");
                super.handleMessage(msg);
            }
        };
        Looper.loop();
    }
}
總結:
消息機制的核心是Message,在大多數情況下要放在MessageQueue中。
使用handler將msg發送到相應的Messagequeue中,並將二者關聯。
每一個Thread中有一個Looper,Looper管理一個MessageQueue,像水泵一樣不斷的從MessageQueue中取出msg.
取出後調用msg相關聯的handler的回調方法處理message。
這樣就完成了進程間的消息機制,可以在不阻塞UI線程的情況下將耗時的操作使用Handler將message傳遞給子線程去處理。
本文只是大致梳理了一下消息機制的框架,總結一下自己最近看的,很多細節都沒有講,等再研究一段時間後再繼續寫幾篇深入的博客,單獨分析一下各個模塊。
本文疏漏之處,還望大家指正,謝謝。
參考:
https://hit-alibaba.github.io/interview/Android/basic/Android-handler-thread-looper.html
https://android.googlesource.com/platform/frameworks/base/+/refs/heads/master/core/java/android/os/MessageQueue.java
https://android.googlesource.com/platform/frameworks/base/+/refs/heads/master/core/java/android/os/Message.java
https://android.googlesource.com/platform/frameworks/base/+/refs/heads/master/core/java/android/os/Looper.java
https://android.googlesource.com/platform/frameworks/base/+/refs/heads/master/core/java/android/os/Handler.java
 Android進階學習
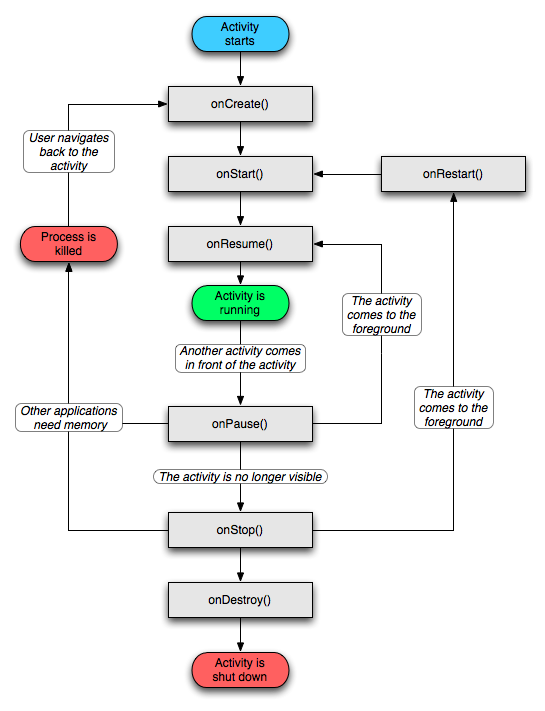
一、Android四大組件1. Activity生命周期:2. Service生命周期:Service的生命周期長,沒有用戶界面,可以用來開發監控程序。Service有兩
 java/android線程池詳解
一,簡述線程池:線程池是如何工作的:一系列任務出現後,根據自己的線程池安排任務進行。如圖: 線程池的好處:重用線程池中的線程,避免因為線程的創建和銷毀所帶來的性能開銷。能
 總結一下Android中主題(Theme)的正確玩法
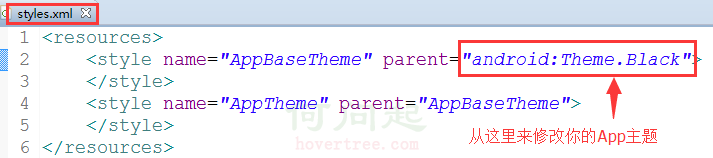
在AndroidManifest.xml文件中有<application android:theme=@style/AppTheme>,其中的@style/A
 Android 自定義ViewGroup的步驟
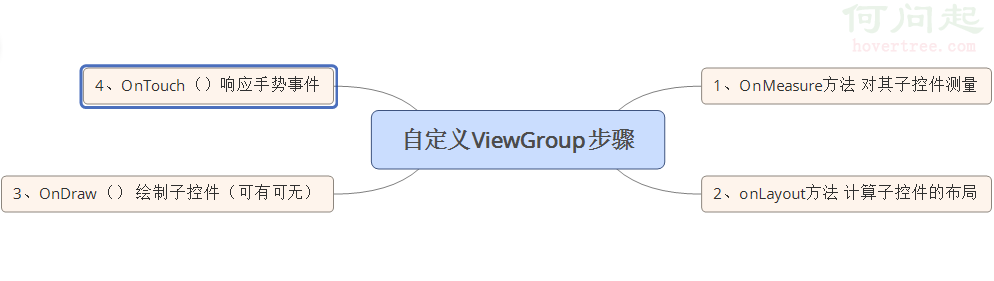
前面幾節,我們重點討論了自定義View的三板斧,這節我們來討論自定義ViewGroup,為什麼要自定義ViewGroup,其實就是為了更好的管理View。 自定義Vie