編輯:Android開發實例
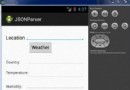
以上是手機端簡單的運行效果圖
通過本文只是想來簡單介紹一下關於android socket編程。
向上服務器端代碼:
package nate.PPT.control;
import java.awt.AWTException;
import java.awt.Robot;
import java.awt.event.KeyEvent;
import java.io.IOException;
import java.io.ObjectInputStream;
import java.io.ObjectOutputStream;
import java.net.ServerSocket;
import java.net.Socket;


public class PPTServer {
	private final static int RIGHT = 1;
	private final static int LEFT = 2;
	private final static int SHIFTF5 = 0;
	private final static int ESC = 3;

	private static int key;
	//注意這裡用的輸入輸出流的對象
	private static ObjectInputStream fromClient;
	private static ObjectOutputStream fromServer;

	public static void main(String[] args) throws IOException,
									ClassNotFoundException, AWTException, InterruptedException{
		ServerSocket sSocket = new ServerSocket(2011);
		System.out.println("waiting a connection from the client");
		Robot robot = new Robot();
		Socket sock = sSocket.accept();
		System.out.println("recv a connection");
		fromClient = new ObjectInputStream(sock.getInputStream());
		fromServer = new ObjectOutputStream(sock.getOutputStream());
		do{
			Choices choice = (Choices)fromClient.readObject();
			System.out.println("the flag is " + choice.getKey());
			key = choice.getKey();
			switch(key){

			case SHIFTF5:
				robot.keyPress(KeyEvent.VK_SHIFT);
				Thread.sleep(20);
				robot.keyPress(KeyEvent.VK_F5);
				Thread.sleep(10);
				robot.keyRelease(KeyEvent.VK_F5);
				robot.keyRelease(KeyEvent.VK_SHIFT);
				Thread.sleep(10);
				break;

			case LEFT:
				robot.keyPress(KeyEvent.VK_LEFT);
				Thread.sleep(10);
				robot.keyRelease(KeyEvent.VK_LEFT);
				Thread.sleep(10);
				break;

			case RIGHT:
				robot.keyPress(KeyEvent.VK_RIGHT);
				Thread.sleep(10);
				robot.keyRelease(KeyEvent.VK_RIGHT);
				Thread.sleep(10);
				break;

			case ESC:
				robot.keyPress(KeyEvent.VK_ESCAPE);
				Thread.sleep(10);
				robot.keyPress(KeyEvent.VK_ESCAPE);
				Thread.sleep(10);
				break;

				default:
					break;
			}
		}while(key != -1);
		System.out.println("exit the app");
		fromClient.close();
		fromServer.close();
		sock.close();
		sSocket.close();
	}
}
本例中,注意一下所用的輸入輸出流對象,關於這個java中已經很清楚了,就不多說。同時,本例中使用java中的Robot來模擬按鍵,即PPT中的快捷鍵從而實現控制PPT的目的。當然,大家都知道,使用ObjectInputStream、ObjectOutputStream傳輸對象首先還需下面的條件。即傳送的對象所屬的類,該類必須實現Serializable接口!同時注意在android手機客戶端,我們需要同樣擁有這樣一個類型!!!將此類copy過去即可,這些都是java中的知識。
package nate.PPT.control;

import java.io.Serializable;

public class Choices implements Serializable{

	private int key;

	public Choices(int key) {
		super();
		this.key = key;
	}

	public int getKey() {
		return key;
	}

	public void setKey(int key) {
		this.key = key;
	}

}
上面類包含了傳輸的信息數據內容。
來看看client端的代碼,部署在android手機端:
package nate.PPT.control;

import java.io.IOException;
import java.io.ObjectInputStream;
import java.io.ObjectOutputStream;
import java.net.InetAddress;
import java.net.Socket;
import java.net.UnknownHostException;
import android.app.Activity;
import android.app.AlertDialog;
import android.content.DialogInterface;
import android.content.Intent;
import android.os.Bundle;
import android.view.KeyEvent;
import android.view.View;
import android.widget.Button;

public class PPTClient extends Activity {
	private Button start;
	private Button escape;
	private Button forward;
	private Button back;
	private Socket sock;
	private ObjectOutputStream fromClient;
	private ObjectInputStream fromServer;
	private final static int RIGHT = 1;
	private final static int LEFT = 2;
	private final static int SHIFTF5 = 0;
	private final static int ESC = 3;

    /** Called when the activity is first created. */
    @Override
    public void onCreate(Bundle savedInstanceState) {
        super.onCreate(savedInstanceState);
        setContentView(R.layout.main);

        try {
			//sock = new Socket(InetAddress.getByName("125.71.69.199"),2011);
        	sock = new Socket(InetAddress.getByName("125.70.223.165"),2011);
        	fromClient = new ObjectOutputStream(sock.getOutputStream());
			fromServer = new ObjectInputStream(sock.getInputStream());

			} catch (UnknownHostException e1) {
			e1.printStackTrace();
		} catch (IOException e1) {
			e1.printStackTrace();
		}

        start = (Button)this.findViewById(R.id.start);
        escape = (Button)this.findViewById(R.id.escape);
        forward = (Button)this.findViewById(R.id.froward);
        back = (Button)this.findViewById(R.id.back);

        start.setOnClickListener(new Button.OnClickListener(){

			@Override
			public void onClick(View v) {
				Choices choice = new Choices(SHIFTF5);
				try {
					fromClient.writeObject(choice);
					System.out.println("send the start shift + f5");
				} catch (IOException e) {
					e.printStackTrace();
				}
			}

        });

        escape.setOnClickListener(new Button.OnClickListener(){

			@Override
			public void onClick(View arg0) {
				Choices  choice = new Choices(ESC);
				try {
					fromClient.writeObject(choice);
					System.out.println("send the escape");
				} catch (IOException e) {
					e.printStackTrace();
				}
			}
        });
        forward.setOnClickListener(new Button.OnClickListener(){

			@Override
			public void onClick(View v) {
				Choices choice = new Choices(RIGHT);
				try {
					fromClient.writeObject(choice);
					System.out.println("send the right (the next)");
				} catch (IOException e) {
					e.printStackTrace();
				}

			}

        });
        back.setOnClickListener(new Button.OnClickListener(){

			@Override
			public void onClick(View v) {
				Choices choice = new Choices(LEFT);
				try {
					fromClient.writeObject(choice);
					System.out.println("send the left (the last)");
				} catch (IOException e) {
					e.printStackTrace();
				}
			}
        });
    }

    /**
     * 監聽BACK鍵
     * @param keyCode
     * @param event
     * @return
     */
    public boolean onKeyDown(int keyCode, KeyEvent event)
    {
		if ( event.getKeyCode() == KeyEvent.KEYCODE_BACK){
			AlertDialog.Builder builder = new AlertDialog.Builder(this);
			builder.setTitle("exit app");
			builder.setMessage("You will exit the app...");
			//builder.setIcon(R.drawable.stat_sys_warning);
			builder.setPositiveButton("OK",new DialogInterface.OnClickListener() {
				@Override
				public void onClick(DialogInterface dialog, int which) {
					Intent startMain = new Intent(Intent.ACTION_MAIN);
					startMain.addCategory(Intent.CATEGORY_HOME);
					startMain.setFlags(Intent.FLAG_ACTIVITY_NEW_TASK);
					startActivity(startMain);
					System.exit(0);
				}
			});
			builder.setNegativeButton("Cancel",new DialogInterface.OnClickListener() {

				@Override
				public void onClick(DialogInterface dialog, int which) {

				}
			});
			builder.show();
		}
		return super.onKeyDown(keyCode, event);
	}
}
代碼還是很簡單的,這裡不多說了,強調一下的是,client端除了一個activity的類外,還有上面的Choices類!!!與服務器端的類型一模一樣!同時,別忘記了需要在android manifest.XML文件中添加
<uses-permission android:name="android.permission.ACCESS_NETWORK_STATE"/>
<uses-permission android:name="android.permission.INTERNET"/>
用戶權限!!!別忘記添加。。。
當然,代碼還有很多需要改進的地方,比如要解決按下可能延遲PPT沒有反應,但是又不知道是否真的按下等問題,我們可以在手機端的按鈕上加上一個震動的效果,這樣我們就能准確的知道我們是否按下手機上的按鍵。這個應該不難吧!不過本篇文章主要還是簡單介紹android socket編程與PC的連接。
 Android游戲開發實踐之人物移動地圖的平滑滾動處理
如圖所示為程序效果動畫圖 地圖滾動的原理 在本人之前博客的文章中介紹過人物在屏幕中的移動方式,因為之前拼的游戲地圖是完全填充整個手機屏幕的,所以無需處理地圖的平
 Android MediaPlayer(多媒體播放)
Android提供了許多方法來控制播放的音頻/視頻文件和流。其中該方法是通過一類稱為MediaPlayer。Android是提供MediaPlayer類訪問內置的媒體播放
 Android MediaPlayer(多媒體播放)
Android提供了許多方法來控制播放的音頻/視頻文件和流。其中該方法是通過一類稱為MediaPlayer。Android是提供MediaPlayer類訪問內置的媒體播放
 pp列表之分組ListView詳解
吸引用戶的眼球,是我們至死不渝的追求;第一時間呈現最有價值的信息,簡明大方,告訴客戶,你的選擇是多麼的明智,這正是你尋覓已久的東西。 分組的應用場合還是很多的,有