編輯:關於Android編程
本文實例為大家分享了android post請求接口demo測試代碼,供大家參考,具體內容如下
MainActivity.java
package com.tsh.test;

import java.io.InputStream;
import java.io.OutputStream;
import java.io.PrintWriter;
import java.net.HttpURLConnection;
import java.net.URL;

import android.app.Activity;
import android.content.Intent;
import android.os.Bundle;
import android.os.Handler;
import android.os.Message;
import android.view.View;
import android.view.View.OnClickListener;
import android.widget.Button;
import android.widget.TextView;
import android.widget.Toast;

public class MainActivity extends Activity {
 public Button loginBtn;
 public TextView loginUserName;
 public TextView loginPassword;
 public static String API="http://mail.sina.net/loginxxx";
 public LoginHandler loginHandler;
 @Override
 protected void onCreate(Bundle savedInstanceState) {
  super.onCreate(savedInstanceState);
  setContentView(R.layout.activity_main);
  //獲取View對象
  loginBtn=(Button) findViewById(R.id.loginBtn);
  loginUserName=(TextView) findViewById(R.id.loginUsername);
  loginPassword=(TextView) findViewById(R.id.loginPassword);
  //給View對象設置點擊事件
  loginBtn.setOnClickListener(new OnClickListener() {
   @Override
   public void onClick(View arg0) {
    //開啟新線程
    Thread loginThread=new Thread(new LoginRunable());
    loginThread.start();
   }
  });
  loginHandler=new LoginHandler();
 }
 //實現Runable接口,開啟新線程
 class LoginRunable implements Runnable{
  @Override
  public void run() {
   try {
    URL url=new URL(API);
    HttpURLConnection http=(HttpURLConnection) url.openConnection();
    http.setRequestMethod("POST");
    http.setDoInput(true);
    http.setDoOutput(true);
    OutputStream ops=http.getOutputStream();
    PrintWriter pw=new PrintWriter(ops);
    String username=loginUserName.getText().toString();
    String password=loginPassword.getText().toString();
    pw.write("email="+username+"&psw="+password+"&loginfrom=app&output=json");
    pw.flush();

    InputStream ins=http.getInputStream();
    byte[] buffer = new byte[1024];
    int length=0;
    StringBuilder sb=new StringBuilder();
    while((length=ins.read(buffer))!=-1){
     sb.append(new String(buffer,0,length));
    }

    Message msg=new Message();
    msg.what=1;
    msg.obj=sb.toString();
    loginHandler.sendMessage(msg);
   } catch (Exception e) {
    // TODO Auto-generated catch block
    e.printStackTrace();
   }

  }
 }
 //傳遞消息的handle
 class LoginHandler extends Handler{
  @Override
  public void handleMessage(Message msg) {
   String loginResponse=(String) msg.obj;
   System.out.println(loginResponse);
   Toast.makeText(MainActivity.this, loginResponse, 10).show();
   Intent intent=new Intent(MainActivity.this, MailIndexActivity.class);
   //startActivity(intent);
  }
 }
}
main_activity.xml
<LinearLayout xmlns:android="http://schemas.android.com/apk/res/android"
 xmlns:tools="http://schemas.android.com/tools"
 android:layout_width="match_parent"
 android:layout_height="match_parent"
 android:orientation="vertical"
 tools:context="${relativePackage}.${activityClass}" >

 <TextView
  android:layout_width="wrap_content"
  android:layout_height="wrap_content"
  android:text="用戶名" />
 <EditText
  android:hint="請輸入用戶名"
  android:layout_width="match_parent"
  android:layout_height="wrap_content"
  android:id="@+id/loginUsername"
  android:text="shihan@appdev.sinanet.com"
  />
 <TextView
  android:layout_width="wrap_content"
  android:layout_height="wrap_content"
  android:text="密碼"/>
 <EditText
  android:hint="請輸入密碼"
  android:layout_width="match_parent"
  android:layout_height="wrap_content"
  android:id="@+id/loginPassword"
  android:text="xxxxxxx"/>
 <Button
  android:id="@+id/loginBtn"
  android:layout_width="match_parent"
  android:layout_height="wrap_content"
  android:text="登陸認證"
  />
</LinearLayout>
以上就是本文的全部內容,希望對大家的學習有所幫助,也希望大家多多支持本站。
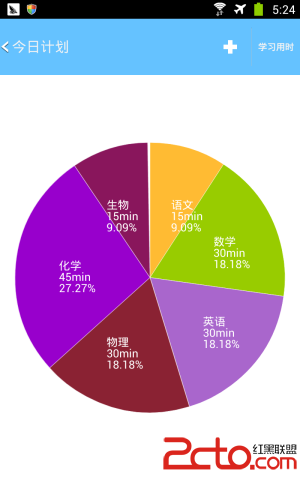 Android繪制簡單餅狀圖
因為在項目中需要用到繪制餅狀圖,所以對github下的android-charts庫進行了精簡和修改,貌似該庫本身有些bug,例如文字繪制有時候會錯位,我改
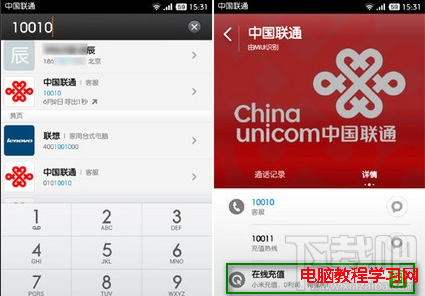 小米手機(MIUI系統)怎麼在撥號界面直接充值話費
如果你是小米手機或小米MIUI系統的用戶,充值話費可以很簡單,你知道嗎?還在打開電腦、登陸淘寶,搜索充值話費的店嗎?看看小米MIUI系統是怎麼在撥號界面輕松
 Android Handler之消息循環的深入解析
Handler是用於操作線程內部的消息隊列的類。這有點繞,沒關系,我們慢慢的來講。前面Looper一篇講到了Looper是用於給線程創建消息隊列用的,也就是說Looper
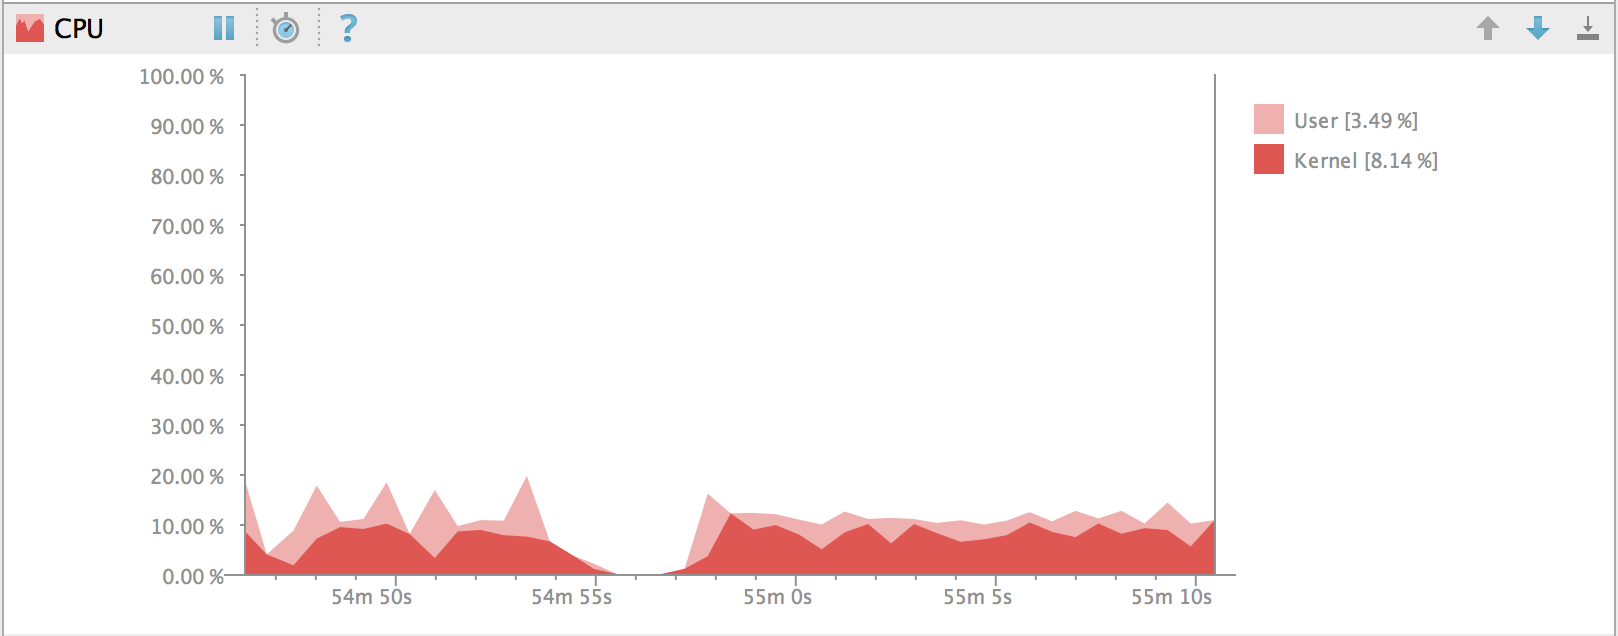 6.3、Android Studio的CPU Monitor
Android Monitor包含一個CPU Monitor,可以讓你非常方便的監測你的應用的CPU的使用。它顯示試試的CPU使用。在CPU Monitor顯示正在運行的