編輯:關於Android編程
相信大家一定都使用過手機QQ和微信之類的軟件,當我們使用時不難發現其界面的切換不僅可以通過點擊頁標簽來實現,還可以通過左右滑動來實現的,耗子君剛開始學Android時就覺得這樣的滑動十分酷炫,十分想要自己來實現它。相信大家也和耗子君一樣,想要迫不期待的學習怎樣實現了吧,OK,下面我來詳細的講一下如何實現這個功能。
先來欣賞一下效果圖吧:
首先,我們先來認識一下控件 ViewPager
ViewPager是Android SDk中自帶的一個附加包android-support-v4.jar中的一個類,可以用來實現屏幕間的切換。android-support-v4.jar可以在網上搜索最新的版本,下載好它後,我們需要把它添加到項目中去。
XML布局
首先來看一下activity的布局,這個布局相信大家都能看得懂,第一行為只有兩個TextView的頁標,至於名字大家就不用在意了,哈哈,第二行為滑動界面時的滾動條,圖片自己要選擇並添加到drawable中,長度不要太長哦,第三行即為我們要實現的界面切換用的ViewPager:
<RelativeLayout xmlns:android="http://schemas.android.com/apk/res/android"
  xmlns:tools="http://schemas.android.com/tools" android:layout_width="match_parent"
  android:layout_height="match_parent" tools:context=".MediaPlayerActivity">
  <LinearLayout
    android:id="@+id/linearLayout"
    android:layout_width="match_parent"
    android:layout_height="50.0dip"
    android:background="#FFFFFF"
    >
    <!--layout_weight這個屬性為權重,讓兩個textview平分這個linearLayout-->
    <TextView
      android:id="@+id/videoLayout"
      android:layout_width="match_parent"
      android:layout_height="match_parent"
      android:layout_weight="1.0"
      android:gravity="center"
      android:text="視頻"
      android:textColor="#000000"
      android:textSize="20dip"
      android:background="@drawable/selector"/>
    <TextView
      android:id="@+id/musicLayout"
      android:layout_width="match_parent"
      android:layout_height="match_parent"
      android:layout_weight="1.0"
      android:gravity="center"
      android:text="音樂"
      android:textColor="#000000"
      android:textSize="20dip"
      android:background="@drawable/selector"/>
  </LinearLayout>
  <ImageView
    android:layout_width="match_parent"
    android:layout_height="10dp"
    android:layout_below="@id/linearLayout"
    android:id="@+id/scrollbar"
    android:scaleType="matrix"
    android:src="@drawable/scrollbar"/>
  <android.support.v4.view.ViewPager
    android:id="@+id/viewPager"
    android:layout_width="match_parent"
    android:layout_height="wrap_content"
    android:layout_below="@id/scrollbar">
  </android.support.v4.view.ViewPager>
</RelativeLayout>
布局中TextView的background屬性是我先設置好的,可以實現在按壓其時,可以使得其背景顏色得到變換,並在松開時恢復顏色。方法為在drawable中新建一個selector.xml文件,寫下如下代碼;
selector.xml:
<?xml version="1.0" encoding="utf-8"?>
<selector xmlns:android="http://schemas.android.com/apk/res/android">
  <item
    android:state_pressed="true"
    android:drawable="@color/press" />
</selector>
當然,首先要在values文件夾下新建好colors.xml文件,配置好press的顏色:
colors.xml:
<?xml version="1.0" encoding="utf-8"?>
<resources>
  <color name="press">#25fa55</color>
</resources>
看完了activity的布局,我們再來看看想要切換的界面的布局,這兩個布局文件只需在layout文件中新建就好,不需要新建activity,為了簡單,這裡就只設置了背景顏色,能夠在測試時看到效果即可:
video_player.xml:
<?xml version="1.0" encoding="utf-8"?>
<RelativeLayout xmlns:android="http://schemas.android.com/apk/res/android"
  android:orientation="vertical" android:layout_width="match_parent"
  android:layout_height="match_parent"
  android:background="#ad2929">
</RelativeLayout>
media_player.xml:
<?xml version="1.0" encoding="utf-8"?>
<RelativeLayout xmlns:android="http://schemas.android.com/apk/res/android"
  android:orientation="vertical" android:layout_width="match_parent"
  android:layout_height="match_parent"
  android:background="#acbbcf">
</RelativeLayout>
Java代碼
package com.example.blacklotus.multimedia;
import android.app.Activity;
import android.graphics.BitmapFactory;
import android.graphics.Matrix;
import android.os.Bundle;
import android.support.v4.view.PagerAdapter;
import android.support.v4.view.ViewPager;
import android.view.LayoutInflater;
import android.view.View;
import android.view.animation.Animation;
import android.view.animation.TranslateAnimation;
import android.widget.Button;
import android.widget.ImageView;
import android.widget.LinearLayout;
import android.widget.TextView;
import android.widget.VideoView;
import java.util.ArrayList;
public class MediaPlayerActivity extends Activity implements View.OnClickListener{
  private ViewPager viewPager;
  private ArrayList<View> pageview;
  private TextView videoLayout;
  private TextView musicLayout;
  // 滾動條圖片
  private ImageView scrollbar;
  // 滾動條初始偏移量
  private int offset = 0;
  // 當前頁編號
  private int currIndex = 0;
  // 滾動條寬度
  private int bmpW;
  //一倍滾動量
  private int one;
  @Override
  protected void onCreate(Bundle savedInstanceState) {
    super.onCreate(savedInstanceState);
    setContentView(R.layout.activity_media_player);
    viewPager = (ViewPager) findViewById(R.id.viewPager);
    //查找布局文件用LayoutInflater.inflate
    LayoutInflater inflater =getLayoutInflater();
    View view1 = inflater.inflate(R.layout.video_player, null);
    View view2 = inflater.inflate(R.layout.media_player, null);
    videoLayout = (TextView)findViewById(R.id.videoLayout);
    musicLayout = (TextView)findViewById(R.id.musicLayout);
    scrollbar = (ImageView)findViewById(R.id.scrollbar);
    videoLayout.setOnClickListener(this);
    musicLayout.setOnClickListener(this);
    pageview =new ArrayList<View>();
    //添加想要切換的界面
    pageview.add(view1);
    pageview.add(view2);
    //數據適配器
    PagerAdapter mPagerAdapter = new PagerAdapter(){
      @Override
      //獲取當前窗體界面數
      public int getCount() {
        // TODO Auto-generated method stub
        return pageview.size();
      }
      @Override
      //判斷是否由對象生成界面
      public boolean isViewFromObject(View arg0, Object arg1) {
        // TODO Auto-generated method stub
        return arg0==arg1;
      }
      //使從ViewGroup中移出當前View
      public void destroyItem(View arg0, int arg1, Object arg2) {
        ((ViewPager) arg0).removeView(pageview.get(arg1));
      }
      //返回一個對象,這個對象表明了PagerAdapter適配器選擇哪個對象放在當前的ViewPager中
      public Object instantiateItem(View arg0, int arg1){
        ((ViewPager)arg0).addView(pageview.get(arg1));
        return pageview.get(arg1);
      }
    };
    //綁定適配器
    viewPager.setAdapter(mPagerAdapter);
    //設置viewPager的初始界面為第一個界面
    viewPager.setCurrentItem(0);
    //添加切換界面的監聽器
    viewPager.addOnPageChangeListener(new MyOnPageChangeListener());
    // 獲取滾動條的寬度
    bmpW = BitmapFactory.decodeResource(getResources(), R.drawable.scrollbar).getWidth();
    //為了獲取屏幕寬度,新建一個DisplayMetrics對象
    DisplayMetrics displayMetrics = new DisplayMetrics();
    //將當前窗口的一些信息放在DisplayMetrics類中
    getWindowManager().getDefaultDisplay().getMetrics(displayMetrics);
    //得到屏幕的寬度
    int screenW = displayMetrics.widthPixels;
    //計算出滾動條初始的偏移量
    offset = (screenW / 2 - bmpW) / 2;
    //計算出切換一個界面時,滾動條的位移量
    one = offset * 2 + bmpW;
    Matrix matrix = new Matrix();
    matrix.postTranslate(offset, 0);
    //將滾動條的初始位置設置成與左邊界間隔一個offset
    scrollbar.setImageMatrix(matrix);
  }
  public class MyOnPageChangeListener implements ViewPager.OnPageChangeListener {
    @Override
    public void onPageSelected(int arg0) {
      Animation animation = null;
      switch (arg0) {
        case 0:
            /**
             * TranslateAnimation的四個屬性分別為
             * float fromXDelta 動畫開始的點離當前View X坐標上的差值
             * float toXDelta 動畫結束的點離當前View X坐標上的差值
             * float fromYDelta 動畫開始的點離當前View Y坐標上的差值
             * float toYDelta 動畫開始的點離當前View Y坐標上的差值
            **/
            animation = new TranslateAnimation(one, 0, 0, 0);
          break;
        case 1:
            animation = new TranslateAnimation(offset, one, 0, 0);
          break;
      }
      //arg0為切換到的頁的編碼
      currIndex = arg0;
      // 將此屬性設置為true可以使得圖片停在動畫結束時的位置
      animation.setFillAfter(true);
      //動畫持續時間,單位為毫秒
      animation.setDuration(200);
      //滾動條開始動畫
      scrollbar.startAnimation(animation);
    }
    @Override
    public void onPageScrolled(int arg0, float arg1, int arg2) {
    }
    @Override
    public void onPageScrollStateChanged(int arg0) {
    }
  }
  @Override
  public void onClick(View view){
     switch (view.getId()){
       case R.id.videoLayout:
         //點擊"視頻“時切換到第一頁
         viewPager.setCurrentItem(0);
         break;
       case R.id.musicLayout:
         //點擊“音樂”時切換的第二頁
         viewPager.setCurrentItem(1);
         break;
     }
  }
}
OK,以上便是所有的代碼,耗子君已經在代碼中注釋的非常詳細了,相信大家都能夠理解,是不是覺得很簡單呢,這麼“酷炫”的效果就這樣實現出來了,哈哈。大家要是想要多建幾個頁也可以,不過要把滑動距離什麼處理好。若大家還有疑問,可以隨時問耗子君;以上若有錯誤的地方,還請指正,大家一起學習進步!
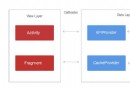 實現Android的MVP框架
內容大綱:Android 開發框架的選擇 如何一步步搭建分層框架 使用 RxJava 來解決主線程發出網絡請求的問題 結語一、Android開發框架的選擇由於原生 And
 Android自定義LinearLayout實現淘寶詳情頁
1.簡單說明淘寶詳情頁就不用我一一介紹了,昨天逛淘寶看到這個效果時,讓我想起了去年剛學習Android只會使用現成的時候,當時在網上找了一個這種效果的使用了,並不懂怎麼實
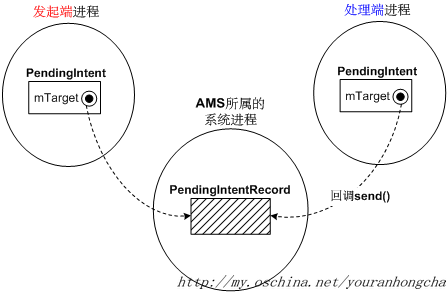 說說PendingIntent的內部機制
1 概述在Android中,我們常常使用PendingIntent來表達一種“留待日後處理”的意思。從這個角度來說,PendingIntent可以
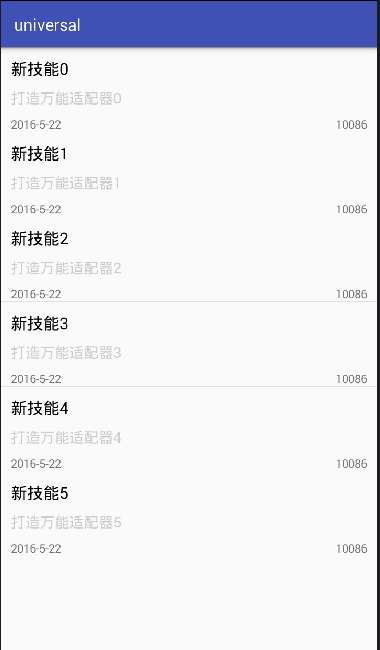 android開發筆記之適配器
大家看到這個標題是不是覺得很詫異呢?什麼叫終極適配器,其實就是這種適配器是萬能的,所有需要使用適配器的組件,都可用這一個適配器就行。既然這樣,就來講講吧。效果:當然這是個