編輯:關於Android編程
LayoutInflater.inflate源碼詳解
LayoutInflater的inflate方法相信大家都不陌生,在Fragment的onCreateView中或者在BaseAdapter的getView方法中我們都會經常用這個方法來實例化出我們需要的View.
假設我們有一個需要實例化的布局文件menu_item.xml:
<LinearLayout xmlns:android="http://schemas.android.com/apk/res/android"
  android:layout_width="match_parent"
  android:layout_height="wrap_content"
  android:orientation="vertical">

  <TextView
    android:id="@+id/id_menu_title_tv"
    android:layout_width="match_parent"
    android:layout_height="300dp"
    android:gravity="center_vertical"
    android:textColor="@android:color/black"
    android:textSize="16sp"
    android:text="@string/menu_item"/>
</LinearLayout>
我們想在BaseAdapter的getView()方法中對其進行實例化,其實例化的方法有三種,分別是:
2個參數的方法:
convertView = mInflater.inflate(R.layout.menu_item, null);
3個參數的方法(attachToRoot=false):
convertView = mInflater.inflate(R.layout.menu_item, parent, false);
3個參數的方法(attachToRoot=true):
convertView = mInflater.inflate(R.layout.menu_item, parent, true);
究竟我們應該用哪個方法進行實例化View,這3個方法又有什麼區別呢?如果有同學對三個方法的區別還不是特別清楚,那麼就和我一起從源碼的角度來分析一下這個問題吧.
源碼
inflate
我們先來看一下兩個參數的inflate方法,源碼如下:
public View inflate(@LayoutRes int resource, @Nullable ViewGroup root) {
  return inflate(resource, root, root != null);
}
從代碼我們看出,其實兩個參數的inflate方法根據父布局parent是否為null作為第三個參數來調用三個參數的inflate方法,三個參數的inflate方法源碼如下:
public View inflate(@LayoutRes int resource, @Nullable ViewGroup root, boolean attachToRoot) {
  // 獲取當前應用的資源集合
  final Resources res = getContext().getResources();
  // 獲取指定資源的xml解析器
  final XmlResourceParser parser = res.getLayout(resource);
  try {
    return inflate(parser, root, attachToRoot);
  } finally {
    // 返回View之前關閉parser資源
    parser.close();
  }
}
這裡需要解釋一下,我們傳入的資源布局id是無法直接實例化的,需要借助XmlResourceParser.
而XmlResourceParser是借助Android的pull解析方法是解析布局文件的.繼續跟蹤inflate方法源碼:
public View inflate(XmlPullParser parser, @Nullable ViewGroup root, boolean attachToRoot) {
  synchronized (mConstructorArgs) {
    // 獲取上下文對象,即LayoutInflater.from傳入的Context.
    final Context inflaterContext = mContext;
    // 根據parser構建XmlPullAttributes.
    final AttributeSet attrs = Xml.asAttributeSet(parser);
    // 保存之前的Context對象.
    Context lastContext = (Context) mConstructorArgs[0];
    // 賦值為傳入的Context對象.
    mConstructorArgs[0] = inflaterContext;
    // 注意,默認返回的是父布局root.
    View result = root;

    try {
      // 查找xml的開始標簽.
      int type;
      while ((type = parser.next()) != XmlPullParser.START_TAG &&
          type != XmlPullParser.END_DOCUMENT) {
        // Empty
      }

      // 如果沒有找到有效的開始標簽,則拋出InflateException異常.
      if (type != XmlPullParser.START_TAG) {
        throw new InflateException(parser.getPositionDescription()
            + ": No start tag found!");
      }

      // 獲取控件名稱.
      final String name = parser.getName();

      // 特殊處理merge標簽
      if (TAG_MERGE.equals(name)) {
        if (root == null || !attachToRoot) {
          throw new InflateException("<merge /> can be used only with a valid "
              + "ViewGroup root and attachToRoot=true");
        }

        rInflate(parser, root, inflaterContext, attrs, false);
      } else {
        // 實例化我們傳入的資源布局的view
        final View temp = createViewFromTag(root, name, inflaterContext, attrs);
        ViewGroup.LayoutParams params = null;

        // 如果傳入的parent不為空.
        if (root != null) {
          if (DEBUG) {
            System.out.println("Creating params from root: " +
                root);
          }
          // 創建父類型的LayoutParams參數.
          params = root.generateLayoutParams(attrs);
          if (!attachToRoot) {
            // 如果實例化的View不需要添加到父布局上,則直接將根據父布局生成的params參數設置
            // 給它即可.
            temp.setLayoutParams(params);
          }
        }

        // 遞歸的創建當前布局的所有控件
        rInflateChildren(parser, temp, attrs, true);

        // 如果傳入的父布局不為null,且attachToRoot為true,則將實例化的View加入到父布局root中
        if (root != null && attachToRoot) {
          root.addView(temp, params);
        }

        // 如果父布局為null或者attachToRoot為false,則將返回值設置成我們實例化的View
        if (root == null || !attachToRoot) {
          result = temp;
        }
      }

    } catch (XmlPullParserException e) {
      InflateException ex = new InflateException(e.getMessage());
      ex.initCause(e);
      throw ex;
    } catch (Exception e) {
      InflateException ex = new InflateException(
          parser.getPositionDescription()
              + ": " + e.getMessage());
      ex.initCause(e);
      throw ex;
    } finally {
      // Don't retain static reference on context.
      mConstructorArgs[0] = lastContext;
      mConstructorArgs[1] = null;
    }

    Trace.traceEnd(Trace.TRACE_TAG_VIEW);

    return result;
  }
}
上述代碼中的關鍵部分我已經加入了中文注釋.從上述代碼中我們還可以發現,我們傳入的布局文件是通過createViewFromTag來實例化每一個子節點的.
createViewFromTag
函數源碼如下:
/**
 * 方便調用5個參數的方法,ignoreThemeAttr的值為false.
 */
private View createViewFromTag(View parent, String name, Context context, AttributeSet attrs) {
  return createViewFromTag(parent, name, context, attrs, false);
}

View createViewFromTag(View parent, String name, Context context, AttributeSet attrs,
    boolean ignoreThemeAttr) {
  if (name.equals("view")) {
    name = attrs.getAttributeValue(null, "class");
  }

  // Apply a theme wrapper, if allowed and one is specified.
  if (!ignoreThemeAttr) {
    final TypedArray ta = context.obtainStyledAttributes(attrs, ATTRS_THEME);
    final int themeResId = ta.getResourceId(0, 0);
    if (themeResId != 0) {
      context = new ContextThemeWrapper(context, themeResId);
    }
    ta.recycle();
  }

  // 特殊處理“1995”這個標簽(ps: 平時我們寫xml布局文件時基本沒有使用過).
  if (name.equals(TAG_1995)) {
    // Let's party like it's 1995!
    return new BlinkLayout(context, attrs);
  }

  try {
    View view;
    if (mFactory2 != null) {
      view = mFactory2.onCreateView(parent, name, context, attrs);
    } else if (mFactory != null) {
      view = mFactory.onCreateView(name, context, attrs);
    } else {
      view = null;
    }

    if (view == null && mPrivateFactory != null) {
      view = mPrivateFactory.onCreateView(parent, name, context, attrs);
    }

    if (view == null) {
      final Object lastContext = mConstructorArgs[0];
      mConstructorArgs[0] = context;
      try {
        if (-1 == name.indexOf('.')) {
          view = onCreateView(parent, name, attrs);
        } else {
          view = createView(name, null, attrs);
        }
      } finally {
        mConstructorArgs[0] = lastContext;
      }
    }

    return view;
  } catch (InflateException e) {
    throw e;

  } catch (ClassNotFoundException e) {
    final InflateException ie = new InflateException(attrs.getPositionDescription()
        + ": Error inflating class " + name);
    ie.initCause(e);
    throw ie;

  } catch (Exception e) {
    final InflateException ie = new InflateException(attrs.getPositionDescription()
        + ": Error inflating class " + name);
    ie.initCause(e);
    throw ie;
  }
}
在createViewFromTag方法中,最終是通過createView方法利用反射來實例化view控件的.
createView
public final View createView(String name, String prefix, AttributeSet attrs)
  throws ClassNotFoundException, InflateException {
  // 以View的name為key, 查詢構造函數的緩存map中是否已經存在該View的構造函數.
  Constructor<? extends View> constructor = sConstructorMap.get(name);
  Class<? extends View> clazz = null;

  try {
    // 構造函數在緩存中未命中
    if (constructor == null) {
      // 通過類名去加載控件的字節碼
      clazz = mContext.getClassLoader().loadClass(prefix != null ? (prefix + name) : name).asSubClass(View.class);
      // 如果有自定義的過濾器並且加載到字節碼,則通過過濾器判斷是否允許加載該View
      if (mFilter != null && clazz != null) {
        boolean allowed = mFilter.onLoadClass(clazz);
        if (!allowed) {
          failNotAllowed(name, prefix, attrs);
        }
      }
      // 得到構造函數
      constructor = clazz.getConstructor(mConstructorSignature);
      constructor.setAccessible(true);
      // 緩存構造函數
      sConstructorMap.put(name, constructor);
    } else {
      if (mFilter != null) {
        // 過濾的map是否包含了此類名
        Boolean allowedState = mFilterMap.get(name);
        if (allowedState == null) {
          // 重新加載類的字節碼
          clazz = mContext.getClassLoader().loadClass(prefix != null ? (prefix + name) : name).asSubclass(View.class);
          boolean allowed = clazz != null && mFilter.onLoadClass(clazz);
          mFilterMap.put(name, allowed);
          if (!allowed) {
            failNotAllowed(name, prefix, attrs);
          }
        } else if (allowedState.equals(Boolean.FALSE)) {
          failNotAllowed(name, prefix, attrs);
        }
      }
    }

    // 實例化類的參數數組(mConstructorArgs[0]為Context, [1]為View的屬性)
    Object[] args = mConstructorArgs;
    args[1] = attrs;
    // 通過構造函數實例化View
    final View view = constructor.newInstance(args);
    if (View instanceof ViewStub) {
      final ViewStub viewStub = (ViewStub) view;
      viewStub.setLayoutInflater(cloneInContext((Context)args[0]))
    }
    return view;
  } catch (NoSunchMethodException e) {
    // ......
  } catch (ClassNotFoundException e) {
    // ......
  } catch (Exception e) {
    // ......
  } finally {
    // ......
  }
}
總結
通過學習了inflate函數源碼,我們再回過頭去看BaseAdapter的那三種方法,我們可以得出的結論是:
第一種方法使用不夠規范, 且會導致實例化View的LayoutParams屬性失效.(ps: 即layout_width和layout_height等參數失效, 因為源碼中這種情況的LayoutParams為null).
第二種是最正確,也是最標准的寫法.
第三種由於attachToRoot為true,所以返回的View其實是父布局ListView,這顯然不是我們想要實例化的View.因此,第三種寫法是錯誤的.
感謝閱讀,希望能幫助到大家,謝謝大家對本站的支持!
 Android學會屬性動畫的基本用法(中)ValueAnimator與ObjectAnimator用法
ValueAnimator的高級用法在上篇文章中介紹補間動畫缺點的時候有提到過,補間動畫是只能對View對象進行動畫操作的。而屬性動畫就不再受這個限制,它可以對任意對象進
 Android實現listview滑動時漸隱漸現頂部欄實例代碼
我在開發的時候遇到了這樣的需求,就是在listview的滑動中,需要對頂部的欄目由透明慢慢的變為不透明的狀態,就是以下的效果最先開始的時候想的很簡單,無非就是監聽list
 Android編程使用Fragment界面向下跳轉並一級級返回的實現方法
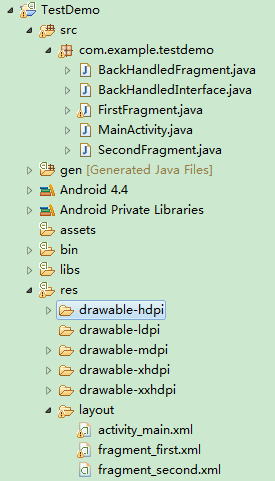
本文實例講述了Android編程使用Fragment界面向下跳轉並一級級返回的實現方法。分享給大家供大家參考,具體如下:1.首先貼上項目結構圖:2.先添加一個接口文件Ba
 Android應用中繪制圓形頭像的方法解析
要畫這種圓形帶陰影的頭像,個人分解成三個圖層1,先畫頭像邊緣的漸變RadialGradient gradient = new RadialGradient(j/2,k/2