編輯:關於Android編程
Android程序中,Tab標簽窗口是一種常用的UI界面元素。它的實現主要是利用了TabHost類。
TabHost說明
TabHost是一個標簽窗口的容器。
一個TabHost對象包含兩個子元素對象:
一個對象是tab標簽集合(TabWidget),用戶點擊它們來選擇一個特定的標簽;
另一個是FrameLayout對象,展示當前頁的內容。
子元素通常是通過容器對象來控制,而不是直接設置子元素的值。
下面結合ApiDemos中的例子來說明TabHost的用法。
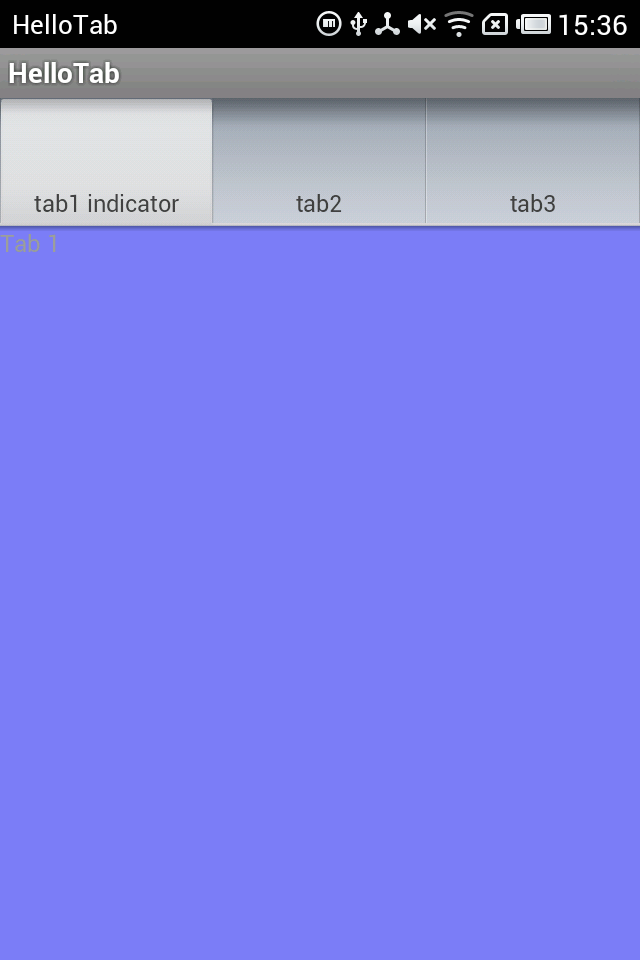
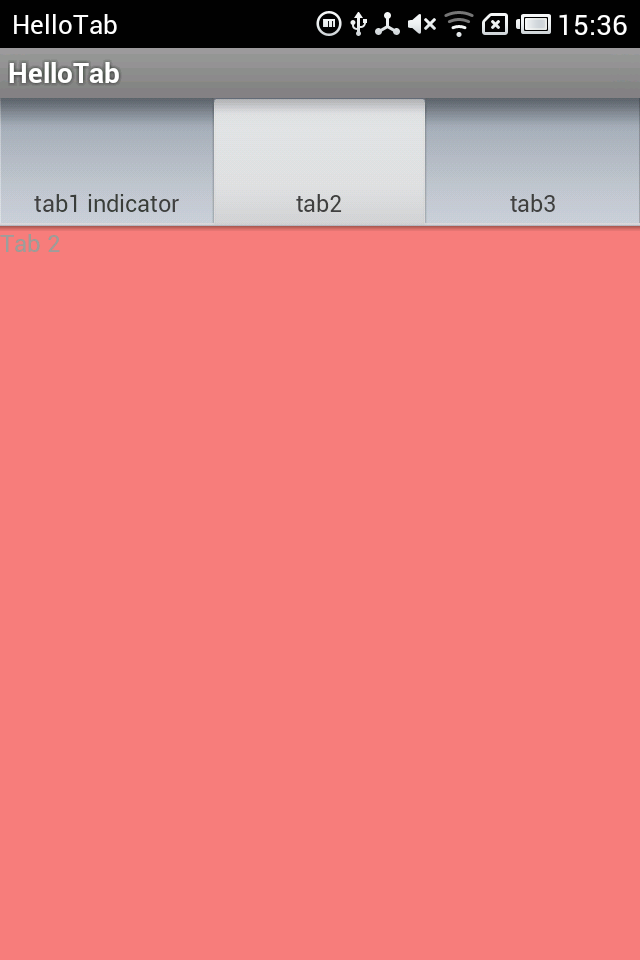
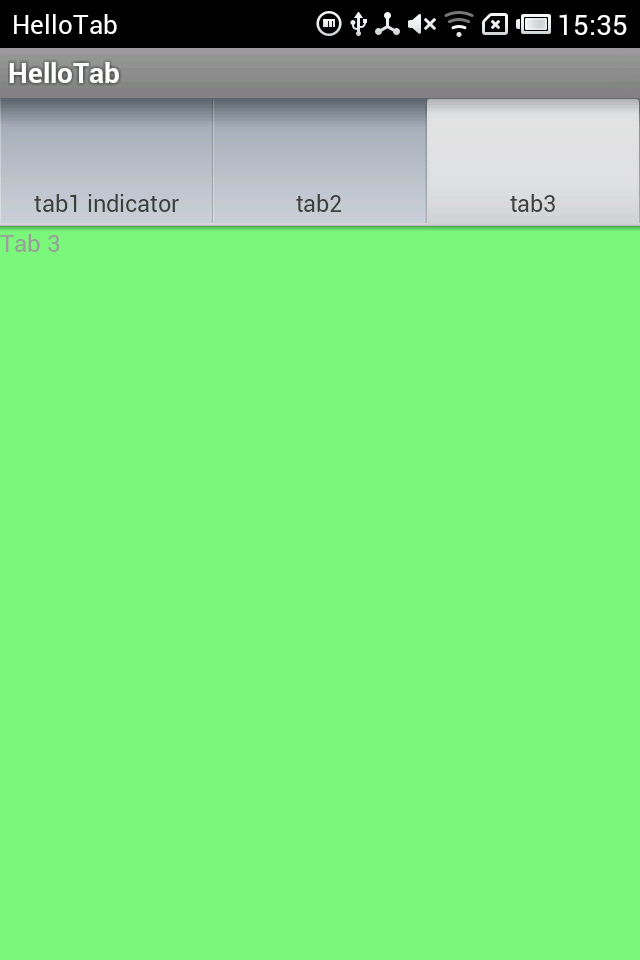
第一個Tab例子:使用TabActivity
這個例子使用了 TabActivity。
Java程序代碼:
package com.meng.hellotab;

import android.os.Bundle;
import android.view.LayoutInflater;
import android.widget.TabHost;
import android.app.TabActivity;

@SuppressWarnings("deprecation")
public class HelloTabActivity extends TabActivity
{

  @Override
  protected void onCreate(Bundle savedInstanceState)
  {
    super.onCreate(savedInstanceState);

    // 得到TabActivity中的TabHost對象
    TabHost tabHost = getTabHost();

    // 內容:采用布局文件中的布局
    LayoutInflater.from(this).inflate(R.layout.activity_hello_tab,
        tabHost.getTabContentView(), true);

    // 加上標簽
    // 參數設置:新增的TabSpec的標簽,標簽中顯示的字樣
    // setContent設置內容對應的View資源標號
    tabHost.addTab(tabHost.newTabSpec("tab1")
        .setIndicator("tab1 indicator").setContent(R.id.view1));
    tabHost.addTab(tabHost.newTabSpec("tab3").setIndicator("tab2")
        .setContent(R.id.view2));
    tabHost.addTab(tabHost.newTabSpec("tab3").setIndicator("tab3")
        .setContent(R.id.view3));
  }

}
其中布局文件如下:
布局文件1
布局文件1

<?xml version="1.0" encoding="utf-8"?>
<FrameLayout xmlns:android="http://schemas.android.com/apk/res/android"
  android:layout_width="match_parent"
  android:layout_height="match_parent" >

  <TextView
    android:id="@+id/view1"
    android:layout_width="match_parent"
    android:layout_height="match_parent"
    android:background="@drawable/blue"
    android:text="@string/tab1" />

  <TextView
    android:id="@+id/view2"
    android:layout_width="match_parent"
    android:layout_height="match_parent"
    android:background="@drawable/red"

    android:text="@string/tab2" />

  <TextView
    android:id="@+id/view3"
    android:layout_width="match_parent"
    android:layout_height="match_parent"
    android:background="@drawable/green"
    android:text="@string/tab3" />

</FrameLayout>
布局文件中的顏色字符串如下:文本字符串略。
colors.xml

<?xml version="1.0" encoding="utf-8"?>
<resources>

  <drawable name="red">#7f00</drawable>
  <drawable name="blue">#770000ff</drawable>
  <drawable name="green">#7700ff00</drawable>
  <drawable name="yellow">#77ffff00</drawable>
  <drawable name="screen_background_black">#ff000000</drawable>
  <drawable name="translucent_background">#e0000000</drawable>
  <drawable name="transparent_background">#00000000</drawable>

  <color name="solid_red">#f00</color>
  <color name="solid_blue">#0000ff</color>
  <color name="solid_green">#f0f0</color>
  <color name="solid_yellow">#ffffff00</color>

</resources>
運行截圖:
注意 TabActivity這個類已經被標注為:This class was deprecated in API level 13。
第二個程序:使用TabHost.TabContentFactory
TabHost.TabContentFactory這個接口是用來在tab被選擇時自己創建內容,而不是顯示一個已經存在的view或者啟動一個activity,這兩種要用其他的方法。
具體實現見代碼:
package com.meng.hellotab;
import android.os.Bundle;
import android.view.LayoutInflater;
import android.view.View;
import android.widget.TabHost;
import android.widget.TextView;
import android.app.TabActivity;
@SuppressWarnings("deprecation")
public class HelloTabActivity extends TabActivity implements
TabHost.TabContentFactory
{
@Override
protected void onCreate(Bundle savedInstanceState)
{
super.onCreate(savedInstanceState);
TabHost tabHost = getTabHost();
// 不再需要載入布局文件,如果此句不注釋掉會導致content的重疊
// LayoutInflater.from(this).inflate(R.layout.activity_hello_tab,
// tabHost.getTabContentView(), true);
// setContent中傳遞this
tabHost.addTab(tabHost.newTabSpec("tab1")
.setIndicator("tab1 indicator").setContent(this));
tabHost.addTab(tabHost.newTabSpec("tab3").setIndicator("tab2")
.setContent(this));
tabHost.addTab(tabHost.newTabSpec("tab3").setIndicator("tab3")
.setContent(this));
}
// setContent的參數設為this時,從這個方法得到每一個Tab的內容(此次不用布局文件,用的話會重疊)
@Override
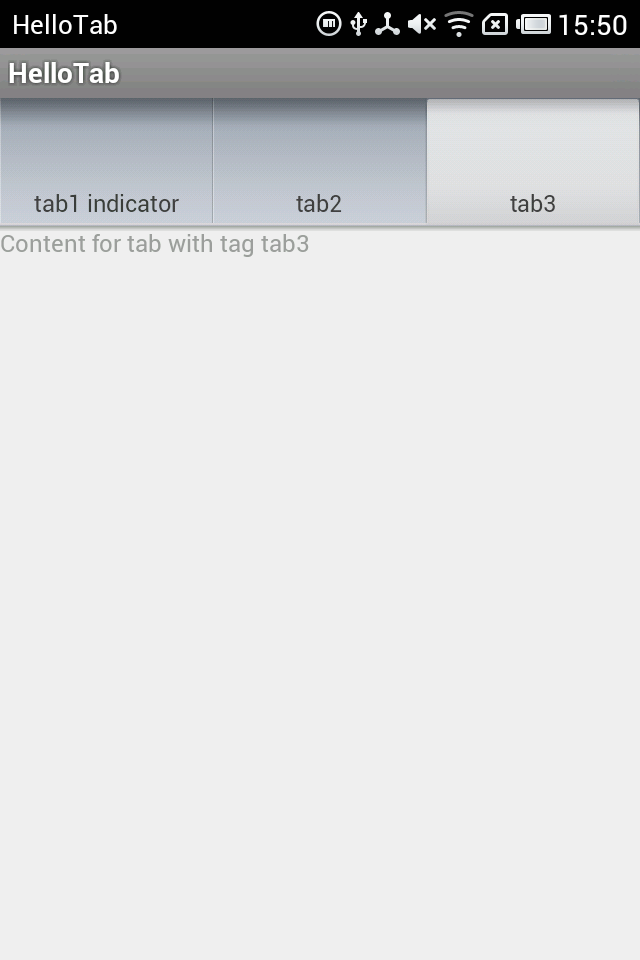
public View createTabContent(String tag)
{
// 參數: 這個方法會接受到被選擇的tag的標簽
final TextView tv = new TextView(this);
tv.setText("Content for tab with tag " + tag);
return tv;
}
}
程序運行截圖:
另外,Tab的content的內容還可以啟動另一個Activity,只要在setContent方法中傳入一個Intent即可。
此部分不再介紹,可以參見ApiDemos中的Tabs3.java代碼。
第三個程序:不繼承TabActivity
前面兩個程序例子中都是繼承了TabActivity類,如果不繼承它,需要自己寫TabHost的布局,其中包含了兩個必要的子元素:TabWidget和FrameLayout,其id都是固定值,見代碼。
布局文件代碼:
<?xml version="1.0" encoding="utf-8"?>
<LinearLayout xmlns:android="http://schemas.android.com/apk/res/android"
  android:layout_width="match_parent"
  android:layout_height="match_parent"
  android:orientation="vertical" >

  <TextView
    android:layout_width="wrap_content"
    android:layout_height="wrap_content"
    android:text="@string/hello_world" />

  <!-- TabHost必須包含一個 TabWidget和一個FrameLayout -->

  <TabHost
    android:id="@+id/myTabHost"
    android:layout_width="match_parent"
    android:layout_height="match_parent" >

    <LinearLayout
      android:layout_width="fill_parent"
      android:layout_height="fill_parent"
      android:orientation="vertical" >

      <!-- TabWidget的id屬性必須為 @android:id/tabs -->

      <TabWidget
        android:id="@android:id/tabs"
        android:layout_width="match_parent"
        android:layout_height="wrap_content"
        android:layout_weight="0"
        android:orientation="horizontal" />

      <!-- FrameLayout的id屬性必須為 @android:id/tabcontent -->

      <FrameLayout
        android:id="@android:id/tabcontent"
        android:layout_width="match_parent"
        android:layout_height="match_parent"
        android:layout_weight="0" >

        <TextView
          android:id="@+id/view1"
          android:layout_width="match_parent"
          android:layout_height="match_parent"
          android:text="Tab1 Content" />

        <TextView
          android:id="@+id/view2"
          android:layout_width="match_parent"
          android:layout_height="match_parent"
          android:text="Tab2 Content" />

        <TextView
          android:id="@+id/view3"
          android:layout_width="match_parent"
          android:layout_height="match_parent"
          android:text="Tab3 Content" />
      </FrameLayout>
    </LinearLayout>
  </TabHost>

</LinearLayout>
Activity代碼:
package com.meng.hellotabhost;

import android.os.Bundle;
import android.app.Activity;
import android.view.Menu;
import android.widget.TabHost;

public class HelloTabHostActivity extends Activity
{

  @Override
  protected void onCreate(Bundle savedInstanceState)
  {
    super.onCreate(savedInstanceState);
    setContentView(R.layout.activity_hello_tab_host);

    TabHost tabHost = (TabHost) findViewById(R.id.myTabHost);

    // 如果不是繼承TabActivity,則必須在得到tabHost之後,添加標簽之前調用tabHost.setup()
    tabHost.setup();

    // 這裡content的設置采用了布局文件中的view
    tabHost.addTab(tabHost.newTabSpec("tab1")
        .setIndicator("tab1 indicator").setContent(R.id.view1));
    tabHost.addTab(tabHost.newTabSpec("tab3").setIndicator("tab2")
        .setContent(R.id.view2));
    tabHost.addTab(tabHost.newTabSpec("tab3").setIndicator("tab3")
        .setContent(R.id.view3));
  }

}
這種方式可以實現比較靈活的布局,可以方便地加入其他組件,還可以改變標簽欄和內容欄的相對位置。
第四個程序:scrolling Tab
當標簽太多時,需要把標簽設置進一個ScrollView中進行滾動。有了上面的程序做基礎,這個很好理解。
ApiDemos中給出的仍然是繼承TabActivity的方法,在這裡給出另一種不用繼承TabActivity的方法,兩種方法很類似。
布局文件:
<?xml version="1.0" encoding="utf-8"?>
<LinearLayout xmlns:android="http://schemas.android.com/apk/res/android"
  android:layout_width="match_parent"
  android:layout_height="match_parent"
  android:orientation="vertical" >

  <TabHost
    android:id="@+id/myTabHost"
    android:layout_width="match_parent"
    android:layout_height="match_parent" >

    <LinearLayout
      android:layout_width="match_parent"
      android:layout_height="match_parent"
      android:orientation="vertical"
      android:padding="5dp" >

      <HorizontalScrollView
        android:layout_width="match_parent"
        android:layout_height="wrap_content"
        android:scrollbars="none" >

        <TabWidget

          android:id="@android:id/tabs"
          android:layout_width="wrap_content"
          android:layout_height="wrap_content" />
      </HorizontalScrollView>

      <FrameLayout
        android:id="@android:id/tabcontent"
        android:layout_width="match_parent"
        android:layout_height="match_parent"
        android:padding="5dp" />
    </LinearLayout>
  </TabHost>

</LinearLayout>
Java代碼:
package com.meng.hellotabscroll;

import android.os.Bundle;
import android.app.Activity;
import android.view.View;
import android.widget.TabHost;
import android.widget.TextView;

public class HelloTabScrollActivity extends Activity implements
    TabHost.TabContentFactory
{

  @Override
  protected void onCreate(Bundle savedInstanceState)
  {
    super.onCreate(savedInstanceState);
    setContentView(R.layout.activity_hello_tab_scroll);

    // 從布局中獲取TabHost並建立
    TabHost tabHost = (TabHost) findViewById(R.id.myTabHost);
    tabHost.setup();

    // 加上30個標簽
    for (int i = 1; i <= 30; i++)
    {
      String name = "Tab " + i;
      tabHost.addTab(tabHost.newTabSpec(name).setIndicator(name)
          .setContent(this));
    }

  }

  @Override
  public View createTabContent(String tag)
  {
    final TextView tv = new TextView(this);
    tv.setText("Content for tab with tag " + tag);
    return tv;
  }

}
以上就是本文的全部內容,希望對大家的學習有所幫助,也希望大家多多支持本站。
 Android模擬登錄評論CSDN實現代碼
有時候作為非官方開發的APP集成了官方的所有信息,但是現在需要實現另一個功能那就是登錄發表評論到官方的網站,而非官方的APP並不知道官方網站是怎麼實現登錄與評論的,而且越
 Android開發Tips
介紹一些, 在Android開發中, 會經常使用的小知識點.1. Download文件夾絕對路徑/storage/emulated/0/Download/xxx遍歷
 Android Facebook和Twitter登錄和分享完整版
最近公司的軟件需要改國際版,需要Facebook和Twitter的登錄和分享。本人先用Umeng的第三方社會化分享實現了該功能,但是後來一想問題來了,經過查證。Umeng
 Android基於訊飛語音SDK實現語音識別
一、准備工作1、你需要android手機應用開發基礎2、科大訊飛語音識別SDK android版3、科大訊飛語音識別開發API文檔4、android手機關於科大訊飛SDK