編輯:關於Android編程
android Notification實例詳解
1.使用Builder模式來創建
2.必須要設置一個smallIcon,還可以設置setTicker
3.可以設置 setContentTitle,setContentInfo,setContentText,setWhen
4.可以設置setDefaults(閃屏,聲音,震動),通過Notification設置flags(能不能被清除)
5.發送需要獲取一個NotificationManager(getSystemService來獲取);notify(int id,Notification)
6.清除 manager.cancelAll(清除所有) cancal(int id); 如果需要16一下的api也能訪問,需要導入v4包,使用notificationCompat兼容類。
自定義通知
使用RemoteViews來建立一個布局,然後使用setContent()設置;
點擊事件使用PendingIntent來完成
下面是一個案例


MainActivity類
public class MainActivity extends Activity {

  @Override
  protected void onCreate(Bundle savedInstanceState) {
    super.onCreate(savedInstanceState);
    setContentView(R.layout.activity_main);

  }

  public void clearNotification(View v) {
    // 通過代碼來清除 NO_CLEAR
    // 清除也需要manager
    NotificationManager manager = (NotificationManager) getSystemService(NOTIFICATION_SERVICE);
    // 只能清除由本應用程序發出去的通知
    manager.cancelAll();
  }

  public void sendNotification(View v) {
    // 他是 在v4包中的通知,用於16以下版本發送通知
    // NotificationCompat
    // 通知的創建
    Notification.Builder builder = new Notification.Builder(this);
    // NotificationCompat.Builder builder2 = new NotificationCompat.Builder(
    // this);
    // 顯示在通知條上的圖標 必須的
    builder.setSmallIcon(R.drawable.ic_launcher);
    // 顯示通知條上的文字 不是必須的
    builder.setTicker("您有一條新的消息!!");

    // 狀態欄中的
    builder.setContentTitle("大標題");
    builder.setContentText("文本");
    builder.setWhen(System.currentTimeMillis());
    builder.setContentInfo("Info");
    builder.setDefaults(Notification.DEFAULT_ALL);
    // 點擊事件使用Pending
    Intent intent = new Intent(this, MainActivity.class);
    PendingIntent pi = PendingIntent.getActivity(this, 1, intent,
        PendingIntent.FLAG_UPDATE_CURRENT);
    builder.setContentIntent(pi);
    // 生成對象 16API以上,支持低版本需要使用v4包中的notificationCompat
    Notification notify = builder.build();
    // 設置不能清除
    notify.flags = Notification.FLAG_NO_CLEAR;

    // 如何將通知發送出去
    NotificationManager mananger = (NotificationManager) getSystemService(NOTIFICATION_SERVICE);
    // 通知的唯一值,如果id重復,表明是更新一條通知,而不是新建
    mananger.notify((int) (Math.random() * 1000), notify);
  }

  public void diyNotification(View v) {
    // 展示在通知上面的視圖
    RemoteViews views = new RemoteViews(getPackageName(), R.layout.layout);
    Notification notification = new Notification.Builder(this)
        .setSmallIcon(R.drawable.ic_launcher).setTicker("自定義通知 ")
        // 布局
        .setContent(views).build();
    // 使用RemoteViews來設置點擊事件
    views.setTextColor(R.id.tv, Color.RED);
    Intent intent = new Intent(this, OneActivity.class);
    // 音樂播放是放在Service
    PendingIntent pi = PendingIntent.getActivity(this, 2, intent,
        PendingIntent.FLAG_UPDATE_CURRENT);
    views.setOnClickPendingIntent(R.id.tv, pi);

    Intent intent2 = new Intent(this, MainActivity.class);

    PendingIntent pi2 = PendingIntent.getActivity(this, 1, intent2,
        PendingIntent.FLAG_UPDATE_CURRENT);
    views.setOnClickPendingIntent(R.id.iv, pi2);
    // 發送
    NotificationManager notify = (NotificationManager) getSystemService(NOTIFICATION_SERVICE);
    notify.notify(1, notification);

  }

}
OneActivity類
public class OneActivity extends Activity {

  @Override
  protected void onCreate(Bundle savedInstanceState) {
    super.onCreate(savedInstanceState);
    TextView tv = new TextView(this);
    tv.setText("跳轉界面");
    setContentView(tv);
  }
}
activity.main.xml
<LinearLayout xmlns:android="http://schemas.android.com/apk/res/android"
  xmlns:tools="http://schemas.android.com/tools"
  android:layout_width="match_parent"
  android:layout_height="match_parent"
  android:orientation="vertical"
  tools:context="com.example.lesson8_notification.MainActivity" >

  <Button
    android:layout_width="wrap_content"
    android:layout_height="wrap_content"
    android:onClick="sendNotification"
    android:text="普通的通知" />

  <Button
    android:layout_width="wrap_content"
    android:layout_height="wrap_content"
    android:onClick="clearNotification"
    android:text="清除所有通知" />

  <Button
    android:layout_width="wrap_content"
    android:layout_height="wrap_content"
    android:onClick="diyNotification"
    android:text="自定義通知" />

</LinearLayout>
layout.xml
<?xml version="1.0" encoding="utf-8"?>
<LinearLayout xmlns:android="http://schemas.android.com/apk/res/android"
  android:layout_width="match_parent"
  android:layout_height="match_parent"
  android:orientation="vertical" >

  <TextView
    android:id="@+id/tv"
    android:layout_width="wrap_content"
    android:layout_height="wrap_content"
    android:text="TextView" />

  <ImageView
    android:id="@+id/iv"
    android:layout_width="wrap_content"
    android:layout_height="wrap_content"
    android:src="@drawable/ic_launcher" />

</LinearLayout>
最後記得注冊activity
感謝閱讀,希望能幫助到大家,謝謝大家對本站的支持!
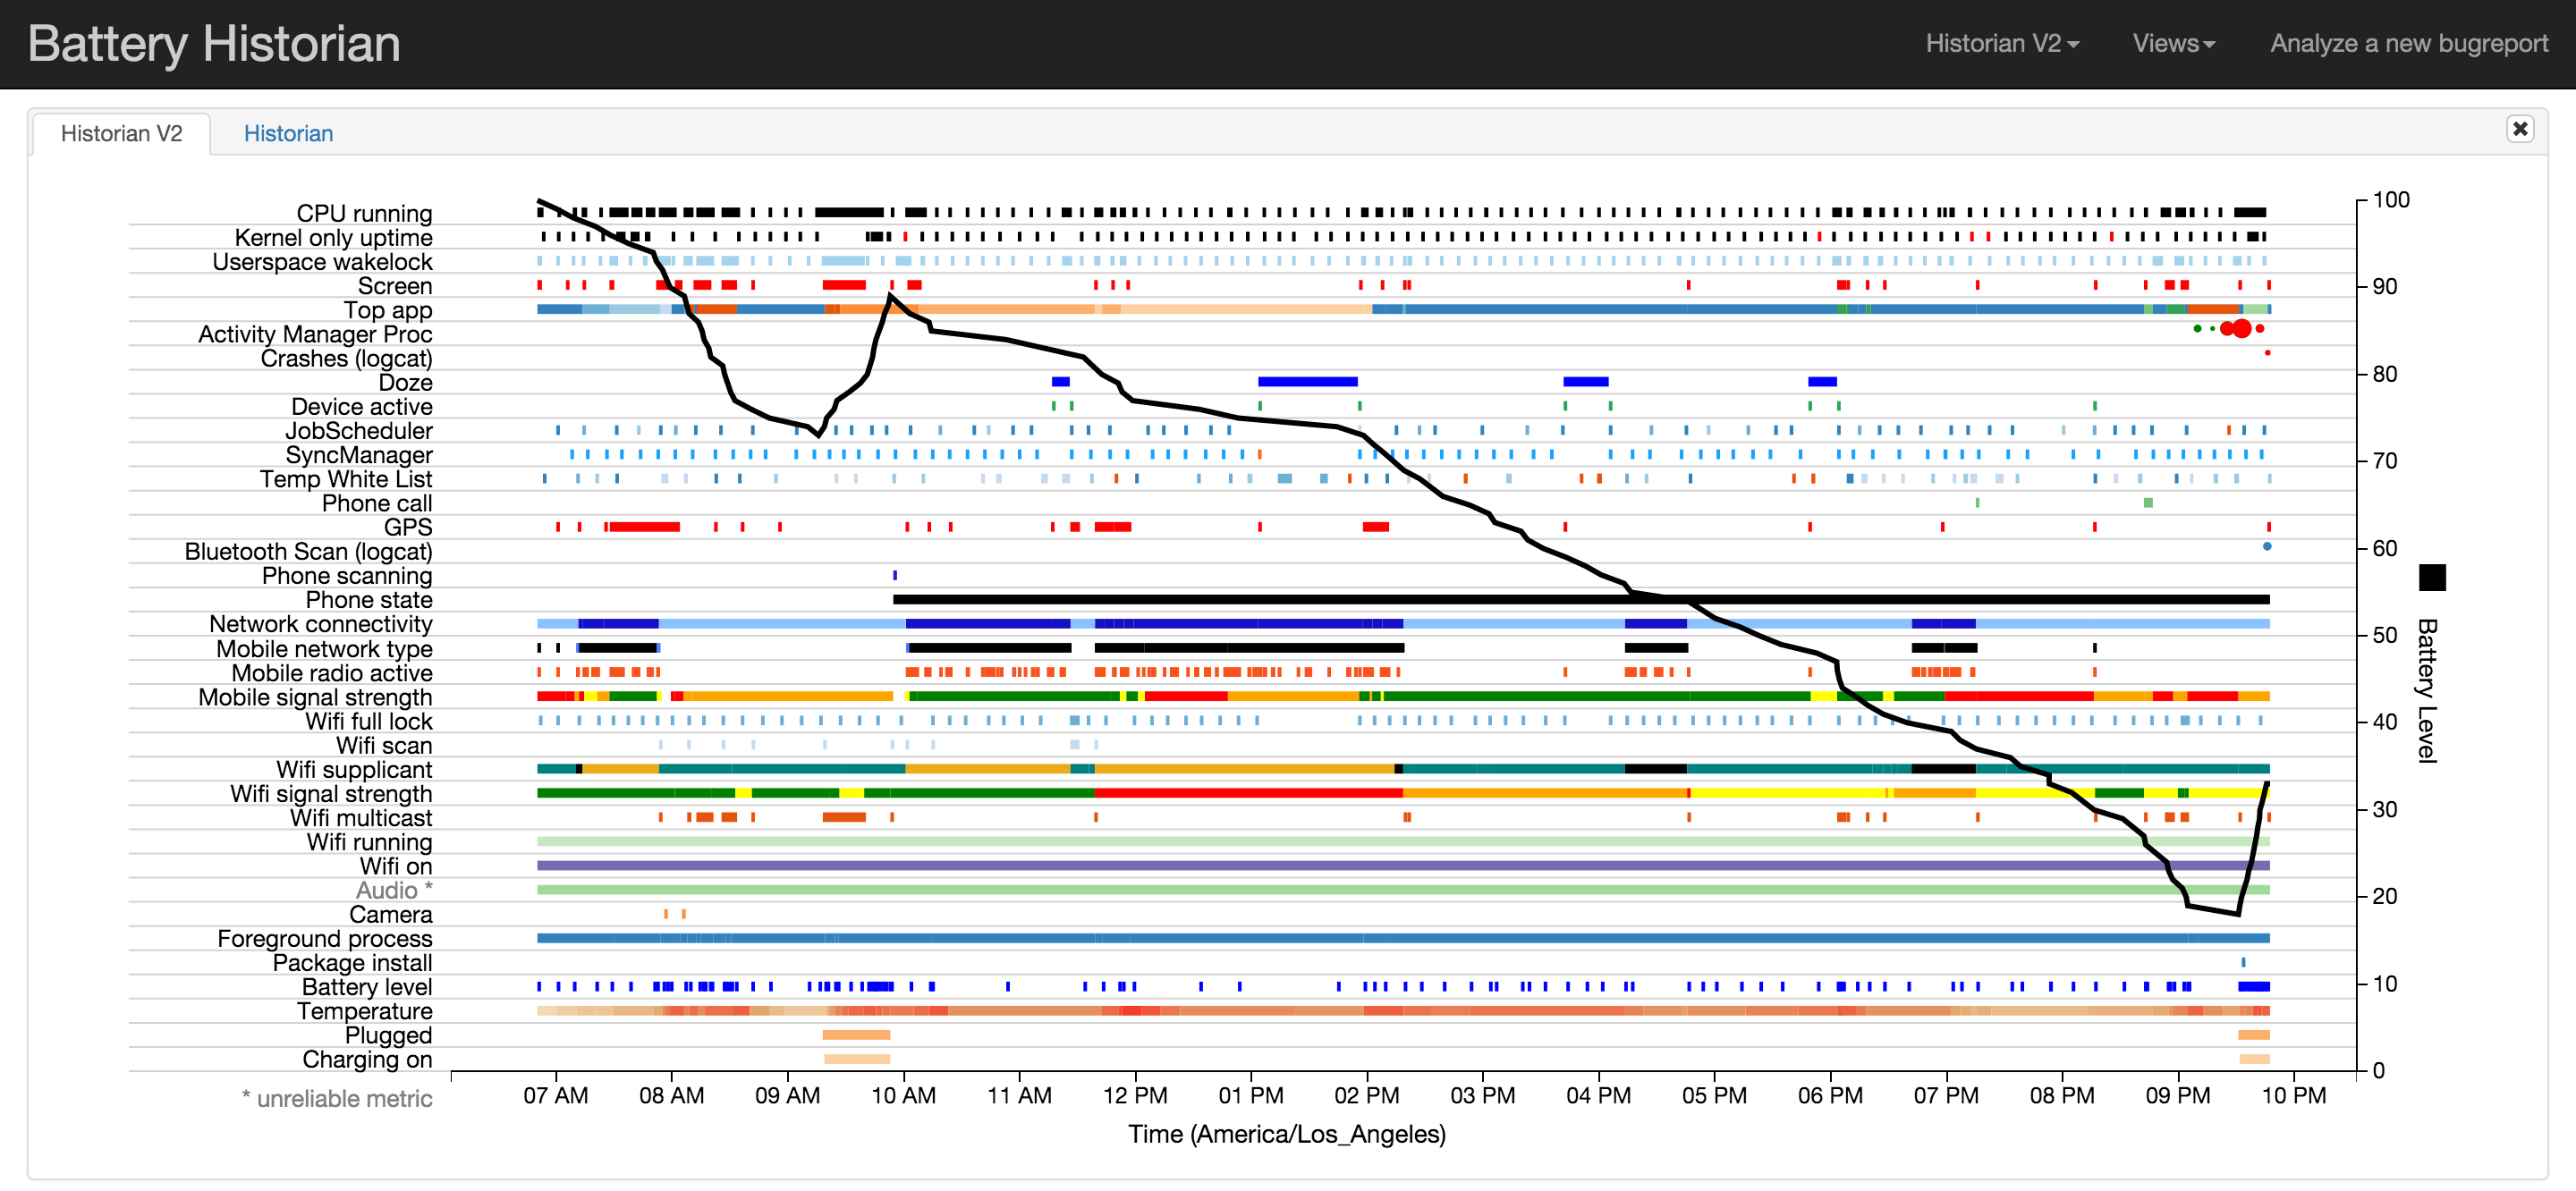 Android adb bugreport工具分析和使用
bugreport是什麼,怎麼用?Android系統想要成為一個功能完備,生態繁榮的操作系統,那就必須提供完整的應用開發環境。而在應用開發中,app程序的調試分析是日常生
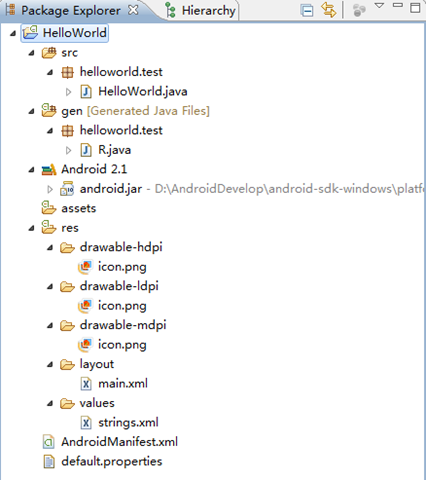 Android編程入門之HelloWorld項目目錄結構分析
本文實例講述了Android編程入門之HelloWorld項目目錄結構。分享給大家供大家參考,具體如下:我們介紹了如何搭建Android開發環境及簡單地建立一個Hello
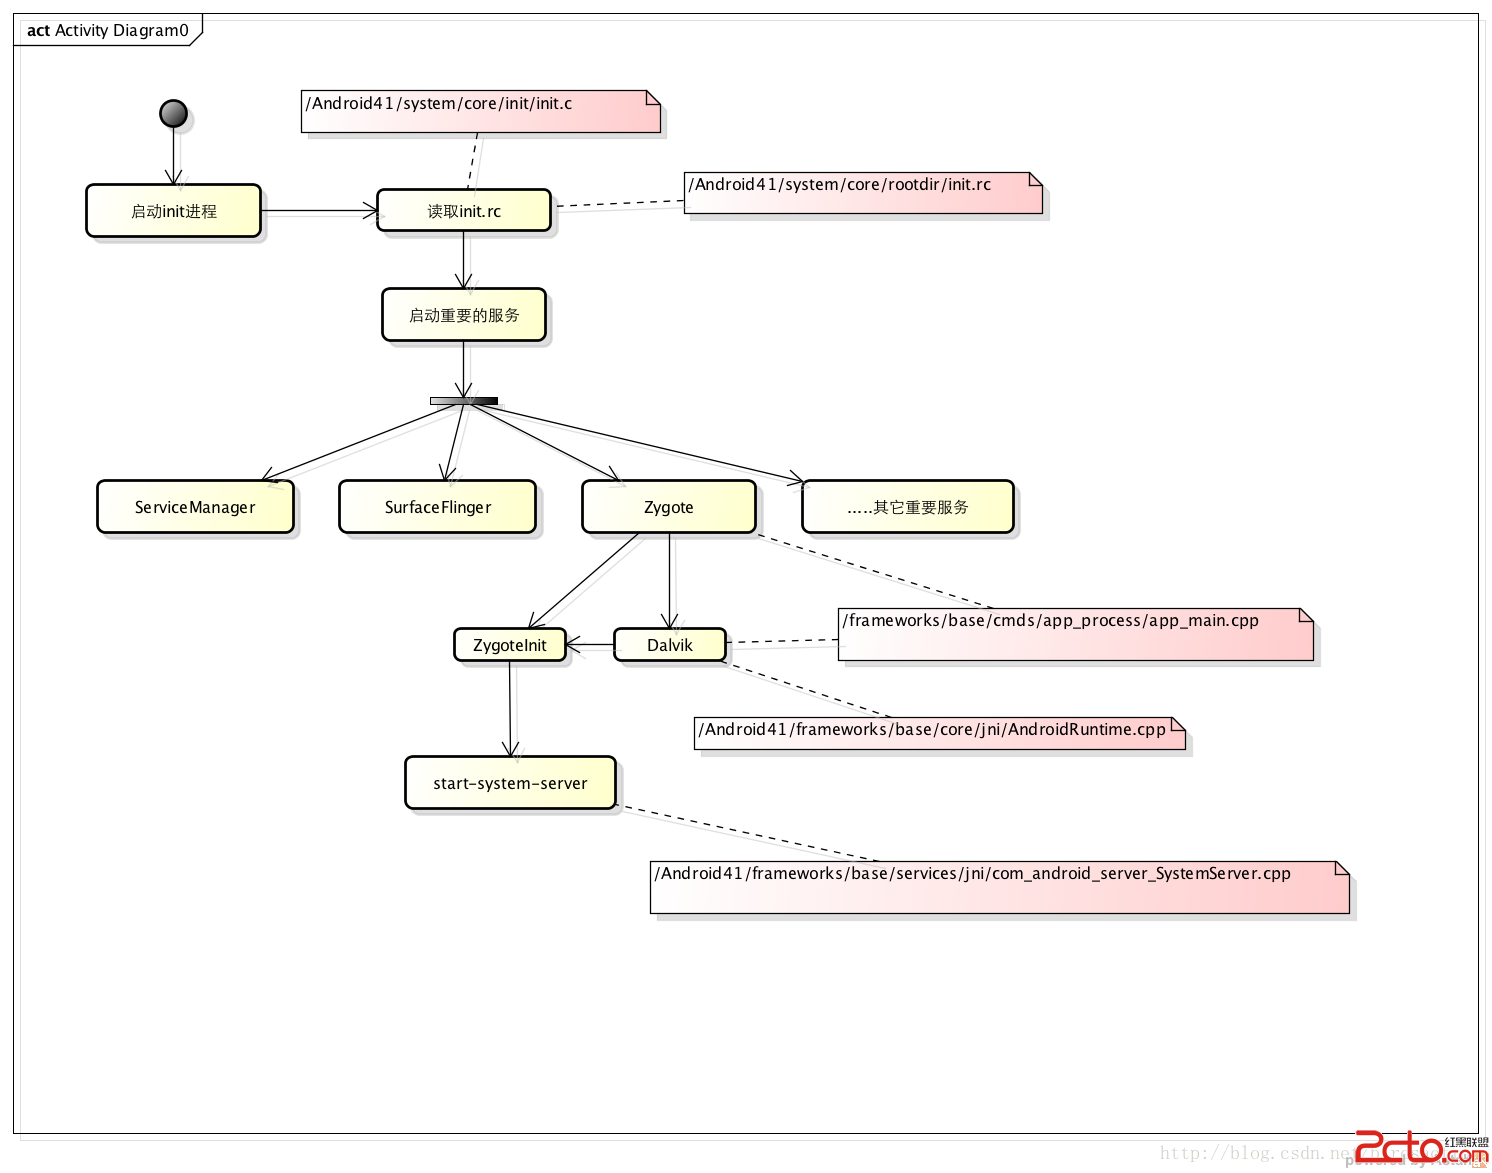 Android系統啟動研究1
Android系統較為龐大,要搞清楚系統運行原理需要長期努力。系統啟動部分看了幾遍但沒有總結,今天簡單總結一下。 Android首先重點是啟動zygote進程,這個進程來
 WebService理解和代碼解析
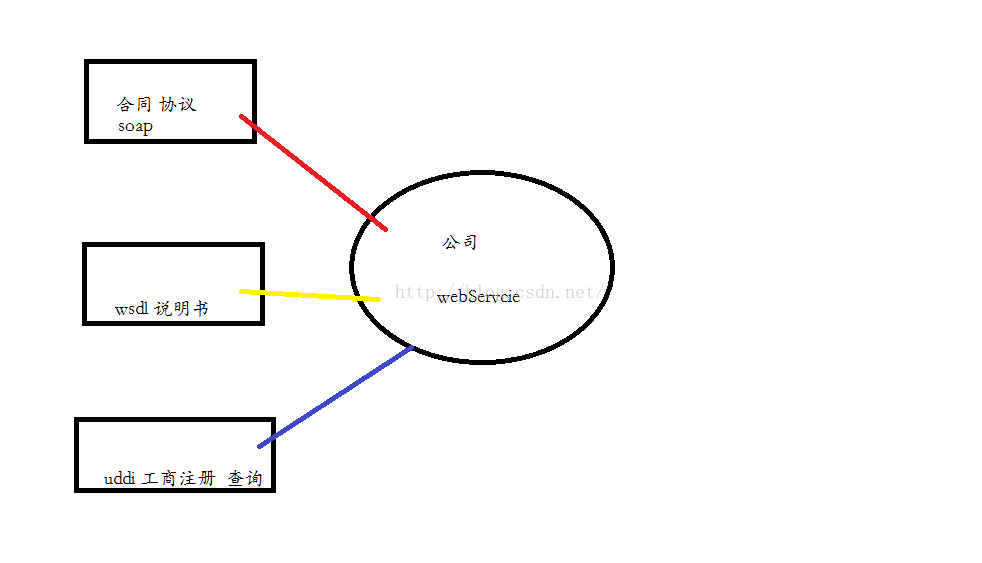
/** WebServcie 概念 多個系統數據交換: 跨平台語言的相互通信; 如:java 的客戶端 和dotnet的服務器端的接口調用: 得到接口和方法 : 基於