編輯:關於Android編程
前言
在H5火熱的時代,許多框架都出了底部彈窗的控件,在H5被稱為彈出菜單ActionSheet,今天我們也來模仿一個ios的底部彈窗,取材於蘋果QQ的選擇頭像功能。
正文
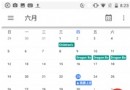
廢話不多說,先來個今天要實現的效果圖

整個PopupWindow的開啟代碼
private void openPopupWindow(View v) {
  //防止重復按按鈕
  if (popupWindow != null && popupWindow.isShowing()) {
    return;
  }
  //設置PopupWindow的View
  View view = LayoutInflater.from(this).inflate(R.layout.view_popupwindow, null);
  popupWindow = new PopupWindow(view, RelativeLayout.LayoutParams.MATCH_PARENT,
      RelativeLayout.LayoutParams.WRAP_CONTENT);
  //設置背景,這個沒什麼效果,不添加會報錯
  popupWindow.setBackgroundDrawable(new BitmapDrawable());
  //設置點擊彈窗外隱藏自身
  popupWindow.setFocusable(true);
  popupWindow.setOutsideTouchable(true);
  //設置動畫
  popupWindow.setAnimationStyle(R.style.PopupWindow);
  //設置位置
  popupWindow.showAtLocation(v, Gravity.BOTTOM, 0, navigationHeight);
  //設置消失監聽
  popupWindow.setOnDismissListener(this);
  //設置PopupWindow的View點擊事件
  setOnPopupViewClick(view);
  //設置背景色
  setBackgroundAlpha(0.5f);
}
步驟分析:
PopupWindow的布局
PopupWindow的創建
PopupWindow添加動畫效果
PopupWindow設置背景陰影
PopupWindow監聽點擊事件
獲取NavigationBar的高度
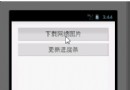
PopupWindow的布局:在Layout中,設計我們需要的布局
<?xml version="1.0" encoding="utf-8"?>
<LinearLayout xmlns:android="http://schemas.android.com/apk/res/android" android:layout_width="match_parent" android:layout_height="wrap_content" android:orientation="vertical">

  <LinearLayout android:layout_width="match_parent" android:layout_height="wrap_content" android:layout_margin="8dp" android:background="@drawable/popup_shape" android:orientation="vertical">

    <TextView android:layout_width="match_parent" android:layout_height="wrap_content" android:gravity="center" android:padding="16dp" android:text="你可以將照片上傳至照片牆" android:textColor="#666" android:textSize="14sp" />

    <View android:layout_width="match_parent" android:layout_height="0.1px" android:background="#888" />

    <TextView android:id="@+id/tv_pick_phone" android:layout_width="match_parent" android:layout_height="wrap_content" android:gravity="center" android:padding="16dp" android:text="從手機相冊選擇" android:textColor="#118" android:textSize="18sp" />

    <View android:layout_width="match_parent" android:layout_height="0.1px" android:background="#888" />

    <TextView android:id="@+id/tv_pick_zone" android:layout_width="match_parent" android:layout_height="wrap_content" android:gravity="center" android:padding="16dp" android:text="從空間相冊選擇" android:textColor="#118" android:textSize="18sp" />
  </LinearLayout>

  <LinearLayout android:layout_width="match_parent" android:layout_height="wrap_content" android:layout_margin="8dp" android:background="@drawable/popup_shape">

    <TextView android:id="@+id/tv_cancel" android:layout_width="match_parent" android:layout_height="wrap_content" android:gravity="center" android:padding="16dp" android:text="取消" android:textColor="#118" android:textSize="18sp" android:text />
  </LinearLayout>
</LinearLayout>
其效果是:

PopupWindow的創建:這個創建與我們普通的控件創建方法是一樣的
//設置PopupWindow的View
View view = LayoutInflater.from(this).inflate(R.layout.view_popupwindow, null);
popupWindow = new PopupWindow(view, RelativeLayout.LayoutParams.MATCH_PARENT,
        RelativeLayout.LayoutParams.WRAP_CONTENT);
PopupWindow添加動畫效果:我們創建一個anim文件夾,創建我們的out和in動畫效果,然後在style添加我們的動畫
<?xml version="1.0" encoding="utf-8"?>
<!--進入動畫-->
<translate xmlns:android="http://schemas.android.com/apk/res/android" android:interpolator="@android:anim/accelerate_interpolator" android:fromYDelta="100%" android:toYDelta="0" android:duration="200"/>

<?xml version="1.0" encoding="utf-8"?>
<!--退出動畫-->
<translate xmlns:android="http://schemas.android.com/apk/res/android" android:interpolator="@android:anim/accelerate_interpolator" android:fromYDelta="0" android:toYDelta="100%" android:duration="200"/>

<!--彈窗動畫-->
<style name="PopupWindow"> <item name="android:windowEnterAnimation">@anim/window_in</item> <item name="android:windowExitAnimation">@anim/window_out</item> </style>
//設置動畫
popupWindow.setAnimationStyle(R.style.PopupWindow);
PopupWindow設置背景陰影:彈窗打開時設置透明度為0.5,彈窗消失時設置透明度為1
//設置屏幕背景透明效果
public void setBackgroundAlpha(float alpha) {
  WindowManager.LayoutParams lp = getWindow().getAttributes();
  lp.alpha = alpha;
  getWindow().setAttributes(lp);
}
PopupWindow監聽點擊事件:監聽我們PopupWindow裡面控件的點擊事件
//設置PopupWindow的View點擊事件
setOnPopupViewClick(view);

private void setOnPopupViewClick(View view) {
  TextView tv_pick_phone, tv_pick_zone, tv_cancel;
  tv_pick_phone = (TextView) view.findViewById(R.id.tv_pick_phone);
  tv_pick_zone = (TextView) view.findViewById(R.id.tv_pick_zone);
  tv_cancel = (TextView) view.findViewById(R.id.tv_cancel);
  tv_pick_phone.setOnClickListener(this);
  tv_pick_zone.setOnClickListener(this);
  tv_cancel.setOnClickListener(this);
}
獲取NavigationBar的高度:這裡需要適配有些手機沒有NavigationBar有些手機有,這裡以存在NavigationBar來演示
int resourceId = getResources().getIdentifier("navigation_bar_height", "dimen", "android");
navigationHeight = getResources().getDimensionPixelSize(resourceId);
對存在NavigationBar的手機上,設置其PopupWindow的出現位置
//設置位置
popupWindow.showAtLocation(v, Gravity.BOTTOM, 0, navigationHeight);
對沒有NavigationBar的手機上,設置其PopupWindow的出現位置
//設置位置
popupWindow.showAtLocation(v, Gravity.BOTTOM, 0, 0);
源碼
Github:https://github.com/AndroidHensen/IOSPopupWindow
public class MainActivity extends AppCompatActivity implements View.OnClickListener, PopupWindow.OnDismissListener {

  private Button bt_open;
  private PopupWindow popupWindow;
  private int navigationHeight;

  @Override
  protected void onCreate(Bundle savedInstanceState) {
    super.onCreate(savedInstanceState);
    setContentView(R.layout.activity_main);

    bt_open = (Button) findViewById(R.id.bt_open);
    bt_open.setOnClickListener(this);

    int resourceId = getResources().getIdentifier("navigation_bar_height", "dimen", "android");
    navigationHeight = getResources().getDimensionPixelSize(resourceId);
  }

  @Override
  public void onClick(View v) {
    switch (v.getId()) {
      case R.id.bt_open:
        openPopupWindow(v);
        break;
      case R.id.tv_pick_phone:
        Toast.makeText(this, "從手機相冊選擇", Toast.LENGTH_SHORT).show();
        popupWindow.dismiss();
        break;
      case R.id.tv_pick_zone:
        Toast.makeText(this, "從空間相冊選擇", Toast.LENGTH_SHORT).show();
        popupWindow.dismiss();
        break;
      case R.id.tv_cancel:
        popupWindow.dismiss();
        break;
    }
  }

  private void openPopupWindow(View v) {
    //防止重復按按鈕
    if (popupWindow != null && popupWindow.isShowing()) {
      return;
    }
    //設置PopupWindow的View
    View view = LayoutInflater.from(this).inflate(R.layout.view_popupwindow, null);
    popupWindow = new PopupWindow(view, RelativeLayout.LayoutParams.MATCH_PARENT,
        RelativeLayout.LayoutParams.WRAP_CONTENT);
    //設置背景,這個沒什麼效果,不添加會報錯
    popupWindow.setBackgroundDrawable(new BitmapDrawable());
    //設置點擊彈窗外隱藏自身
    popupWindow.setFocusable(true);
    popupWindow.setOutsideTouchable(true);
    //設置動畫
    popupWindow.setAnimationStyle(R.style.PopupWindow);
    //設置位置
    popupWindow.showAtLocation(v, Gravity.BOTTOM, 0, navigationHeight);
    //設置消失監聽
    popupWindow.setOnDismissListener(this);
    //設置PopupWindow的View點擊事件
    setOnPopupViewClick(view);
    //設置背景色
    setBackgroundAlpha(0.5f);
  }

  private void setOnPopupViewClick(View view) {
    TextView tv_pick_phone, tv_pick_zone, tv_cancel;
    tv_pick_phone = (TextView) view.findViewById(R.id.tv_pick_phone);
    tv_pick_zone = (TextView) view.findViewById(R.id.tv_pick_zone);
    tv_cancel = (TextView) view.findViewById(R.id.tv_cancel);
    tv_pick_phone.setOnClickListener(this);
    tv_pick_zone.setOnClickListener(this);
    tv_cancel.setOnClickListener(this);
  }

  //設置屏幕背景透明效果
  public void setBackgroundAlpha(float alpha) {
    WindowManager.LayoutParams lp = getWindow().getAttributes();
    lp.alpha = alpha;
    getWindow().setAttributes(lp);
  }

  @Override
  public void onDismiss() {
    setBackgroundAlpha(1);
  }
}
以上就是本文的全部內容,希望對大家的學習有所幫助,也希望大家多多支持本站。
 Android官方文檔之Location and Sensors APIs(中)
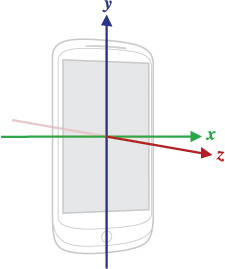
本文將介紹Android設備中的傳感器。傳感器概述(Sensors Overview)大部分Android設備內置了大量的傳感器,比較常見的有測量位移的、感應方向的、感應
 Android N上一些新特性的介紹
隨著6月份google的Android N preview 4版本的發布,筆者也借著東風在N6P上體驗了一把新系統,試玩之後認為有幾點新的感受特記錄之。1.分屏多任務進入
 Android_AsyncTask
一.AsyncTask的簡介在Android中實現異步任務機制有兩種方式,Handler和AsyncTask。Handler模式需要為每一個任務創建一個新的線程,任務完成
 Android仿微信UI布局視圖(圓角布局的實現)
圓角按鈕,或布局可以在xml文件中實現,但也可以使用圖片直接達到所需的效果,以前版本的微信就使用了這種方法。 實現效果圖: 不得不說,這種做法還是比較方便的。 源