編輯:關於Android編程
Google在2015的IO大會上,給我們帶來了更加詳細的Material Design設計規范,同時,也給我們帶來了全新的Android Design Support Library,在這個support庫裡面,Google給我們提供了更加規范的MD設計風格的控件。最重要的是,Android Design Support Library的兼容性更廣,直接可以向下兼容到Android 2.2。
這兩天需要做一個仿京東詳情的頁面,上面的Tab切換,以前都是自己寫Viewpager+fragment,或者Indicator的深度定制,一直想嘗試一下TabLayout,於是就有了下面的坑。

然後下面是我簡單的實現效果(個人覺得很坑,還不如自己自定義的導航器)

添加引用庫
dependencies {
 compile fileTree(dir: 'libs', include: ['*.jar'])
 compile 'com.android.support:appcompat-v7:24.2.0'
 compile 'com.android.support:design:24.2.0'
 compile 'com.android.support:recyclerview-v7:24.2.0'
 compile 'com.android.support:cardview-v7:24.2.0'
}
Toolbar與TabLayout
我們來看一下實現的布局:
<?xml version="1.0" encoding="utf-8"?>
<LinearLayout xmlns:android="http://schemas.android.com/apk/res/android"
 xmlns:app="http://schemas.android.com/apk/res-auto"
 android:layout_width="match_parent"
 android:layout_height="match_parent"
 android:orientation="vertical">


 <LinearLayout
  android:layout_width="match_parent"
  android:layout_height="wrap_content"
  android:background="@color/c12"
  android:gravity="center_vertical"
  android:minHeight="45dp"
  android:orientation="horizontal"
  android:paddingLeft="15dp"
  android:paddingRight="15dp">

  <ImageView
   android:id="@+id/back"
   android:layout_width="wrap_content"
   android:layout_height="wrap_content"
   android:background="@drawable/back_icon" />

  <LinearLayout
   android:layout_width="0dp"
   android:layout_height="match_parent"
   android:layout_weight="1"
   android:orientation="horizontal">

   <android.support.design.widget.TabLayout
    android:id="@+id/tabLayout"
    android:layout_width="match_parent"
    android:layout_height="match_parent"
    app:tabTextAppearance="@style/TabLayoutTextStyle"
    app:tabGravity="center"
    app:tabMode="fixed"
    app:tabTextColor="@color/c7"
    app:tabSelectedTextColor="@color/c8"/>

  </LinearLayout>

  <ImageView
   android:id="@+id/toolbar_more"
   android:layout_width="wrap_content"
   android:layout_height="wrap_content"
   android:layout_marginLeft="10dp"
   android:background="@drawable/more_icon" />
 </LinearLayout>

 <View  />

 <android.support.v4.view.ViewPager
  android:id="@+id/viewPager"
  android:layout_width="match_parent"
  android:layout_height="0dp"
  android:layout_weight="1" />


 <View  />

 <LinearLayout
  android:layout_width="match_parent"
  android:layout_height="48dp"
  android:background="@color/c12"
  android:orientation="horizontal">

  <LinearLayout
   android:layout_width="0dp"
   android:layout_height="match_parent"
   android:layout_weight="1">

   <TextView
    android:layout_width="0dp"
    android:layout_height="match_parent"
    android:layout_weight="1"
    android:gravity="center"
    android:text="收藏"
    android:textSize="10sp" />

   <View  />

   <TextView
    android:layout_width="0dp"
    android:layout_height="match_parent"
    android:layout_weight="1"
    android:gravity="center"
    android:text="購物車"
    android:textSize="10sp" />
  </LinearLayout>

  <LinearLayout
   android:layout_width="0dp"
   android:layout_height="match_parent"
   android:layout_weight="1.5"
   android:background="@color/c8"
   android:gravity="center">

   <TextView

    android:gravity="center"
    android:text="加入購物車" />
  </LinearLayout>
 </LinearLayout>
</LinearLayout>
這布局文件最關鍵的一點就是android.support.design.widget.TabLayout 標簽中的app:tabMode=”scrollable”,他設置tab的模式為“可滑動的”。
其他的用法和Indicator的用法差不多,都需要設置適配器,然後通過數據實現頁面的適配。直接上代碼
Adapter
public class ProductDetailPagerAdapter extends FragmentPagerAdapter {

 private List<Fragment> mFragments=null;
 private List<String> mTitles=null;

 public ProductDetailPagerAdapter(FragmentManager fm, List<Fragment> mFragments,List<String> mTitles) {
  super(fm);
  this.mFragments =mFragments;
  this.mTitles=mTitles;
 }

 public ProductDetailPagerAdapter(FragmentManager fm, Fragment... fragments) {
  super(fm);
  this.mFragments = Arrays.asList(fragments);
 }

 @Override
 public Fragment getItem(int position) {
  return mFragments.get(position);
 }

 @Override
 public int getCount() {
  return mFragments.size();
 }

 @Override
 public CharSequence getPageTitle(int position) {
  return mTitles.get(position);
 }
}
主頁面的相關邏輯,這裡的Fragment就是簡單的Fragment。
public class ProductDetailsActivity extends BaseActivity {

 @BindView(R.id.viewPager)
 ViewPager viewPager;
 @BindView(R.id.toolbar_more)
 ImageView toolbarMore;
 @BindView(R.id.tabLayout)
 TabLayout tabLayout;

 private List<Fragment> mFragments;
 private String[] titles = new String[]{"商品", "詳情"};
 private ProductDetailPagerAdapter productPagerAdapter = null;
 private MorePopupWindow popupWindow = null;

 @Override
 protected void onCreate(Bundle savedInstanceState) {
  super.onCreate(savedInstanceState);
  setContentView(R.layout.activity_product_details);
  ButterKnife.bind(this);
  init();
 }

 private void init() {
  initViewPager();
 }

 private void initViewPager() {
  mFragments = new ArrayList<>();
  mFragments.add(new ProductFragment());
  mFragments.add(new ProductDetailFragment());

  productPagerAdapter = new ProductDetailPagerAdapter(getSupportFragmentManager(), mFragments, Arrays.asList(titles));
  viewPager.setOffscreenPageLimit(2);
  viewPager.setAdapter(productPagerAdapter);
  viewPager.setCurrentItem(1);
  tabLayout.setupWithViewPager(viewPager);
 }


 @OnClick(R.id.back)
 public void backClick() {
  finish();
 }

 @OnClick(R.id.toolbar_more)
 public void moreClick() {

 }

 private AdapterView.OnItemClickListener onItemClickListener = new AdapterView.OnItemClickListener() {
  @Override
  public void onItemClick(AdapterView<?> parent, View view, int position,
        long id) {
   popupWindow.dismiss();
  }
 };


 public static void open(Context context) {
  Intent intent = new Intent(context, ProductDetailsActivity.class);
  context.startActivity(intent);
 }
}
上面的代碼都比較簡單不做過多的解釋,在使用TabLayout的時候需要注意一點:
tabmode有兩個屬性值:
MODE_FIXED:Fixed tabs display all tabs concurrently and are best used with content that benefits from quick pivots between tabs.
MODE_SCROLLABLE:Scrollable tabs display a subset of tabs at any given moment, and can contain longer tab labels and a larger number of tabs.
MODE_SCROLLABLE適合很多tabs的情況,是可以滾動的,如果你要實現京東的那種擠在一起的效果就需要MODE_FIXED了。
為了更好的滿足開發需要,TabLayout實現了自定義TabLayout的樣式,然後通過引入
app:tabTextAppearance=""
自定義icon添加到tab
當前的TabLayout沒有方法讓我們去添加icon,我們可以使用SpannableString結合ImageSpan來實現
private int[] imageResId = {
  R.drawable.ic_one,
  R.drawable.ic_two,
  R.drawable.ic_three
};

// ...

@Override
public CharSequence getPageTitle(int position) {
 // Generate title based on item position
 // return tabTitles[position];
 Drawable image = context.getResources().getDrawable(imageResId[position]);
 image.setBounds(0, 0, image.getIntrinsicWidth(), image.getIntrinsicHeight());
 SpannableString sb = new SpannableString(" ");
 ImageSpan imageSpan = new ImageSpan(image, ImageSpan.ALIGN_BOTTOM);
 sb.setSpan(imageSpan, 0, 1, Spannable.SPAN_EXCLUSIVE_EXCLUSIVE);
 return sb;
}
運行,發現沒有顯示,這是因為TabLayout創建的tab默認設置textAllCaps屬性為true,這阻止了ImageSpan被渲染出來,可以通過下面的樣式文件定義來改變:
<style name="MyCustomTabLayout" parent="Widget.Design.TabLayout">
  <item name="tabTextAppearance">@style/MyCustomTextAppearance</item>
</style>

<style name="MyCustomTextAppearance" parent="TextAppearance.Design.Tab">
  <item name="textAllCaps">false</item>
</style>
然後在getPageTitle方法中設置上有標題的tab
@Override
public CharSequence getPageTitle(int position) {
 // Generate title based on item position
 Drawable image = context.getResources().getDrawable(imageResId[position]);
 image.setBounds(0, 0, image.getIntrinsicWidth(), image.getIntrinsicHeight());
 // Replace blank spaces with image icon
 SpannableString sb = new SpannableString(" " + tabTitles[position]);
 ImageSpan imageSpan = new ImageSpan(image, ImageSpan.ALIGN_BOTTOM);
 sb.setSpan(imageSpan, 0, 1, Spannable.SPAN_EXCLUSIVE_EXCLUSIVE);
 return sb;
}
TabLayout還支持自定義View,通過getTabView來設置,這裡就不講怎麼實現了,有興趣的可以自行研究。

部分代碼:https://github.com/xiangzhihong/jingdongApp
以上就是本文的全部內容,希望對大家的學習有所幫助,也希望大家多多支持本站。
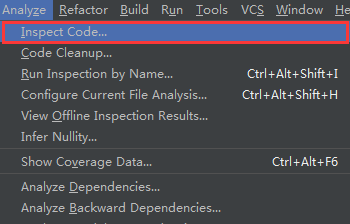 Android Studio使用Lint進行代碼檢查
Android Studio目前已經更新到1.4版本,它作為Google官方推薦的IDE,功能非常強大,其中提供了一套靜態代碼分析工具,它可以幫助我們檢查項目中存在的問題
 分享Android中ExpandableListView控件使用教程
本文采用一個Demo來展示Android中ExpandableListView控件的使用,如如何在組/子ListView中綁定數據源。直接上代碼如下:程序結構圖:layo
 Android調試出現The selected device is incompatible問題解決
Android調試出現The selected device is incompatible問題解決在做Android調試時碰到該問題。詳情如下圖所示:總結了一下碰到該問
 Android 熱修復使用Gradle Plugin1.5改造Nuwa插件
隨著谷歌的Gradle插件版本的不斷升級,Gradle插件現在最新的已經到了2.1.0-beta1,對應的依賴為com.android.tools.build:gradl