編輯:關於Android編程
activity_main.xml源碼
<?xml version="1.0" encoding="utf-8"?>
<LinearLayout xmlns:android="http://schemas.android.com/apk/res/android"
  xmlns:tools="http://schemas.android.com/tools"
  android:layout_width="match_parent"
  android:layout_height="match_parent"
  android:gravity="center"
  android:orientation="vertical"
  android:paddingBottom="@dimen/activity_vertical_margin"
  android:paddingLeft="@dimen/activity_horizontal_margin"
  android:paddingRight="@dimen/activity_horizontal_margin"
  android:paddingTop="@dimen/activity_vertical_margin"
  tools:context="com.liu.finger.MainActivity">

  <TextView
    android:id="@+id/textView"
    android:layout_width="wrap_content"
    android:layout_height="wrap_content"
    android:text="Hello World!"
    android:textSize="18sp" />

  <Button
    android:id="@+id/btn_activity_main_finger"
    android:layout_width="match_parent"
    android:layout_height="wrap_content"
    android:layout_alignParentStart="true"
    android:layout_below="@+id/textView"
    android:layout_marginTop="54dp"
    android:text="指紋識別" />
</LinearLayout>
MainActivity.java源碼
package com.liu.finger;

import android.Manifest;
import android.app.KeyguardManager;
import android.content.Context;
import android.content.Intent;
import android.content.pm.PackageManager;
import android.hardware.fingerprint.FingerprintManager;
import android.os.Bundle;
import android.os.CancellationSignal;
import android.support.v4.app.ActivityCompat;
import android.support.v4.app.FragmentActivity;
import android.util.Log;
import android.view.View;
import android.widget.Button;
import android.widget.Toast;


public class MainActivity extends FragmentActivity {
  FingerprintManager manager;
  KeyguardManager mKeyManager;
  private final static int REQUEST_CODE_CONFIRM_DEVICE_CREDENTIALS = 0;
  private final static String TAG = "finger_log";

  @Override
  protected void onCreate(Bundle savedInstanceState) {
    super.onCreate(savedInstanceState);
    setContentView(R.layout.activity_main);
    manager = (FingerprintManager) this.getSystemService(Context.FINGERPRINT_SERVICE);
    mKeyManager = (KeyguardManager) this.getSystemService(Context.KEYGUARD_SERVICE);
    Button btn_finger = (Button) findViewById(R.id.btn_activity_main_finger);
    btn_finger.setOnClickListener(new View.OnClickListener() {
      @Override
      public void onClick(View v) {
        if (isFinger()) {
          Toast.makeText(MainActivity.this, "請進行指紋識別", Toast.LENGTH_LONG).show();
          Log(TAG, "keyi");
          startListening(null);
        }
      }
    });

  }

  public boolean isFinger() {

    //android studio 上,沒有這個會報錯
    if (ActivityCompat.checkSelfPermission(this, Manifest.permission.USE_FINGERPRINT) != PackageManager.PERMISSION_GRANTED) {
      Toast.makeText(this, "沒有指紋識別權限", Toast.LENGTH_SHORT).show();
      return false;
    }
    Log(TAG, "有指紋權限");
    //判斷硬件是否支持指紋識別
    if (!manager.isHardwareDetected()) {
      Toast.makeText(this, "沒有指紋識別模塊", Toast.LENGTH_SHORT).show();
      return false;
    }
   Log(TAG, "有指紋模塊");
    //判斷 是否開啟鎖屏密碼

    if (!mKeyManager.isKeyguardSecure()) {
      Toast.makeText(this, "沒有開啟鎖屏密碼", Toast.LENGTH_SHORT).show();
      return false;
    }
    Log(TAG, "已開啟鎖屏密碼");
    //判斷是否有指紋錄入
    if (!manager.hasEnrolledFingerprints()) {
      Toast.makeText(this, "沒有錄入指紋", Toast.LENGTH_SHORT).show();
      return false;
    }
    Log(TAG, "已錄入指紋");

    return true;
  }

  CancellationSignal mCancellationSignal = new CancellationSignal();
  //回調方法
  FingerprintManager.AuthenticationCallback mSelfCancelled = new FingerprintManager.AuthenticationCallback() {
    @Override
    public void onAuthenticationError(int errorCode, CharSequence errString) {
      //但多次指紋密碼驗證錯誤後,進入此方法;並且,不能短時間內調用指紋驗證
      Toast.makeText(MainActivity.this, errString, Toast.LENGTH_SHORT).show();
      showAuthenticationScreen();
    }

    @Override
    public void onAuthenticationHelp(int helpCode, CharSequence helpString) {

      Toast.makeText(MainActivity.this, helpString, Toast.LENGTH_SHORT).show();
    }

    @Override
    public void onAuthenticationSucceeded(FingerprintManager.AuthenticationResult result) {

      Toast.makeText(MainActivity.this, "指紋識別成功", Toast.LENGTH_SHORT).show();
    }

    @Override
    public void onAuthenticationFailed() {
      Toast.makeText(MainActivity.this, "指紋識別失敗", Toast.LENGTH_SHORT).show();
    }
  };


  public void startListening(FingerprintManager.CryptoObject cryptoObject) {
    //android studio 上,沒有這個會報錯
    if (ActivityCompat.checkSelfPermission(this, Manifest.permission.USE_FINGERPRINT) != PackageManager.PERMISSION_GRANTED) {
      Toast.makeText(this, "沒有指紋識別權限", Toast.LENGTH_SHORT).show();
      return;
    }
    manager.authenticate(cryptoObject, mCancellationSignal, 0, mSelfCancelled, null);


  }

  /**
   * 鎖屏密碼
   */
  private void showAuthenticationScreen() {

    Intent intent = mKeyManager.createConfirmDeviceCredentialIntent("finger", "測試指紋識別");
    if (intent != null) {
      startActivityForResult(intent, REQUEST_CODE_CONFIRM_DEVICE_CREDENTIALS);
    }
  }

  @Override
  protected void onActivityResult(int requestCode, int resultCode, Intent data) {
    if (requestCode == REQUEST_CODE_CONFIRM_DEVICE_CREDENTIALS) {
      // Challenge completed, proceed with using cipher
      if (resultCode == RESULT_OK) {
        Toast.makeText(this, "識別成功", Toast.LENGTH_SHORT).show();
      } else {
        Toast.makeText(this, "識別失敗", Toast.LENGTH_SHORT).show();
      }
    }
  }

  private void Log(String tag, String msg) {
    Log.d(tag, msg);
  }
}
通過此文希望能幫助開發Android 指紋識別的朋友,謝謝大家對本站的支持!
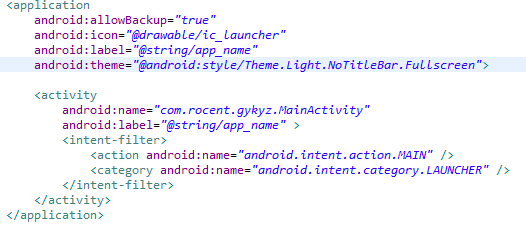 android 設置全屏的兩種方法
現在android的每一個項目都會需要設置為全屏,現在介紹兩種設置為全屏的方式。一、在配置文件中設置android:theme=”@android:style/Theme
 Android平台Camera實時濾鏡實現方法探討(八)--簡單美顏濾鏡
美顏包含磨皮、美白、瘦臉等效果,其中磨皮算法在很多博客中均有介紹例如:雙指數邊緣平滑濾波器用於磨皮算法的嘗試選擇性模糊及其算法的實現基於局部均方差相關信息的圖像去噪及其在
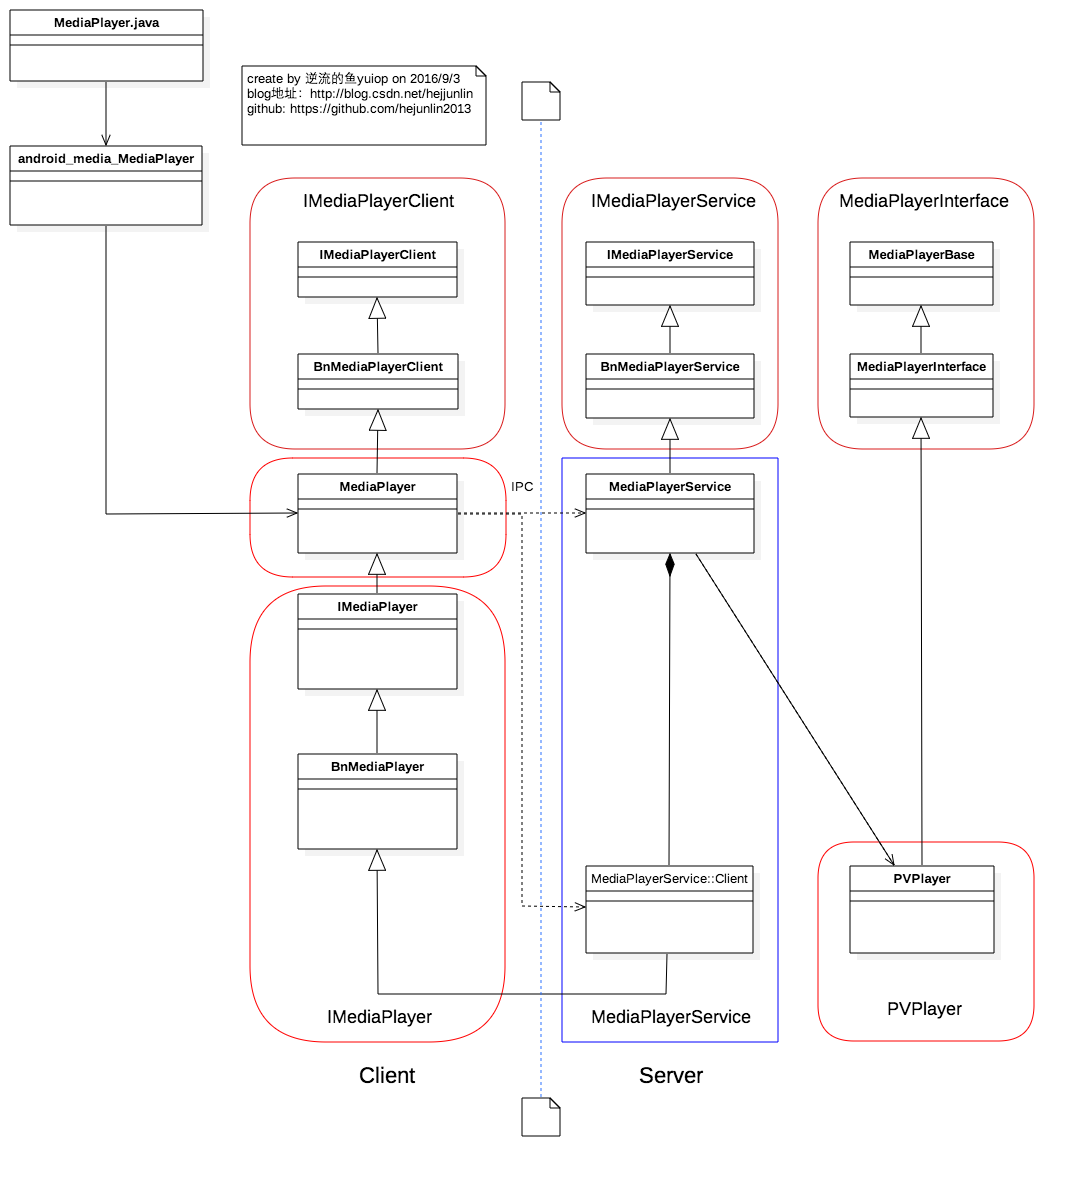 Android Multimedia框架總結(四)MediaPlayer中從Java層到C++層類關系及prepare及之後其他過程
前言:在上篇中,分析了MediaPlayer的從創建到setDataSource過程,盡管看了代碼,但是沒有從MediaPlayer生態上認識各類庫之間依賴調用關系,在本
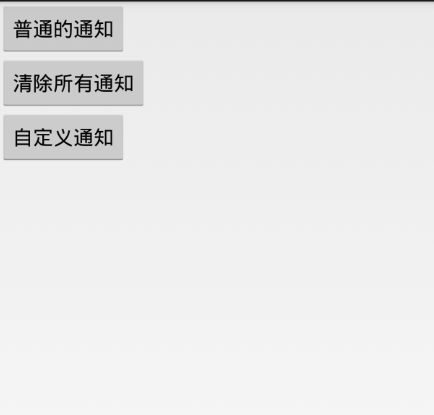 android 通知Notification詳解及實例代碼
android Notification實例詳解1.使用Builder模式來創建2.必須要設置一個smallIcon,還可以設置setTicker3.可以設置 setCo