編輯:關於Android編程
本文實例講述了Android中Service用法。分享給大家供大家參考,具體如下:
關於Service的講解網上已經很多了,這裡是關於自己通過寫代碼Service的一點體會 還有結合其他人對Service的一點總結
Service可以理解為一個隱形的Activity 但它又與Activity有些不同,首先Service是沒界面,用戶看不到 可交互的組件 級別是與Activity是差不多的
Service中定義了一系列和自身聲明周期相關的方法:
onBind(...)是必須實現的方法,返回一個綁定接口給Service
onCreate(); 當Service第一次被創建時 由系統調用
onStart(...)當通過startService()方法調用啟動Service時被調用
onDestroy();當Service不再使用,系統調用該方法....
本次代碼分別有MainActivity,Java,MyService.java main.xml這幾個重要文件 下面通過這幾個文件對Service進行理解 見注釋
老規矩 先開始布局 挺簡單的 就是幾個Button
<?xml version="1.0" encoding="utf-8"?>
<LinearLayout xmlns:android="http://schemas.android.com/apk/res/android"
 android:orientation="vertical"
 android:layout_width="fill_parent"
 android:layout_height="fill_parent"
 >
<TextView
 android:layout_width="fill_parent"
 android:layout_height="wrap_content"
 android:text="Service測試"
 android:gravity="center_horizontal"
 />
<Button
 android:id="@+id/startButton"
 android:layout_width="fill_parent"
 android:layout_height="wrap_content"
 android:text="Start Service"
/>
<Button
 android:id="@+id/stopButton"
 android:layout_width="fill_parent"
 android:layout_height="wrap_content"
 android:text="Stop Service"
/>
<Button
 android:id="@+id/bindButton"
 android:layout_width="fill_parent"
 android:layout_height="wrap_content"
 android:text="Bind Service"
/>
<Button
 android:id="@+id/unBindButton"
 android:layout_width="fill_parent"
 android:layout_height="wrap_content"
 android:text="Unbind Service"
/>
</LinearLayout>
布局效果圖:

開始服務文件, MyService繼承Service
public class MyService extends Service
{
 final static String TAG = "MyService";
 @Override
 public IBinder onBind(Intent intent)
 {
  Log.i(TAG,"OnBind()......");
  showInfo("Onbind()......");
  return null;
 }
 // Setvice創建時被調用
 @Override
 public void onCreate()
 {
  Log.i(TAG,"onCreate()......");
   showInfo("onCreate()......");
  super.onCreate();
 }
 //當客戶調用startService()啟動Service時被調用
 @Override
 public void onStart(Intent intent, int startId)
 {
  Log.i(TAG,"onStart()........");
  showInfo("onStart()........");
  super.onStart(intent, startId);
 }
 @Override
 public void onDestroy()
 {
  Log.i(TAG,"onDestroy()........");
  showInfo("onDestroy()........");
  super.onDestroy();
 }
 @Override
 public boolean onUnbind(Intent intent)
 {
  Log.i(TAG,"onUnbind()........");
  showInfo("onUnbind()........");
  return super.onUnbind(intent);
 }
 public void showInfo(String str)
 {
  Toast.makeText(this, str, Toast.LENGTH_SHORT).show();
 }
}
上面主要是Service中幾個周期函數 這個MyService代表一個服務,當然在這裡面我們在裡面加什麼實質性的東西,例如可以在
Onstart(...)函數裡創建一個音樂播放器MediaPlayer 當服務被啟動時播放音樂.....
你創建了Service 就跟你創建Activity一樣 必須在Manifest裡注冊 下面開始注冊
<!-- 增加的Service -->
<service android:name=".MyService">
<intent-filter >
 <action android:name="com.study.android.action.MY_SERVICE"/>
</intent-filter>
</service>
服務就這樣 注冊成功。光注冊成功還沒有完成任務哦...... 還有啟動服務,停止服務,綁定服務,解除綁定的服務
package com.study.android;
import android.app.Activity;
import android.app.Service;
import android.content.ComponentName;
import android.content.Intent;
import android.content.ServiceConnection;
import android.os.Bundle;
import android.os.IBinder;
import android.util.Log;
import android.view.View;
import android.view.View.OnClickListener;
import android.widget.Button;
import android.widget.Toast;
public class MainActivity extends Activity {
 final static String ACTION = "com.study.android.action.MY_SERVICE";
 private Button startButton,stopButton;
 private Button bindButton,unbindButton;
 @Override
 public void onCreate(Bundle savedInstanceState) {
  super.onCreate(savedInstanceState);
  setContentView(R.layout.main);
  startButton = (Button)findViewById(R.id.startButton);
  stopButton = (Button)findViewById(R.id.stopButton);
  bindButton = (Button)findViewById(R.id.bindButton);
  unbindButton = (Button)findViewById(R.id.unBindButton);
  // 開啟服務
  startButton.setOnClickListener(new OnClickListener()
 {
  @Override
  public void onClick(View v)
  {
   // 啟動服務
   startService(buildIntent());
  }
 });
  //startButton按下後 周期函數執行順序 onCreate()----->onStart()
  /******************************************/
  // 停止服務
  stopButton.setOnClickListener(new OnClickListener()
 {
  @Override
  public void onClick(View v)
  {
   stopService(buildIntent());
  }
 });
  //stopButton按下後 周期函數執行順序 onDestroy()
   /******************************************/
  // 綁定服務
  bindButton.setOnClickListener(new OnClickListener()
 {
  @Override
  public void onClick(View v)
  {
   bindService(buildIntent(),conn,Service.BIND_AUTO_CREATE);
   /*第三個參數:如何創建service 一般是制定綁定時自動創建*/
  }
 });
  // bindButton 被按下後(當前服務已經stop掉)周期函數執行順序 onCreate()------->onBind()
   /******************************************/
  // 接觸綁定Service
  unbindButton.setOnClickListener(new OnClickListener()
 {
  @Override
  public void onClick(View v)
  {
   unbindService(conn);
  }
 });
  //unbindButton按下後 周期函數執行順序onUnbind()------->onDestroy()
 }
 // 連接對象
 private ServiceConnection conn = new ServiceConnection()
 {
 @Override
 public void onServiceConnected(ComponentName name, IBinder service)
 {
   Log.i("SERVICE","連接服務成功!");
   showInfo("連接服務成功!");
 }
 @Override
 public void onServiceDisconnected(ComponentName name)
 {
  Log.i("SERVICE","服務連接斷開!");
  showInfo("服務連接斷開!");
 }
 };
 public Intent buildIntent()
 {
  Intent intent = new Intent();
  // 設置Intent屬性 注意:這裡action屬性要與Manifest裡服務對應
  intent.setAction(ACTION);
  return intent;
 }
 public void showInfo(String str)
 {
   Toast.makeText(this, str, Toast.LENGTH_SHORT).show();
 }
}
更多關於Android相關內容感興趣的讀者可查看本站專題:《Android Service組件使用技巧總結》、《Android編程之activity操作技巧總結》、《Android資源操作技巧匯總》、《Android文件操作技巧匯總》、《Android操作SQLite數據庫技巧總結》、《Android操作json格式數據技巧總結》、《Android數據庫操作技巧總結》、《Android開發入門與進階教程》、《Android視圖View技巧總結》及《Android控件用法總結》
希望本文所述對大家Android程序設計有所幫助。
 Android aidl Binder框架淺析
1、概述Binder能干什麼?Binder可以提供系統中任何程序都可以訪問的全局服務。這個功能當然是任何系統都應該提供的,下面我們簡單看一下Android的Binder的
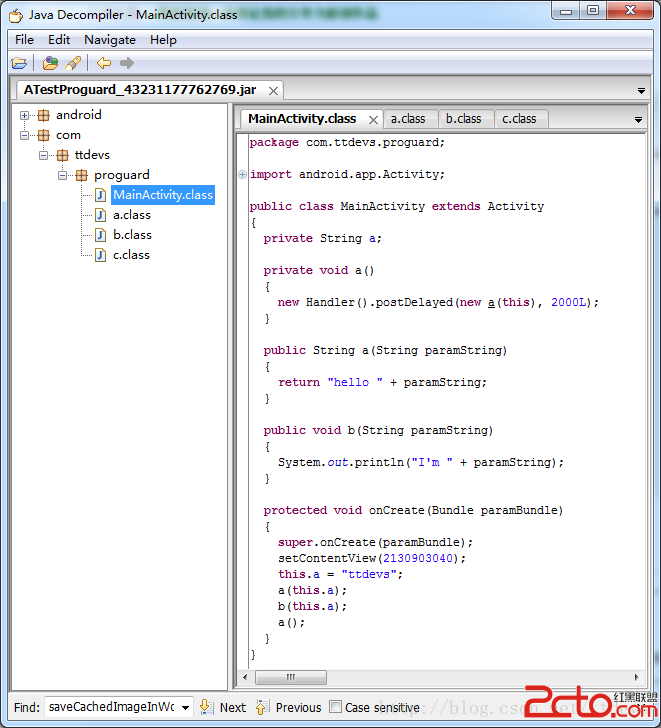 android對app進行代碼混淆
接到一個新的任務,對現有項目進行代碼混淆。之前對混淆有過一些了解,但是不夠詳細和完整,知道有些東西混淆起來還是比較棘手的。不過幸好目前的項目不是太復雜(針對混淆這塊來說)
 Android 自動化測試經驗分享 UiObejct.getFromParent()的使用方法
1. UiObejct.getFromParent()的用法:從這個名字就知道,就是從當前對象的父對象中查找想要的子對象,該子對象和當前對象應該是同一層級。如上圖所示:M
 Android之三種Menu的使用與分析
以下說明全部針對Android3.0(Api-11)。本指南將介紹三種基本菜單分別是PartA:操作欄(選項菜單OptionMenu)、PartB:上下文操作模式(Act