編輯:關於Android編程
其實這個安卓計算機,所有的後台思想與《C#計算器編寫代碼》是一模一樣的。Win窗體程序移植到安卓,從C#到Java其實很簡單的,因為兩者的基本語法都很相像,唯一的難點是安卓的xml布局部分,不像C#窗體能夠直接拖。
還是如下圖一個能夠完成基本四則運算的計算器:

先在res\values\strings.xml設置按鈕相應的字體,以免布局文件警告滿天飛:
 <?xml version="1.0" encoding="utf-8"?>
<resources>

  <string name="app_name">計算器</string>
  <string name="bt_1">1</string>
  <string name="bt_2">2</string>
  <string name="bt_3">3</string>
  <string name="bt_4">4</string>
  <string name="bt_5">5</string>
  <string name="bt_6">6</string>
  <string name="bt_7">7</string>
  <string name="bt_8">8</string>
  <string name="bt_9">9</string>
  <string name="bt_0">0</string>
  <string name="bt_point">.</string>
  <string name="bt_ce">CE</string>
  <string name="bt_plus">+</string>
  <string name="bt_minus">-</string>
  <string name="bt_multi">×</string>
  <string name="bt_div">÷</string>
  <string name="bt_result">=</string>

</resources>
之後,布局部分采用了《【Android】關於百分比布局多個LinearLayout嵌套時出現的問題與解決方案》(點擊打開鏈接)的思想,具體如下圖,一個TextView、一個EditText,皆直接用match_parent占據整行的寬度,之後利用LinearLayout與TableLayout作橫向比例的劃分。

因此,res\layout\activity_main.xml具體代碼如下,之後的操作要操作的組件加上Id,這裡加上《【Android】內存卡圖片讀取器,圖庫app》(點擊打開鏈接)的ScrollView是防止某些手機屏幕過少,加上垂直滾動條:
 <ScrollView xmlns:android="http://schemas.android.com/apk/res/android"
  android:layout_width="match_parent"
  android:layout_height="match_parent"
  android:orientation="vertical" >

  <LinearLayout
    android:layout_width="match_parent"
    android:layout_height="wrap_content"
    android:orientation="vertical" >

    <TextView
      android:id="@+id/textView1"
      android:layout_width="match_parent"
      android:layout_height="wrap_content" />

    <EditText
      android:id="@+id/editText1"
      android:layout_width="match_parent"
      android:layout_height="wrap_content"
      android:enabled="false"
      android:inputType="none"
      android:textSize="18sp" />

    <LinearLayout
      android:baselineAligned="false"
      android:layout_width="match_parent"
      android:layout_height="match_parent" >

      <TableLayout
        android:layout_width="0dp"
        android:layout_height="match_parent"
        android:layout_weight="2" >

        <LinearLayout
          android:layout_width="match_parent"
          android:layout_height="wrap_content" >

          <Button
            android:id="@+id/bt_7"
            android:layout_width="0dp"
            android:layout_height="wrap_content"
            android:layout_weight="1"
            android:text="@string/bt_7" />

          <Button
            android:id="@+id/bt_8"
            android:layout_width="0dp"
            android:layout_height="wrap_content"
            android:layout_weight="1"
            android:text="@string/bt_8" />

          <Button
            android:id="@+id/bt_9"
            android:layout_width="0dp"
            android:layout_height="wrap_content"
            android:layout_weight="1"
            android:text="@string/bt_9" />
        </LinearLayout>

        <LinearLayout
          android:layout_width="match_parent"
          android:layout_height="wrap_content" >

          <Button
            android:id="@+id/bt_4"
            android:layout_width="0dp"
            android:layout_height="wrap_content"
            android:layout_weight="1"
            android:text="@string/bt_4" />

          <Button
            android:id="@+id/bt_5"
            android:layout_width="0dp"
            android:layout_height="wrap_content"
            android:layout_weight="1"
            android:text="@string/bt_5" />

          <Button
            android:id="@+id/bt_6"
            android:layout_width="0dp"
            android:layout_height="wrap_content"
            android:layout_weight="1"
            android:text="@string/bt_6" />
        </LinearLayout>

        <LinearLayout
          android:layout_width="match_parent"
          android:layout_height="wrap_content" >

          <Button
            android:id="@+id/bt_1"
            android:layout_width="0dp"
            android:layout_height="wrap_content"
            android:layout_weight="1"
            android:text="@string/bt_1" />

          <Button
            android:id="@+id/bt_2"
            android:layout_width="0dp"
            android:layout_height="wrap_content"
            android:layout_weight="1"
            android:text="@string/bt_2" />

          <Button
            android:id="@+id/bt_3"
            android:layout_width="0dp"
            android:layout_height="wrap_content"
            android:layout_weight="1"
            android:text="@string/bt_3" />
        </LinearLayout>

        <LinearLayout
          android:layout_width="match_parent"
          android:layout_height="wrap_content" >

          <Button
            android:id="@+id/bt_0"
            android:layout_width="0dp"
            android:layout_height="wrap_content"
            android:layout_weight="1"
            android:text="@string/bt_0" />

          <Button
            android:id="@+id/bt_point"
            android:layout_width="0dp"
            android:layout_height="wrap_content"
            android:layout_weight="1"
            android:text="@string/bt_point" />
        </LinearLayout>
      </TableLayout>

      <TableLayout
        android:layout_width="0dp"
        android:layout_height="match_parent"
        android:layout_weight="1" >

        <Button
          android:id="@+id/bt_ce"
          android:layout_width="match_parent"
          android:layout_height="wrap_content"
          android:text="@string/bt_ce" />

        <LinearLayout
          android:layout_width="match_parent"
          android:layout_height="wrap_content" >

          <Button
            android:id="@+id/bt_plus"
            android:layout_width="0dp"
            android:layout_height="wrap_content"
            android:layout_weight="1"
            android:text="@string/bt_plus" />

          <Button
            android:id="@+id/bt_minus"
            android:layout_width="0dp"
            android:layout_height="wrap_content"
            android:layout_weight="1"
            android:text="@string/bt_minus" />
        </LinearLayout>

        <LinearLayout
          android:layout_width="match_parent"
          android:layout_height="wrap_content" >

          <Button
            android:id="@+id/bt_multi"
            android:layout_width="0dp"
            android:layout_height="wrap_content"
            android:layout_weight="1"
            android:text="@string/bt_multi" />

          <Button
            android:id="@+id/bt_div"
            android:layout_width="0dp"
            android:layout_height="wrap_content"
            android:layout_weight="1"
            android:text="@string/bt_div" />
        </LinearLayout>

        <Button
          android:id="@+id/bt_result"
          android:layout_width="match_parent"
          android:layout_height="wrap_content"
          android:text="@string/bt_result" />
      </TableLayout>
    </LinearLayout>
  </LinearLayout>

</ScrollView>
之後是MainActivity.java沒什麼好說的,基本與直接Win窗體的《C#計算器編寫代碼》,將C#改成java是一個很簡單的事情。唯一注意的是,這裡的按鈕比較多,因此不建議像《【Android】利用Java代碼布局,按鈕添加點擊事件》(點擊打開鏈接)一樣,使用內部匿名類實現按鈕的點擊事件,應該讓MainActivity實現OnClickListener接口,之後在繼承下來的onClick方法,根據傳遞過來的View v中的id,利用switch-case結構來搞,這樣清晰明了。
 package com.calculator;

import java.util.*;
import android.os.Bundle;
import android.view.View;
import android.view.View.OnClickListener;
import android.widget.EditText;
import android.widget.TextView;
import android.app.Activity;

public class MainActivity extends Activity implements OnClickListener {

 private List<Double> value_list = new ArrayList<Double>();// 存用戶輸入的數字
 private List<Integer> operator_list = new ArrayList<Integer>();// 存用戶輸入的運算符,定義+為0,-為1,×為2,÷為3
 // 狀態記錄
 private boolean add_flag = false;// +按下
 private boolean minus_flag = false;// -按下
 private boolean multi_flag = false;// ×按下
 private boolean div_flag = false;// ÷按下
 private boolean result_flag = false;// =按下
 private boolean can_operate_flag = false;// 按下=是否響應

 private TextView textView1;
 private EditText editText1;

 @Override
 protected void onCreate(Bundle savedInstanceState) {
 super.onCreate(savedInstanceState);
 setContentView(R.layout.activity_main);
 findViewById(R.id.bt_0).setOnClickListener(this);
 findViewById(R.id.bt_1).setOnClickListener(this);
 findViewById(R.id.bt_2).setOnClickListener(this);
 findViewById(R.id.bt_3).setOnClickListener(this);
 findViewById(R.id.bt_4).setOnClickListener(this);
 findViewById(R.id.bt_5).setOnClickListener(this);
 findViewById(R.id.bt_6).setOnClickListener(this);
 findViewById(R.id.bt_7).setOnClickListener(this);
 findViewById(R.id.bt_8).setOnClickListener(this);
 findViewById(R.id.bt_9).setOnClickListener(this);
 findViewById(R.id.bt_point).setOnClickListener(this);
 findViewById(R.id.bt_ce).setOnClickListener(this);
 findViewById(R.id.bt_plus).setOnClickListener(this);
 findViewById(R.id.bt_minus).setOnClickListener(this);
 findViewById(R.id.bt_multi).setOnClickListener(this);
 findViewById(R.id.bt_div).setOnClickListener(this);
 findViewById(R.id.bt_result).setOnClickListener(this);
 textView1 = (TextView) findViewById(R.id.textView1);
 editText1 = (EditText) findViewById(R.id.editText1);

 }

 @Override
 public void onClick(View v) {
 switch (v.getId()) {
 case R.id.bt_0:
  num_down("0");
  break;
 case R.id.bt_1:
  num_down("1");
  break;
 case R.id.bt_2:
  num_down("2");
  break;
 case R.id.bt_3:
  num_down("3");
  break;
 case R.id.bt_4:
  num_down("4");
  break;
 case R.id.bt_5:
  num_down("5");
  break;
 case R.id.bt_6:
  num_down("6");
  break;
 case R.id.bt_7:
  num_down("7");
  break;
 case R.id.bt_8:
  num_down("8");
  break;
 case R.id.bt_9:
  num_down("9");
  break;
 case R.id.bt_point:
  num_down(".");
  break;
 case R.id.bt_plus:
  if (!add_flag)// 防止用戶多次輸入一個符號鍵,符號鍵只允許輸入一次
  {
  result_flag = false;
  value_list.add(Double.parseDouble(editText1.getText()
   .toString()));// 將當前已輸入的數字放入value_list
  operator_list.add(0);
  textView1.setText(textView1.getText() + "+");
  add_flag = true;
  can_operate_flag = false;// 剛剛輸入完符號,不能構成一條正常的表達式,如111+,設置為不可運行狀態
  }
  break;
 case R.id.bt_minus:
  if (!minus_flag) {
  result_flag = false;
  value_list.add(Double.parseDouble(editText1.getText()
   .toString()));
  operator_list.add(1);
  textView1.setText(textView1.getText() + "-");
  minus_flag = true;
  can_operate_flag = false;
  }
  break;
 case R.id.bt_multi:
  if (!multi_flag) {
  result_flag = false;
  value_list.add(Double.parseDouble(editText1.getText()
   .toString()));
  operator_list.add(2);
  textView1.setText("(" + textView1.getText() + ")×");// 給前面的已經輸入的東西加個括號。(運算符棧問題是一個很復雜的數據結構問題,這裡不做,:P)
  multi_flag = true;
  can_operate_flag = false;
  }
  break;
 case R.id.bt_div:
  if (!div_flag) {
  result_flag = false;
  value_list.add(Double.parseDouble(editText1.getText()
   .toString()));
  operator_list.add(3);
  textView1.setText("(" + textView1.getText() + ")÷");
  div_flag = true;
  can_operate_flag = false;
  }
  break;
 case R.id.bt_result:
  if (value_list.size() > 0 && operator_list.size() > 0
   && can_operate_flag) {// 需要防止用戶沒輸入數字,或者只輸入了一個數,就按=。
  value_list.add(Double.parseDouble(editText1.getText()
   .toString()));
  double total = value_list.get(0);
  for (int i = 0; i < operator_list.size(); i++) {
   int _operator = operator_list.get(i);// operator是C#的運算符重載的關鍵字,前面加個_來區別
   switch (_operator) {
   case 0:
   total += value_list.get(i + 1);
   break;
   case 1:
   total -= value_list.get(i + 1);
   break;
   case 2:
   total *= value_list.get(i + 1);
   break;
   case 3:
   total /= value_list.get(i + 1);
   break;
   }
  }
  editText1.setText(total + "");
  textView1.setText(total + "");
  operator_list.clear();// 算完,就清空累積數字與運算數組
  value_list.clear();
  result_flag = true;// 表示=按下
  }
  break;
 case R.id.bt_ce:
  operator_list.clear();
  value_list.clear();
  add_flag = false;
  minus_flag = false;
  multi_flag = false;
  div_flag = false;
  result_flag = false;
  can_operate_flag = false;
  editText1.setText("");
  textView1.setText("");
  break;
 }
 }

 // 數字鍵按下,含0與.,類似000001223這類情況這裡允許,因為java可以講000001223自己轉化為1223
 private void num_down(String num) {
 if (add_flag || minus_flag || multi_flag || div_flag || result_flag) {
  if (result_flag)// 按下等號,剛剛算完一個運算的狀態
  {
  textView1.setText("");
  }
  editText1.setText("");// 如果用戶剛剛輸入完一個運算符
  add_flag = false;
  minus_flag = false;
  multi_flag = false;
  div_flag = false;
  result_flag = false;
 }
 if ((num.equals(".") && editText1.getText().toString().indexOf(".") < 0)
  || !num.equals(".")) {
  // 如果用戶輸入的是小數點.,則要判斷當前已輸入的數字中是否含有小數點.才允許輸入
  editText1.setText(editText1.getText() + num);
  textView1.setText(textView1.getText() + num);
  can_operate_flag = true;
 }
 }

}
以上就是本文的全部內容,希望對大家的學習有所幫助,也希望大家多多支持本站。
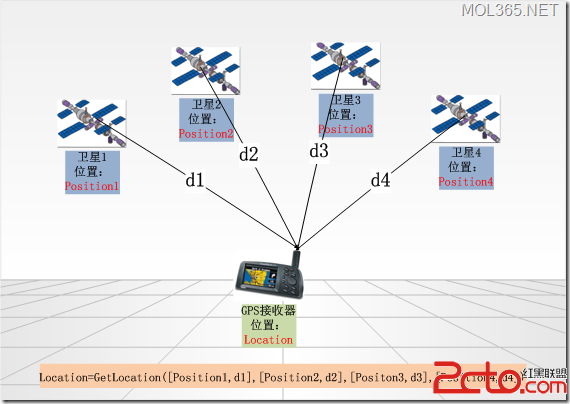 android GPS應用程序設計
GPS簡介 GPS是英文Global Positioning System(全球定位系統)的簡稱。GPS是20世紀70年代由美國陸海空三軍聯合研制的 新一代空間衛星導航定
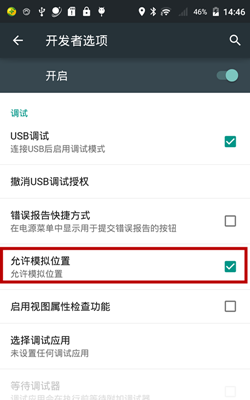 Android 使用模擬位置(支持Android 6.0)
開啟系統設置中的模擬位置Android 6.0 以下:【開發者選項 -> 允許模擬位置】Android 6.0 及以上:【開發者選項 -> 選擇模擬位置信息應
 Android通過JNI實現守護進程
開發一個需要常住後台的App其實是一件非常頭疼的事情,不僅要應對國內各大廠商的ROM,還需要應對各類的安全管家...雖然不斷的研究各式各樣的方法,但是效果並不好,比如任務
 Android開發之自定義控件用法詳解
本文實例講述了Android開發之自定義控件用法。分享給大家供大家參考,具體如下:今天和大家分享下組合控件的使用。很多時候android自定義控件並不能滿足需求,如何做呢